
Erin’s Ultimate Gluten-Free Artisan Bread Guide
Welcome, fellow bread lovers! If you’ve been on a quest for truly exceptional gluten-free artisan bread, your search ends here. I’m Erin, and I’m thrilled to share a recipe that consistently delivers a loaf so good, you’ll forget it’s gluten-free. This isn’t just a recipe; it’s a revelation for anyone missing the simple pleasure of a beautifully crusted, chewy loaf.
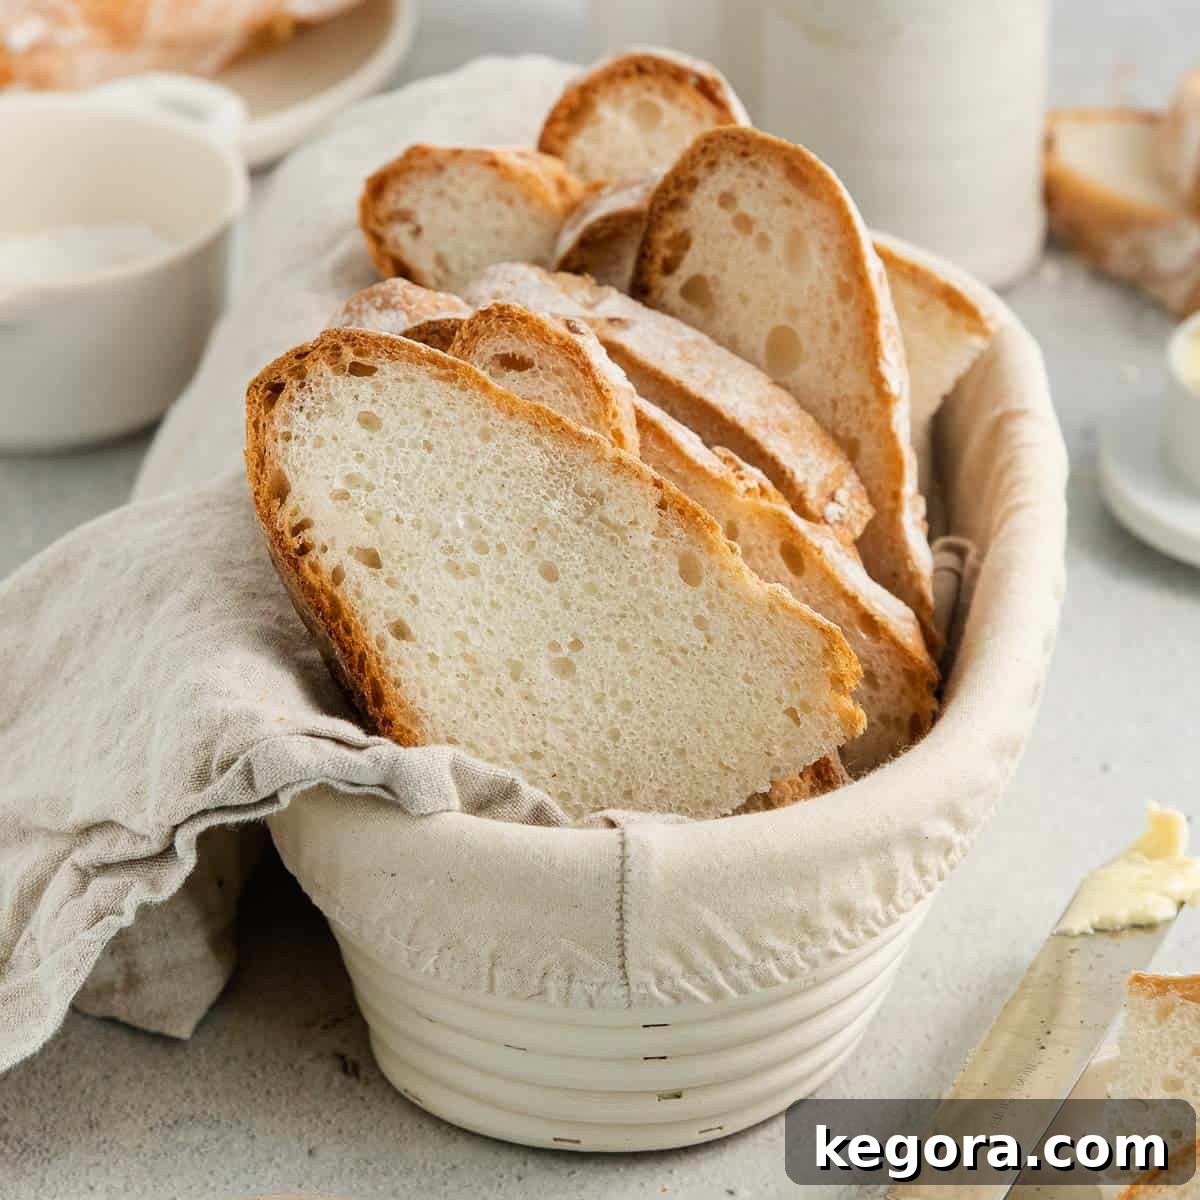
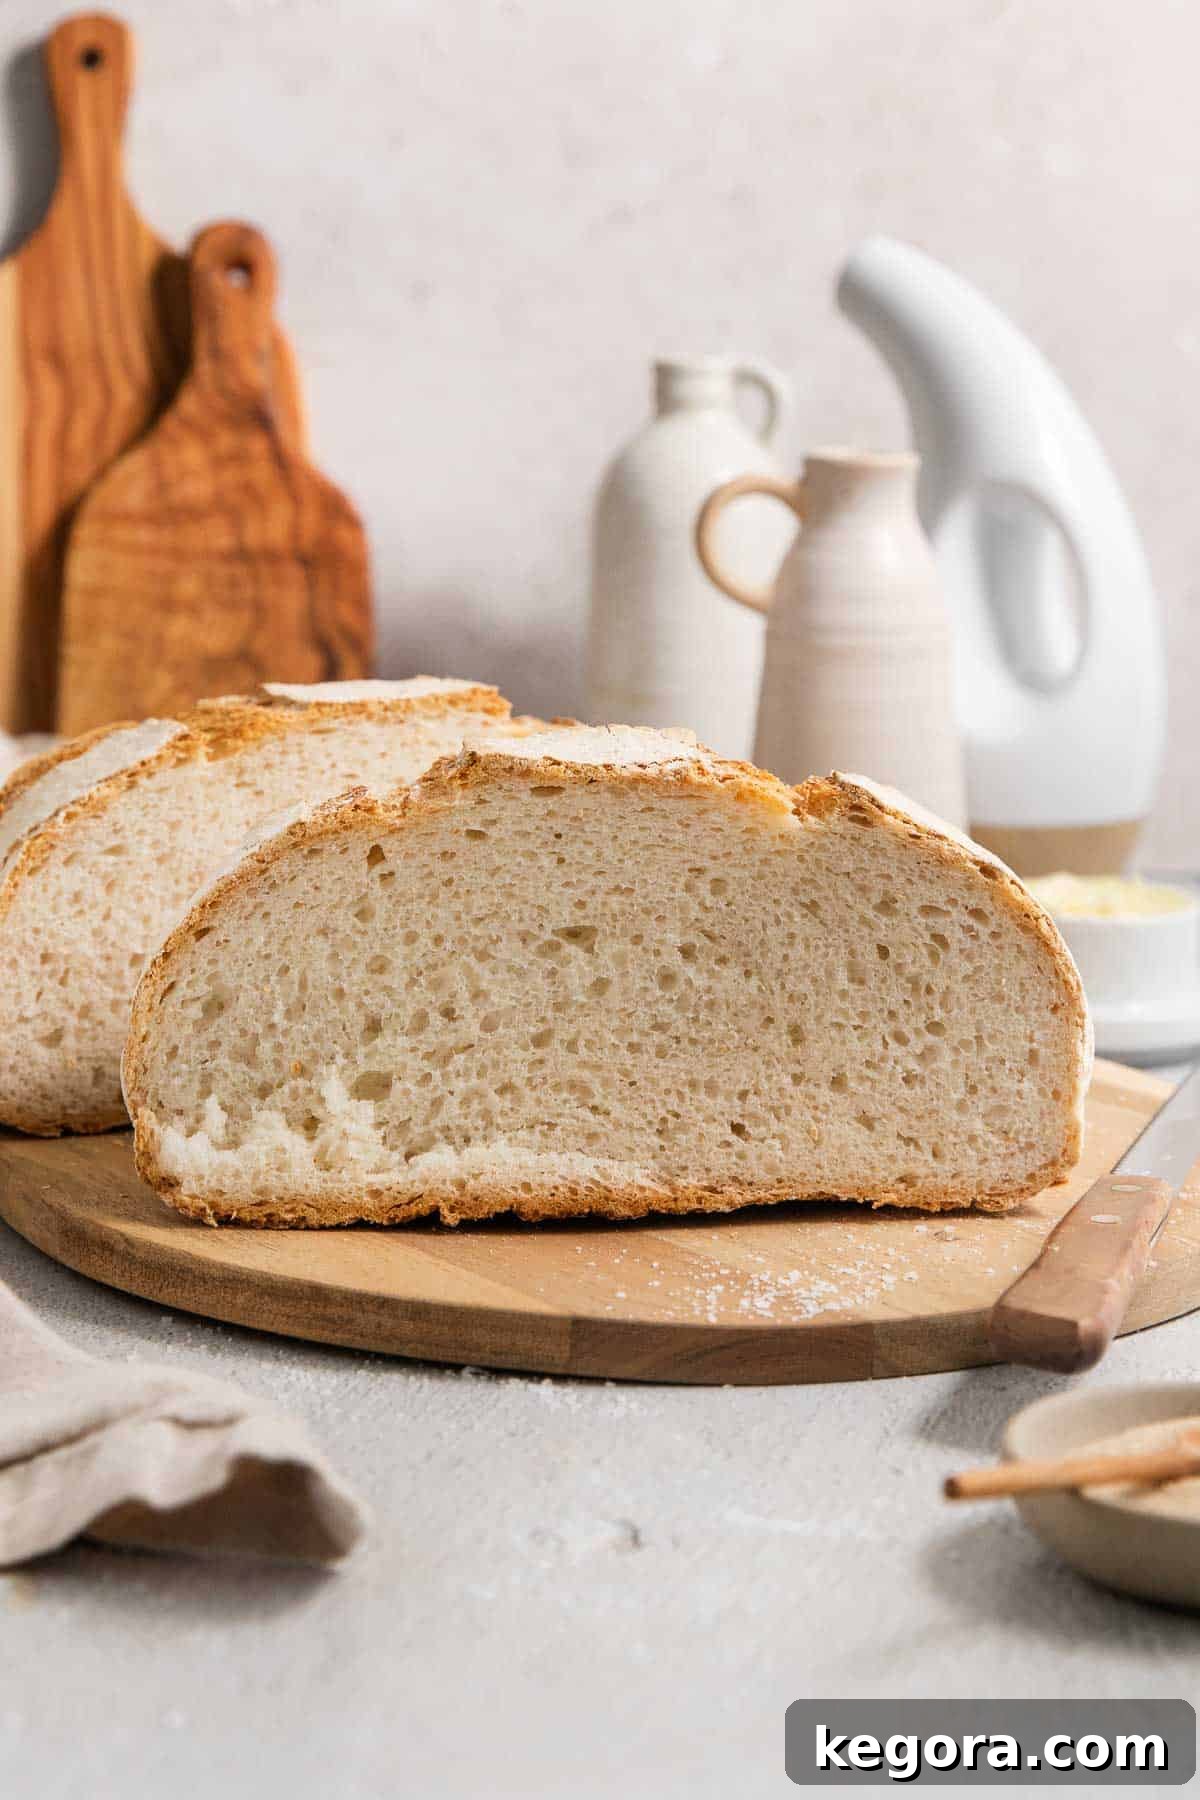
Texture Perfection: Imagine biting into a bread with a gloriously crisp, golden-brown crust that gives way to a miraculously soft, airy, and open crumb. This loaf offers a satisfying chewiness that rivals any traditional artisan bread. The contrast between the crackly exterior and the tender interior is truly what makes this recipe a standout.
Taste Profile: Every slice boasts a subtly savory and light flavor, beautifully complemented by delicate hints of rich olive oil. It’s a clean taste that makes it versatile enough for any meal, allowing it to shine whether it’s dipped in olive oil, slathered with butter, or accompanying a hearty soup.
Effortless Elegance: Don’t let the impressive results fool you—this is an incredibly easy gluten-free bread recipe, requiring only 5 core ingredients. The process is straightforward, but the key to its success lies in planning for the essential rise and chill times. These periods are crucial for developing the perfect structure and flavor, transforming simple ingredients into a gourmet experience.
Baking Brilliance Tip: The secret to achieving that coveted, perfectly crispy crust is baking this bread in a Dutch oven. This method creates a steamy environment that mimics a professional bakery oven, ensuring an irresistible golden finish and a soft interior.
The Magic Flour: This recipe has been meticulously developed and tested using Caputo Fioreglut Gluten-Free Flour. I cannot emphasize enough how critical this specific flour is to the success of this recipe. Unfortunately, due to its unique composition, no other gluten-free flour can be substituted with the same exceptional results. It truly is the star ingredient that makes this artisan loaf possible.
A Definite Keeper? Absolutely, yes! There are moments when only a piece of warm, crusty bread can truly make the world feel right again. This gluten-free artisan bread consistently hits that spot, delivering comfort and satisfaction with every bite. It’s more than just bread; it’s a staple you’ll be proud to bake repeatedly.
xoxo erin
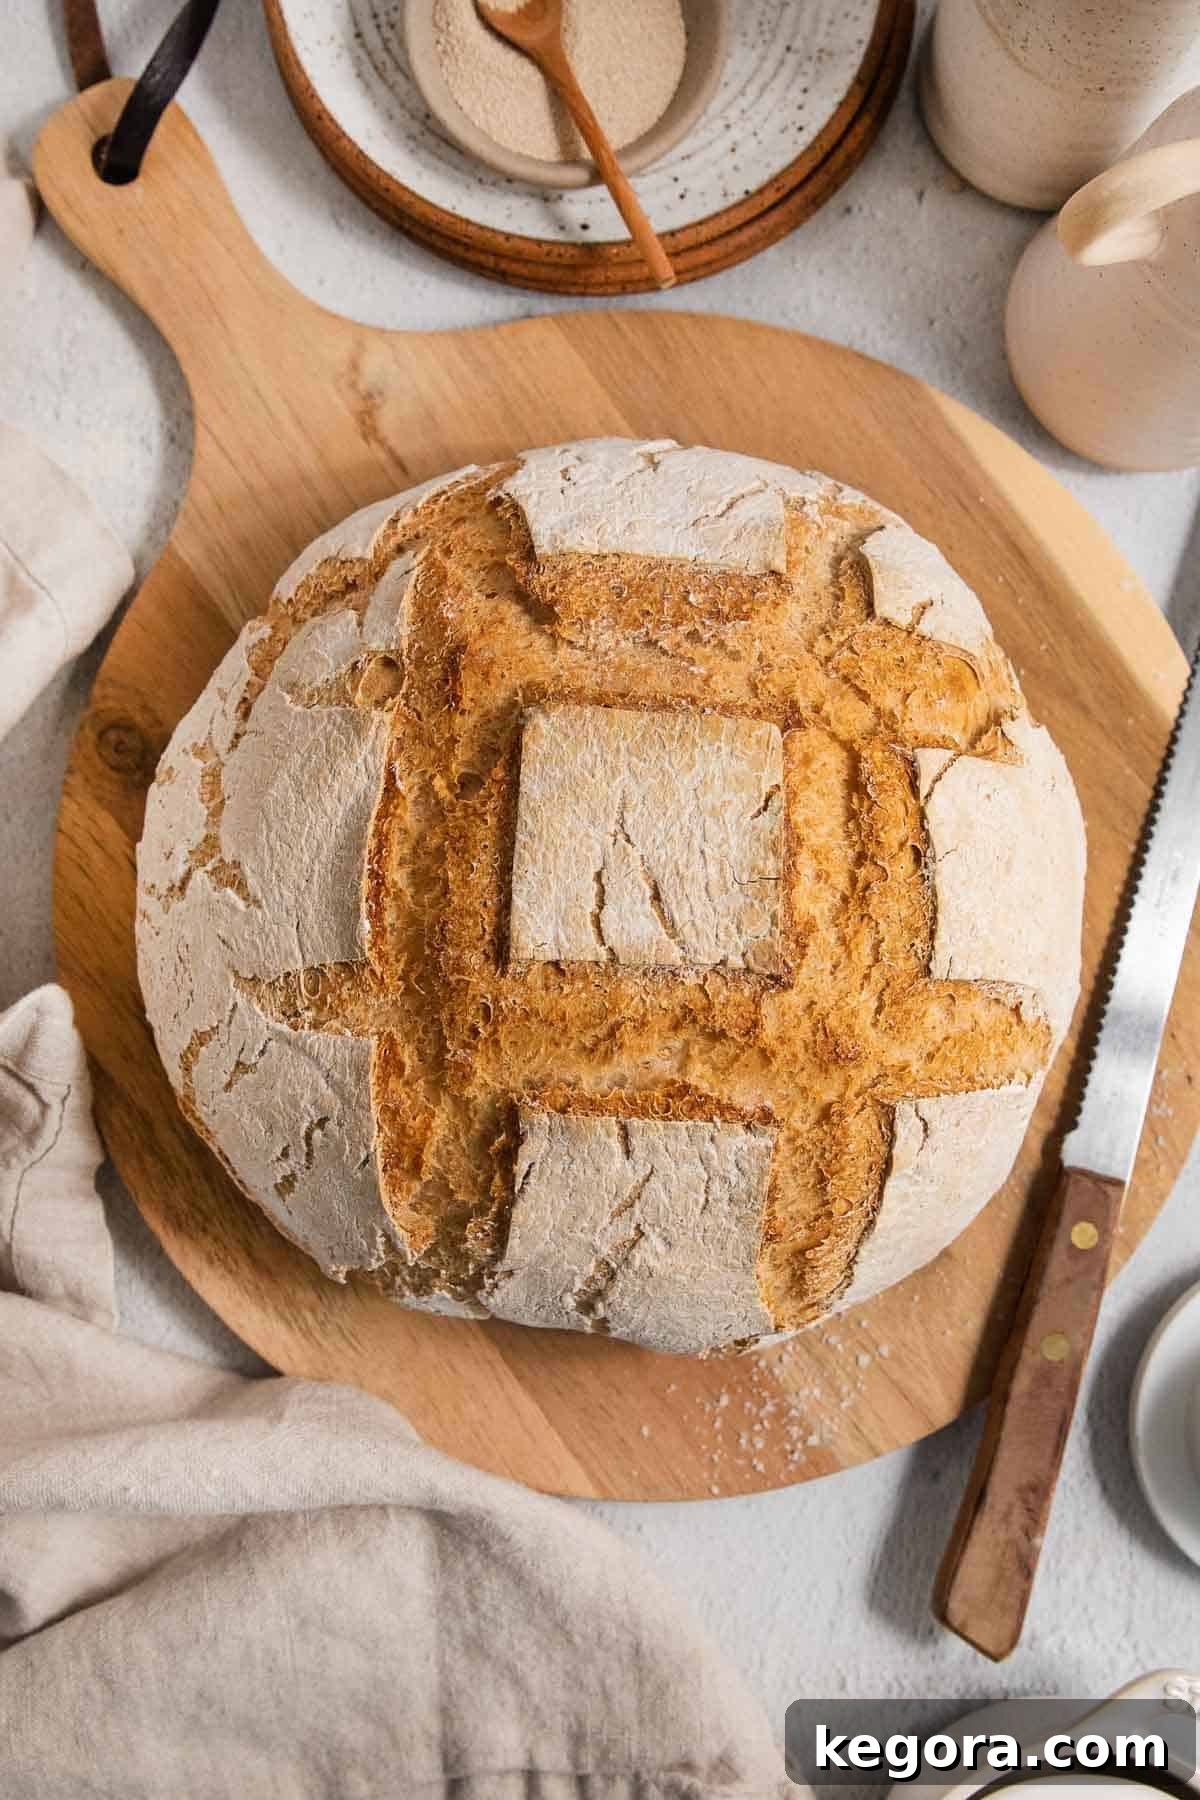
Embark on a culinary journey to bake the finest gluten-free artisan bread right in your own kitchen! This extraordinary recipe leverages the unique qualities of the specially formulated Caputo Fioreglut gluten-free flour and the power of a Dutch oven to achieve a loaf that boasts a gorgeously crusted exterior and an interior with an ideal soft and chewy texture, reminiscent of your favorite bakery-quality bread.
Designed for simplicity and spectacular results, this easy gluten-free bread recipe is perfect for any meal or special occasion. Its authentic taste and texture are so compelling that no one will ever suspect it’s gluten-free, making it an excellent choice for sharing with both gluten-sensitive and gluten-loving friends and family. Say goodbye to dense, crumbly gluten-free breads and hello to a truly enjoyable, artisan experience!
Featured Comment
From Kelly: “Are you kidding!!! Where has this been my whole miserable gf life. I will now be making every recipe on your website. This bread was delicious!”
97 more comments
Table of Contents
- Erin’s Ultimate Gluten-Free Artisan Bread Guide
- Essential Ingredients You’ll Need
- Step-by-Step Guide: How to Make Gluten-Free Artisan Bread
- Make-Ahead, Storage, and Freezing Tips
- Is This Gluten-Free Artisan Bread Dairy-Free or Nut-Free?
- Can I Substitute Caputo Fioreglut with Another Gluten-Free Flour?
- Dutch Oven Necessity: Baking Without It
- Perfect Pairings: What to Serve with Your Gluten-Free Artisan Bread
- Recommended Equipment for Gluten-Free Bread Baking
- More Irresistible Gluten-Free Bread Recipes
- Gluten-Free Artisan Bread (5 Ingredients!) Recipe Card
Essential Ingredients You’ll Need
Crafting this incredible gluten-free artisan bread requires a handful of carefully selected ingredients. Each plays a vital role in developing the unique texture and flavor that makes this loaf so special. Below are a few detailed notes on the key components. For precise measurements, please refer to the comprehensive recipe card located at the end of this guide.
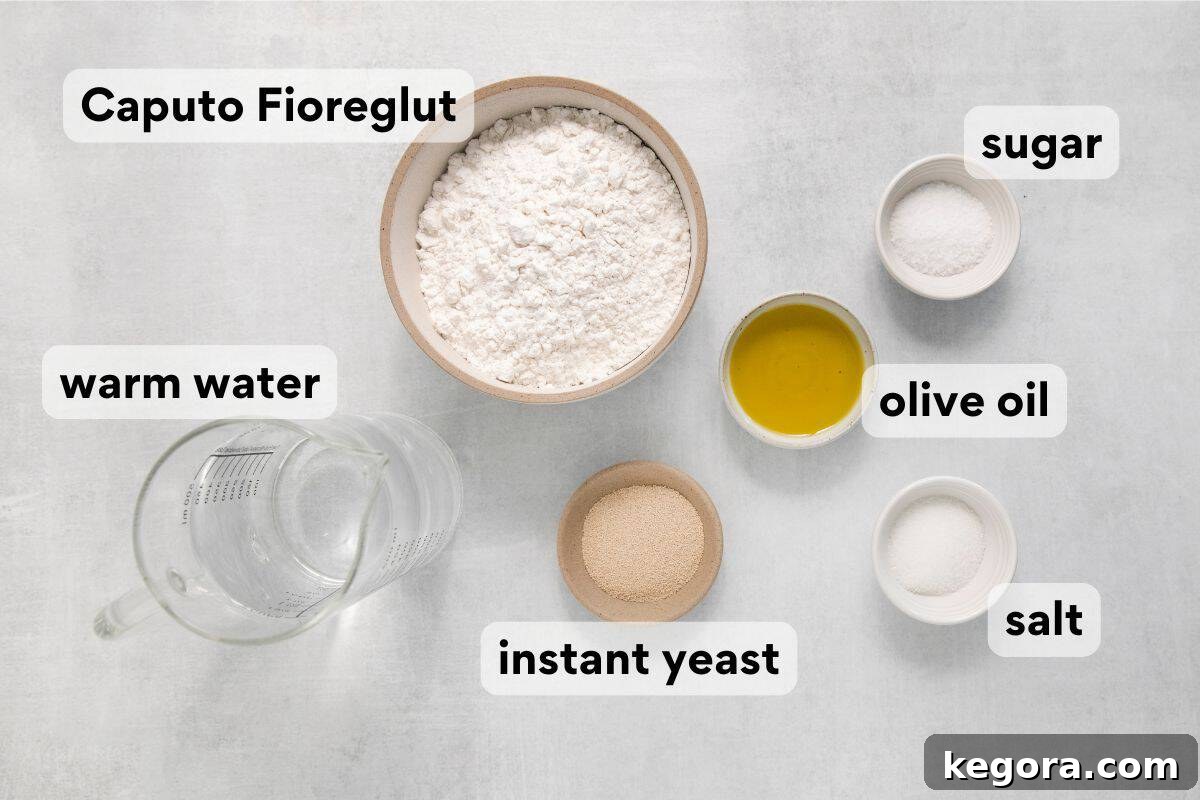
- Gluten-Free Flour (Caputo Fioreglut): This is truly the foundation of our crusty gluten-free bread. My recipe was meticulously developed to maximize the potential of Caputo Fioreglut gluten-free flour, known for creating an unparalleled crumb structure that closely mimics traditional wheat bread. It’s crucial to understand that while it is certified gluten-free, this flour contains gluten-free wheat starch. Therefore, it is suitable for those avoiding gluten, but not for individuals with wheat allergies. This specific composition is what allows for such an incredible, flexible dough and a perfectly airy interior.
- Instant Yeast: The choice of yeast is important for a reliable rise. Instant yeast is my preference because it’s highly active and doesn’t require prior proofing, simplifying the baking process significantly. When combined with a touch of sugar and warm water, it effectively leavens the dough, ensuring our bread achieves that desirable light and fluffy interior. Always check the expiration date to guarantee your yeast is fresh and potent for optimal results.
- Olive Oil: Far more than just a fat, rich olive oil contributes profoundly to both the texture and the savory taste of this easy gluten-free bread. It imparts a beautiful softness and moisture to the center of the loaf, preventing it from becoming dry. Simultaneously, it plays a key role in developing that signature crackly, crisp crust that makes artisan bread so utterly irresistible. Opt for a good quality extra virgin olive oil for the best flavor infusion.
- Kosher Salt: Salt isn’t just for flavor; it’s also vital for controlling yeast activity and strengthening the gluten-free structure (in the case of Fioreglut). Use kosher salt for its pure taste and easy dissolution.
- Granulated Sugar: A small amount of sugar acts as food for the yeast, kickstarting its activity and helping the bread rise effectively. It also aids in achieving that beautiful golden-brown crust.
- Warm Water: The temperature of the water is critical. It should be warm, not hot, to activate the instant yeast without killing it. This helps ensure a lively dough and a good rise.
Step-by-Step Guide: How to Make Gluten-Free Artisan Bread
Baking this homemade gluten-free bread is a rewarding experience, and with these detailed steps, you’ll achieve perfect results every time. This overview provides insights into each stage; for the full, precise instructions and measurements, please refer to the complete recipe card below.
Phase 1: Preparing the Dough
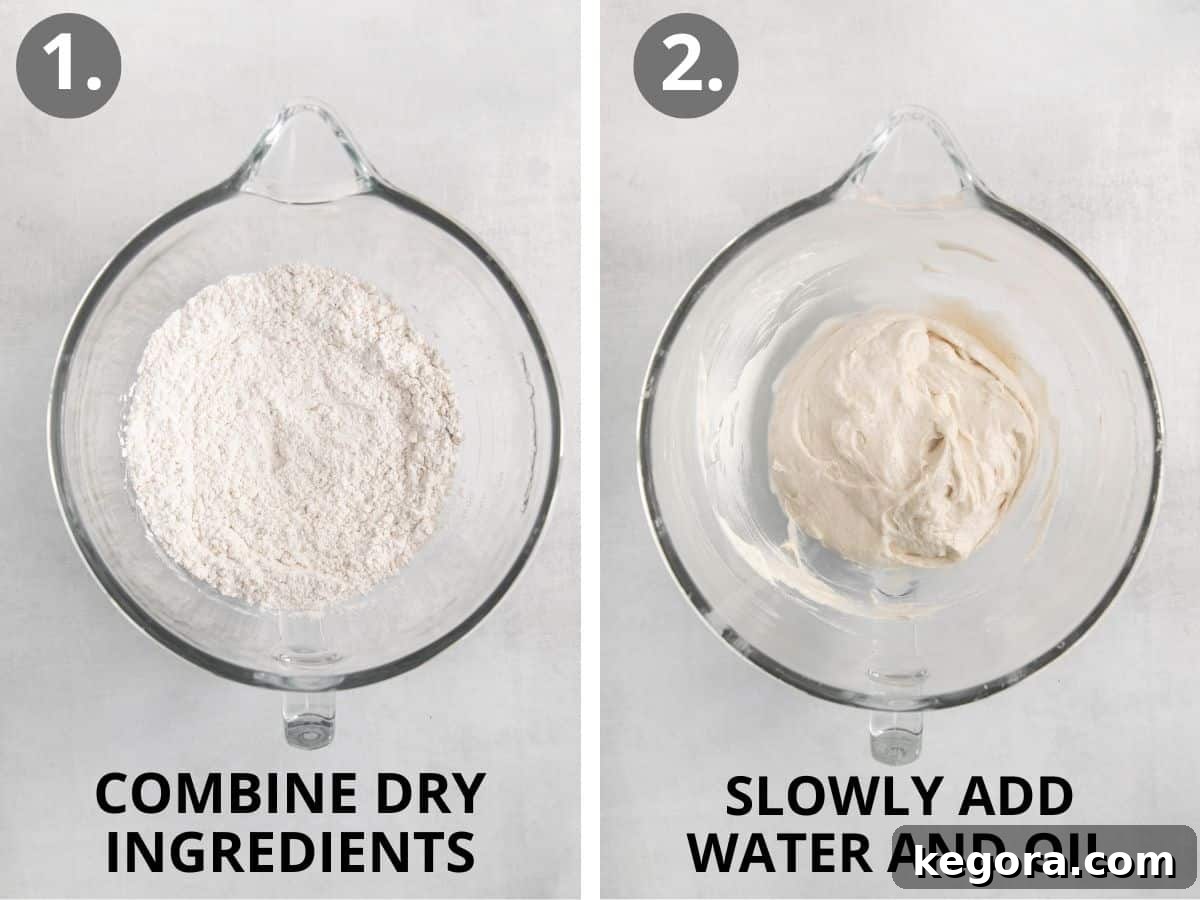
- Combine Dry Ingredients: Begin by adding all the dry ingredients – the Caputo Fioreglut gluten-free flour, kosher salt, granulated sugar, and instant yeast – into the bowl of your stand mixer. Use a paddle attachment and mix them briefly until they are just combined. This ensures an even distribution of the leavening agents and flavor throughout the dough.
- Incorporate Wet Ingredients: With the mixer set to a low speed, slowly and steadily pour in the warm water and olive oil. Once these liquids are incorporated, increase the mixer speed to medium-high and allow the dough to mix thoroughly for about 5 minutes. This extended mixing time is crucial for developing the structure in gluten-free dough, especially with Fioreglut, creating elasticity. Don’t be alarmed by the consistency; the dough will resemble a thick cookie dough, which is perfectly normal for this type of gluten-free bread.
- Ensure Homogeneity: After mixing, pause to scrape down the bottom and sides of the bowl with an oiled spatula. This ensures all ingredients are fully incorporated and no dry spots remain. Mix again briefly until the dough is uniformly combined and smooth.
Phase 2: Shaping and Rising
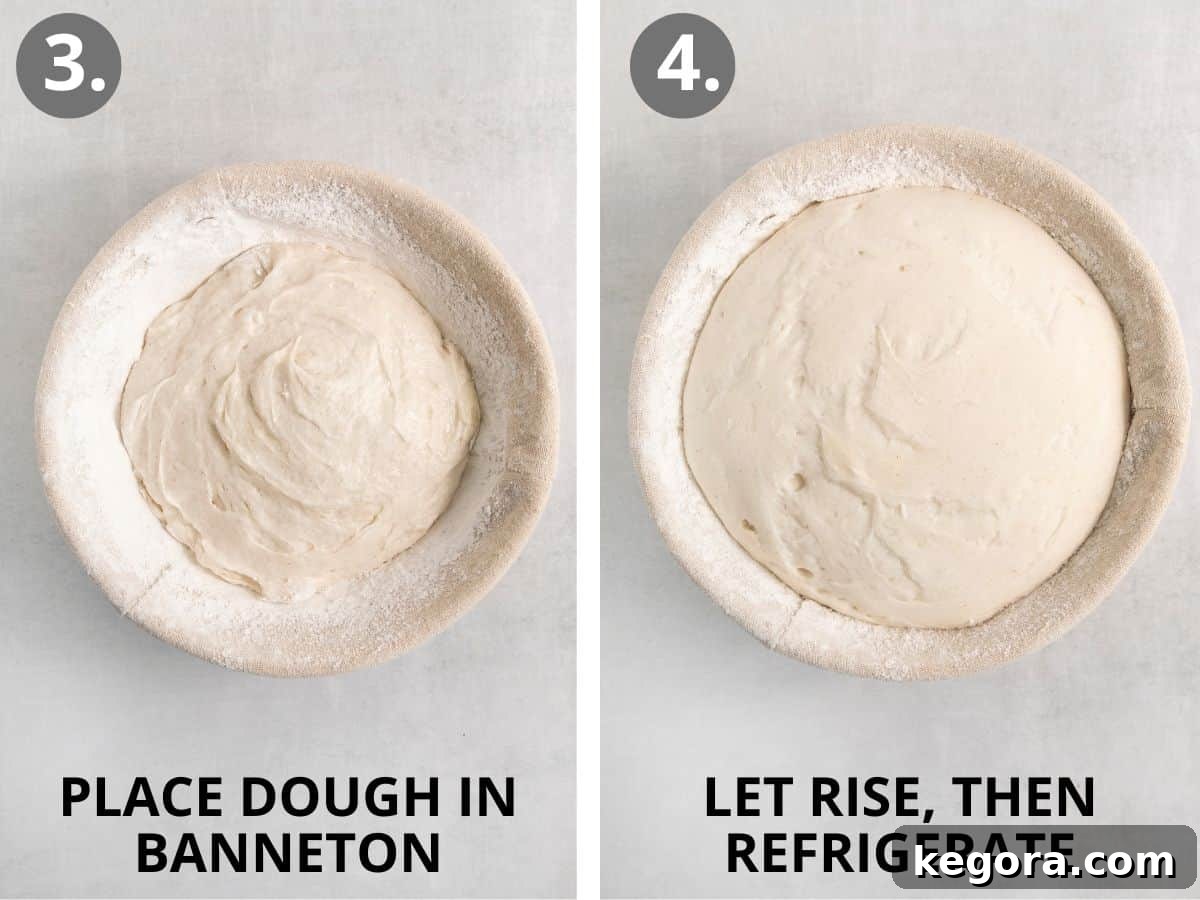
- Prepare Your Proofing Vessel: Generously flour a 7-inch banneton with gluten-free flour. A banneton helps the loaf hold its shape and imparts a lovely artisanal pattern. If you don’t have a banneton, an alternative is to lightly oil a small mixing bowl and flour it—it will still provide the necessary support during the rise.
- Shape the Loaf: Lightly flour a clean, flat work surface. Gently scoop the dough out onto this surface. Press the dough into a roughly 2-inch thick circle. Then, carefully pull the edges of the circle upwards and towards the center, forming a tight, round loaf. Flip the loaf over so the seam side is down and gently rotate it in place for a few seconds to seal the seams and create surface tension. This technique helps build structure and prevents the loaf from spreading too much during baking.
- First Rise and Refrigeration: Carefully place the shaped loaf into your prepared banneton (or oiled bowl), ensuring the seam side is facing upward. Cover the bowl loosely with oiled plastic wrap, creating a humid environment for the dough. Let the loaf rise in a warm, draft-free place for approximately 45-60 minutes, or until visibly expanded. Once risen, transfer the covered dough to the refrigerator for 30 minutes. This chilling step is vital; it helps the dough firm up, making it easier to handle and ensuring the loaf holds its beautiful artisan shape during baking.
Phase 3: Baking for the Perfect Crust
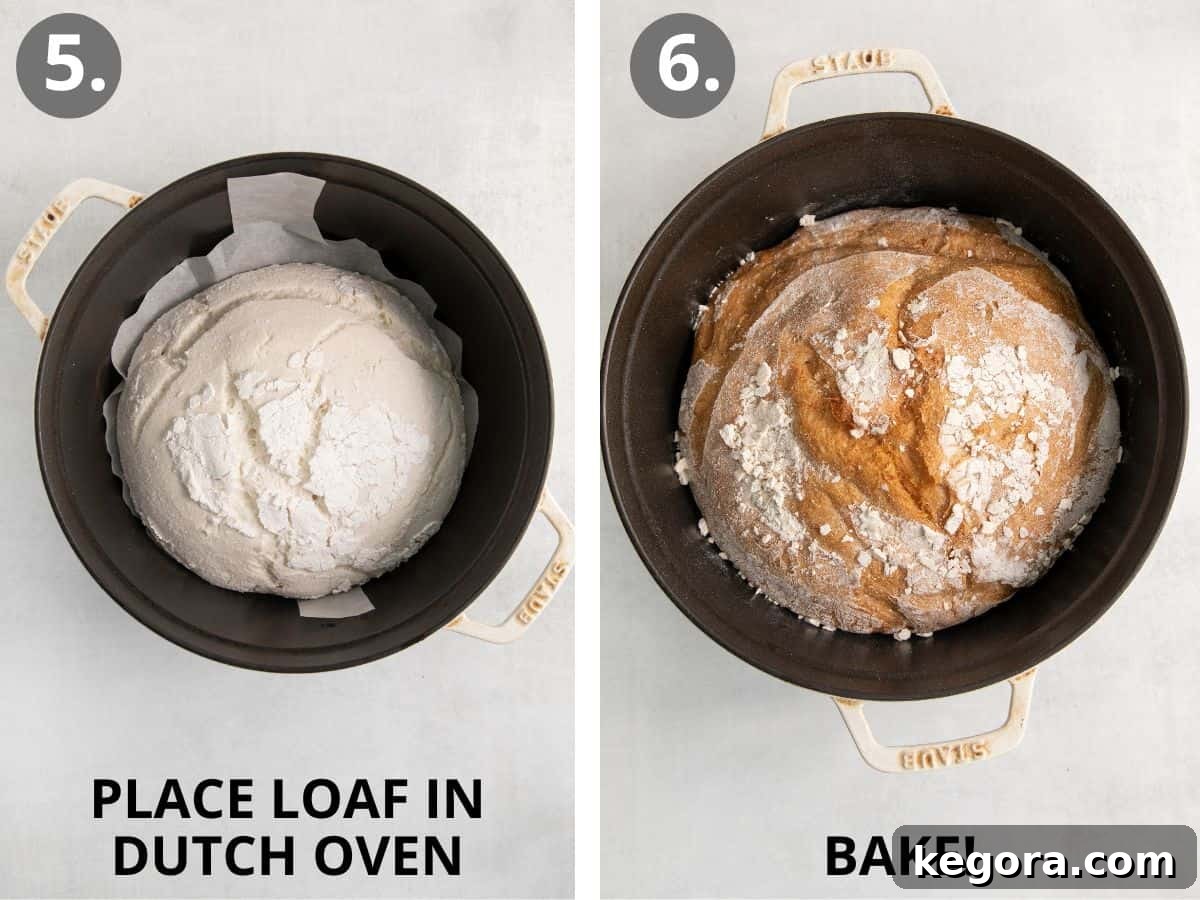
- Preheat Oven and Dutch Oven: This step is paramount for achieving that signature crusty gluten-free bread. Place your Dutch oven (I highly recommend a 5-quart Lodge Dutch Oven for its consistent heat retention) with its lid securely on, into the middle or lower rack of your oven. Preheat the oven to a high temperature of 475°F (245°C) and allow the Dutch oven to preheat for at least 30 minutes. A super-hot Dutch oven is key to achieving a professional-quality crust.
- Prepare and Score the Loaf: While the oven and Dutch oven are preheating, gently turn the chilled loaf out onto a piece of parchment paper. This paper will help you safely transfer the dough. Using a bread lame (a specialized scoring tool) or a very sharp knife, make a single deep score across the top of the loaf. Scoring allows the bread to expand predictably in the oven, creating a beautiful ‘ear’ and preventing uncontrolled tearing.
- Transfer and Create Steam: With extreme caution, remove the preheated Dutch oven from the oven. Using the parchment paper as a sling, carefully lower the scored loaf into the searing hot Dutch oven. Immediately add 5-6 ice cubes around the edges of the loaf – these will melt rapidly, creating a burst of steam that is crucial for developing a thin, crisp crust. Quickly replace the lid to trap all that valuable steam inside.
- Initial Covered Bake: Bake the bread, still covered, for 30 minutes. The trapped steam during this phase helps the crust stay soft and flexible, allowing the loaf to expand fully before the crust sets. After 30 minutes, reduce the oven temperature to 450°F (230°C) and continue baking for another 30 minutes with the lid still on. This helps the interior cook thoroughly.
- Uncovered Bake for Golden Crust: Finally, remove the lid from the Dutch oven. Continue to bake the bread uncovered for an additional 15-20 minutes, or until the crust reaches a deep, golden-brown hue and sounds hollow when tapped gently. For ultimate precision, an instant-read thermometer inserted into the center of the loaf should register above 205°F (96°C) for perfect doneness.
- Crucial Cooling Step: Once baked, carefully remove the loaf from the oven and turn it out onto a wire rack. It is absolutely essential to let the bread cool completely for at least 3 hours before attempting to slice it. This prolonged cooling period allows the internal structure to set properly and, most importantly, ensures the crust develops its ultimate crispness. Slicing too early can result in a gummy interior and a less defined crust. Once fully cooled, slice and savor your perfectly baked gluten-free artisan bread!
Make-Ahead, Storage, and Freezing Tips
Enjoying freshly baked gluten-free artisan bread is a delight, and with these convenient make-ahead and storage instructions, you can savor it for days or prepare it for future enjoyment.
To Make-Ahead: If you prefer to spread out your baking process, this dough can be prepared up to one day in advance. Simply follow the recipe instructions through step 7 (the shaping and placing in the banneton). Instead of the 30-minute refrigeration before baking, allow the shaped dough to remain in the fridge for up to 24 hours. This extended cold proof can even enhance the flavor development. When ready to bake, proceed directly to the preheating and baking steps from the refrigerator.
To Store: For optimal freshness and to maintain that delicious crispy crust, ensure your gluten-free bread has cooled completely to room temperature before storing. Once cool, place it in an airtight container or a bread bag at room temperature. It will retain its quality and deliciousness for up to 3 days. Avoid refrigerating fully baked bread as it can accelerate staling.
To Freeze: This easy gluten-free bread recipe freezes beautifully, allowing you to have a homemade loaf ready whenever cravings strike. After the bread has completely cooled, wrap it tightly in plastic wrap, followed by a layer of aluminum foil, or place it in a freezer-safe bag or airtight container. Freeze for up to 3 months. To enjoy, simply thaw the bread at room temperature for a few hours. For an extra crisp crust, you can warm the thawed loaf in a preheated oven (around 350°F / 175°C) for 10-15 minutes.
Is This Gluten-Free Artisan Bread Dairy-Free or Nut-Free?
Yes! This fantastic gluten-free artisan bread is naturally both dairy-free and nut-free. The ingredients used in this recipe—Caputo Fioreglut flour, instant yeast, olive oil, salt, sugar, and water—do not contain any dairy or nuts. This makes it an excellent and safe option for individuals with dairy or nut allergies, requiring no modifications to enjoy its delicious flavor and texture.
Can I Substitute Caputo Fioreglut with Another Gluten-Free Flour?
This is a crucial point for the success of this gluten-free bread recipe. This recipe has been specifically developed and extensively tested with Caputo Fioreglut Gluten-Free Flour. The unique composition of Fioreglut, which includes gluten-free wheat starch, provides exceptional elasticity and structure to the dough that other gluten-free flour blends simply cannot replicate. Attempting to substitute with a different gluten-free flour blend will almost certainly result in a significantly different, and likely disappointing, outcome. For the best, most authentic artisan bread experience, using Caputo Fioreglut is non-negotiable.
Dutch Oven Necessity: Baking Without It
The characteristic crispy, crackly crust of this crusty gluten-free bread is largely a result of baking it in a preheated Dutch oven. The sealed environment of the Dutch oven, combined with the addition of ice cubes, traps steam around the loaf. This steam keeps the crust soft initially, allowing the bread to expand fully, before it dries out and becomes incredibly crisp and golden. While you could technically bake this bread on a baking sheet or in a different type of pan, the absence of this steamy environment will dramatically impact the crust’s development and the overall structure of the bread, resulting in a less authentic artisan feel. For the best possible results, a Dutch oven is highly recommended.
Perfect Pairings: What to Serve with Your Gluten-Free Artisan Bread
This versatile gluten-free artisan bread is so delicious, it can be enjoyed simply on its own, perhaps with a drizzle of extra virgin olive oil and a sprinkle of flaky sea salt, or slathered with your favorite butter or spread. Beyond that, its robust flavor and satisfying texture make it an ideal companion for a wide variety of meals.
It pairs beautifully with comforting soups, enhancing every spoonful. Consider serving it alongside a hearty bowl of Gluten-Free Minestrone Soup for a truly satisfying meal. It’s also excellent with vibrant, flavor-packed salads, adding a delightful crunch. Imagine it with a fresh Arugula Pear Goat Cheese Salad with Maple Vinaigrette, providing the perfect counterpoint to the greens and fruit.
Naturally, this best gluten-free bread recipe is a phenomenal addition to Italian dishes, soaking up rich sauces and complementing savory flavors. Here are a few of my top Italian-inspired favorites that truly sing with a side of this artisan bread:
- Gluten-Free Lasagna: Perfect for sopping up that rich tomato and cheese sauce.
- Gluten-Free Meatballs: Ideal for creating mouth-watering meatball subs or serving with pasta.
- Dairy-Free Baked Ziti: A comforting dish that truly shines when paired with a fresh slice of this bread.
No matter how you choose to enjoy it, this homemade gluten-free bread is sure to elevate your dining experience.
Recommended Equipment for Gluten-Free Bread Baking
Having the right tools can make all the difference in your gluten-free bread baking journey. These are the specific items I use and highly recommend for achieving the best possible results with this artisan bread recipe:
- Dutch Oven: A high-quality Dutch oven is indispensable for that signature crispy crust. I use and enthusiastically recommend this 5-quart Lodge Dutch Oven for its excellent heat distribution and durability.
- Banneton: A banneton, or proofing basket, helps the dough maintain its shape during the rise and adds a rustic flour pattern to your loaf. This 7-inch round banneton is the perfect size for this recipe.
- Gluten-Free Flour: As previously emphasized, the specific flour is key. This recipe was meticulously developed with Caputo Fioreglut Flour, and I strongly advise against substitutions for best results.
- Stand Mixer with Paddle Attachment: While not strictly essential (you can mix by hand with enough effort), a stand mixer makes the dough preparation much easier and ensures thorough mixing.
- Bread Lame or Sharp Knife: For scoring the top of your loaf before baking, which allows for controlled expansion and creates a beautiful aesthetic.
- Parchment Paper: Crucial for safely transferring the dough into and out of the hot Dutch oven.
- Wire Rack: For cooling the bread completely, which is vital for proper crust development and crumb texture.
More Irresistible Gluten-Free Bread Recipes
If you’ve fallen in love with this gluten-free artisan bread, you’ll be thrilled to explore more delicious gluten-free bread recipes from my kitchen. Many of these also utilize the wonderful Caputo Fioreglut flour for truly outstanding results:
- Gluten-Free Focaccia (with Caputo Fioreglut): A light and airy focaccia, perfect for dipping.
- Gluten-Free Cheese Breadsticks (with Caputo Fioreglut): Cheesy, garlicky, and utterly addictive.
- Gluten-Free Cinnamon Breadsticks (with Caputo Fioreglut): A sweet treat for breakfast or dessert.
- Gluten-Free Dinner Rolls: Soft, fluffy rolls perfect for any meal.
- Gluten-Free Sandwich Bread: Your new go-to for daily sandwiches.
- Gluten-Free Crescent Rolls: Buttery, flaky, and irresistible.
Happy baking, and enjoy your journey into the wonderful world of gluten-free bread!
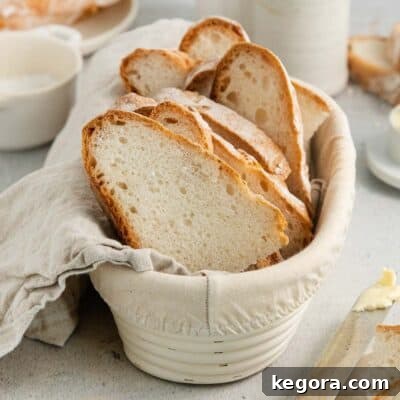
Gluten-Free Artisan Bread (Only 5 Ingredients!)
Erin Collins
15 mins
1 hr 15 mins
1 hr 15 mins
2 hrs 45 mins
8
Do you eat gluten-free and miss crusty artisan bread? You’re in the right place!
This EASY gluten-free bread recipe delivers a loaf that is crusty on the outside and soft and chewy on the inside. The magic comes from using Caputo Fioreglut Flour and baking it in a Dutch oven, creating the best gluten-free bread recipe you’ll ever try!
Comments
Ingredients
Instructions
Make the Dough
-
In the bowl of a stand mixer fitted with the paddle attachment, combine the Caputo Fioreglut flour, salt, sugar, and instant yeast. Mix briefly until just combined.
-
With the mixer running on low speed, slowly add the warm water and olive oil. Once incorporated, increase the speed to medium-high and mix for 5 minutes. The dough will have a thick cookie dough consistency.
-
Using an oiled rubber spatula, scrape down the bottom and sides of the bowl. Mix again until the dough is well-combined and uniform.
Shape & Rise
-
Flour a 7-inch banneton with gluten-free flour. (Alternatively, you can use a small oiled and floured mixing bowl.)
-
Scoop the dough onto a lightly floured surface. Press the dough into a 2-inch thick circle. Pull the sides upwards, then towards the center to form a round loaf. Flip the loaf seam side down onto the floured surface and rotate to seal the seams.
-
Place the loaf into the banneton, seam side facing upward. Cover with oiled plastic wrap and let rise in a warm place for 45-60 minutes.
-
Once the dough has risen, place it in the refrigerator for 30 minutes before baking. (This helps the bread maintain its shape during transfer and baking.)
Bake
-
Place a Dutch oven with the lid on in the middle/lower rack of your oven. Preheat the oven to 475°F (245°C). Allow the Dutch oven to preheat for at least 30 minutes.
-
Gently turn out the chilled loaf onto a piece of parchment paper. Using a bread lame or sharp knife, score the top of the loaf.
-
Carefully remove the hot Dutch oven from the oven. Using the parchment paper, gently place the scored loaf into the Dutch oven. Add 5-6 ice cubes around the edges and quickly replace the lid to trap the steam.
-
Bake the bread covered for 30 minutes. Then, reduce the oven temperature to 450°F (230°C) and continue baking for another 30 minutes.
-
Remove the lid and bake uncovered for another 15-20 minutes, or until the crust is golden brown and the loaf sounds hollow when tapped. (For accuracy, an instant-read thermometer inserted in the center should read above 205°F / 96°C.)
-
Remove the bread from the oven and turn it out onto a wire rack. Let the bread cool for at least 3 hours before slicing. This is critical for the crust and interior crumb to properly set. Slice and enjoy!
Notes
Gluten-Free Bread Flour: This recipe was specifically designed to work with Caputo Fioreglut Gluten-Free Flour. No other flour can be substituted with the same exceptional results.
Dairy-Free: This crusty bread recipe is naturally dairy-free.
Nut-Free: This crusty bread recipe is naturally nut-free.
To Make-Ahead: Prep the dough up to 1 day in advance. Follow the recipe through step 7. Instead of refrigerating for 30 minutes, allow it to remain in the fridge for up to 24 hours. Proceed with baking from the refrigerator.
To Store: Let the bread cool completely, then store it in an airtight container at room temperature for up to 3 days.
To Freeze: After the bread has cooled, wrap it tightly in plastic wrap or foil, then place it in a freezer bag or airtight container. Freeze for up to 3 months. Thaw at room temperature for a few hours before serving, or reheat briefly in the oven for a crispier crust.
Nutrition
Calories:
287
kcal
|
Carbohydrates:
55
g
|
Protein:
4
g
|
Fat:
6
g
|
Saturated Fat:
1
g
|
Polyunsaturated Fat:
1
g
|
Monounsaturated Fat:
4
g
|
Sodium:
877
mg
|
Potassium:
32
mg
|
Fiber:
2
g
|
Sugar:
2
g
|
Vitamin C:
0.01
mg
|
Calcium:
3
mg
|
Iron:
0.1
mg