
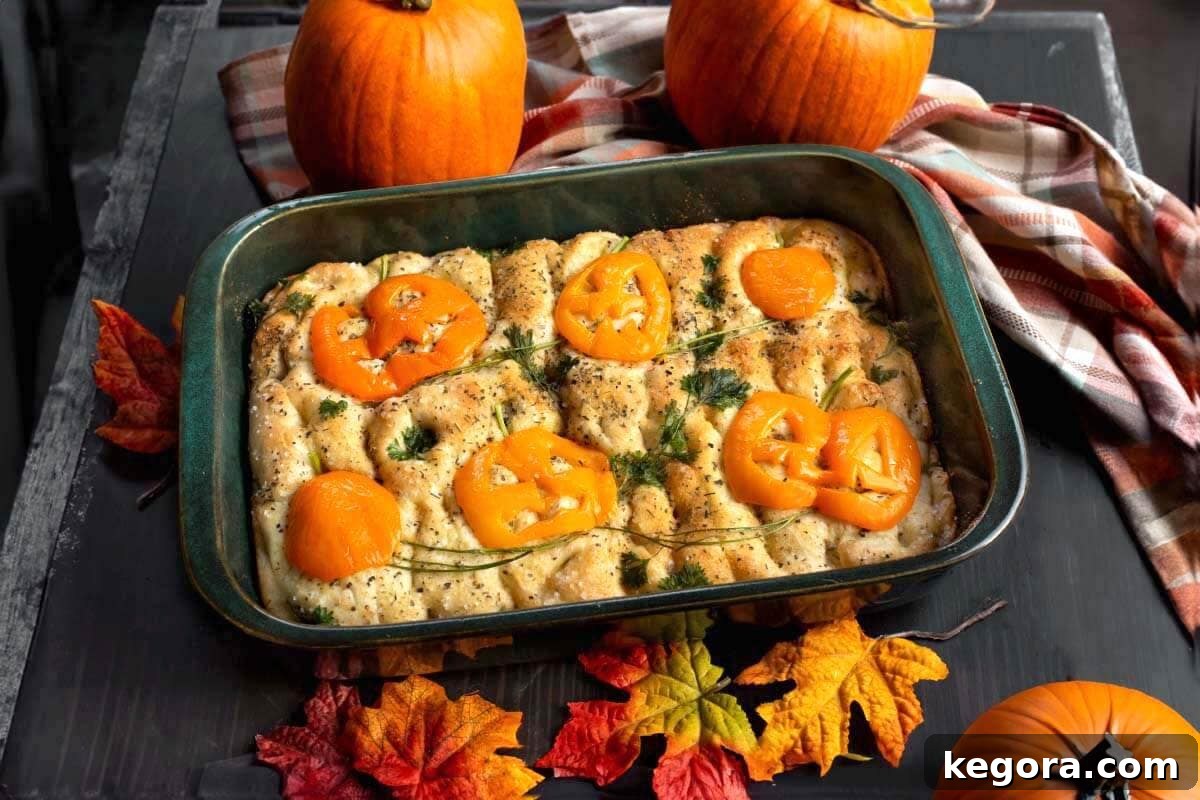
Transform your Halloween party into a truly spectacular event with a delightful and easy-to-make Halloween Focaccia Bread! This festive appetizer not only boasts incredible flavor but also doubles as an adorable, edible centerpiece, setting the perfect spooky yet charming tone for your celebrations. Forget the complexities often associated with traditional bread making; we’re embracing a brilliant shortcut by using frozen dinner rolls, making homemade focaccia accessible and enjoyable for everyone, regardless of their baking experience. This guide will walk you through every step, ensuring your Halloween party food is both delicious and visually stunning, providing a creative outlet for all ages.
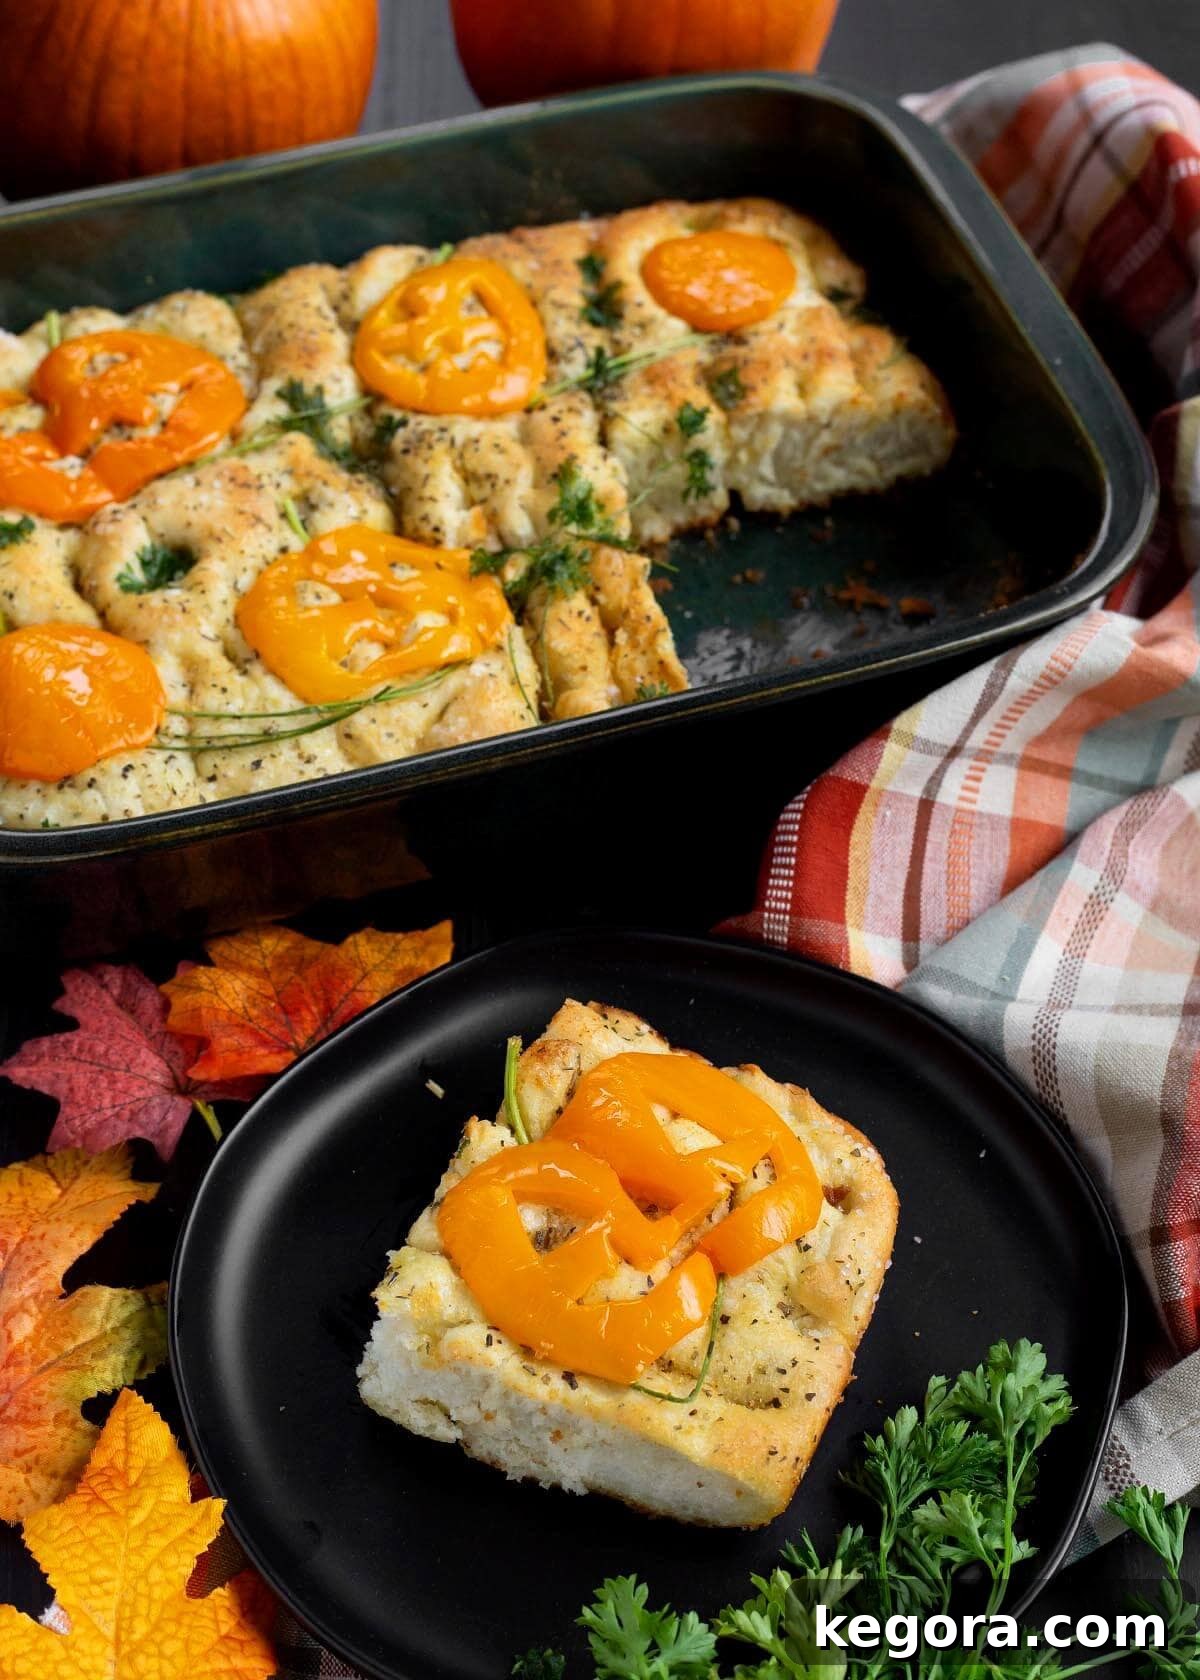
Effortless Focaccia From Frozen Rolls: Your Halloween Shortcut
Creating impressive Halloween party food doesn’t have to be a daunting task. This recipe revolutionizes focaccia by utilizing convenient frozen dinner rolls, eliminating the need for tedious mixing and kneading from scratch. The result is a wonderfully soft and pillowy bread, featuring a delicately crisp top and an irresistible aroma of fresh herbs and garlic. It’s the perfect savory canvas for your festive decorations, ensuring a crowd-pleasing appetizer that’s both fun to make and delicious to devour.
This incredibly easy Halloween appetizer pairs perfectly with our Spooky Halloween Party Punch recipe!
Why You’ll Fall in Love with This Halloween Focaccia
This Halloween Focaccia isn’t just another dish; it’s an experience that brings joy and deliciousness to your festive gatherings. Here’s why it’s destined to become a staple in your Halloween entertaining:
- Adorable & Edible Décor: More than just a snack, this focaccia acts as an eye-catching centerpiece that guests can admire, then slice and enjoy. Imagine a table adorned with a bread “canvas” featuring charming pumpkins, spooky spiders, or ghostly figures – all made from fresh, vibrant vegetables. It’s food that sparks conversation and delights both children and adults.
- Shortcut Dough for Stress-Free Baking: The secret to its simplicity lies in using frozen dinner rolls. This ingenious hack means no complex dough mixing, no lengthy kneading sessions, and significantly less cleanup. You get all the authentic focaccia flavor and texture with a fraction of the effort, leaving you more time to enjoy the Halloween festivities.
- Endless Customizable Designs: This recipe truly shines in its versatility. The risen dough provides a blank slate for your wildest Halloween imaginations. Create classic Jack-o’-lanterns, intricate spider webs, whimsical graveyards, or even friendly ghosts. Gather your family and friends, set out bowls of prepped vegetables, and let everyone design their own spooky scene directly on the dough. It’s an activity as much as it is a recipe!
- Make-Ahead Friendly for Easy Hosting: Planning a party can be hectic, but this focaccia helps ease the load. You can proof the dough and meticulously prep all your colorful vegetable toppings earlier in the day. This allows you to simply assemble and bake closer to serving time, ensuring fresh, warm bread for your guests without last-minute stress.
- A Universal Crowd-Pleaser: Savory, herby, and incredibly dippable, focaccia is inherently appealing. This Halloween version is no exception. Its rich flavors make it a perfect accompaniment to hearty soups, robust chili, or as a star component on a festive Halloween charcuterie board. It’s satisfying and versatile, guaranteed to be a hit with everyone.
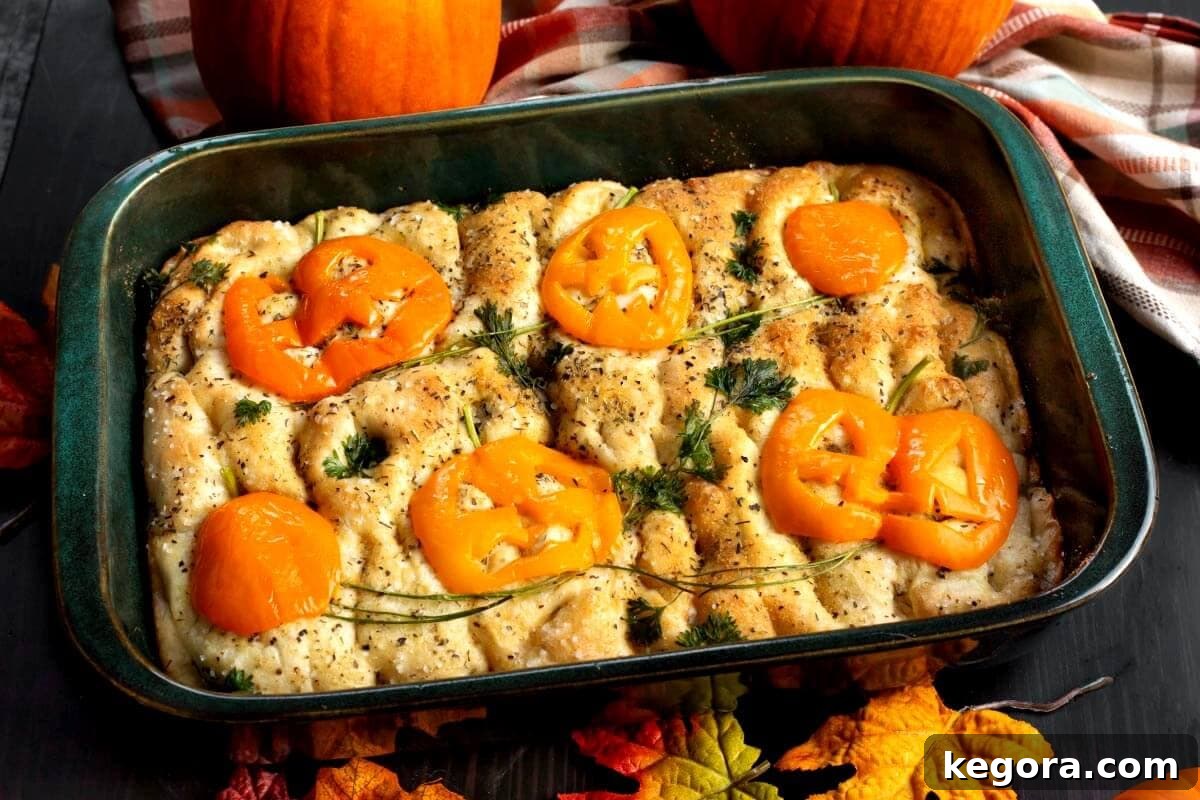
One of the most appealing aspects of decorating focaccia dough with vegetables is the incredible stability of your designs. Unlike some delicate edible crafts, your intricate scenes and cute characters will remain beautifully intact throughout the baking process, emerging from the oven looking just as charming as when you placed them.
Halloween Party Focaccia: Key Ingredients
Crafting this festive focaccia requires only a handful of common ingredients, making it both accessible and budget-friendly. Here’s what you’ll need:
For the Focaccia Bread Base:
- Olive Oil: A generous amount for flavor, texture, and a beautiful golden crust.
- Frozen Bread Dough Rolls: Such as Rhodes® dinner rolls. These are your secret weapon for a no-fuss, no-knead dough. Typically, 18 rolls are perfect for a standard baking dish.
- Kosher Salt: Essential for seasoning the dough and enhancing all the flavors.
- Italian Seasoning: A fragrant blend of dried herbs that infuses the focaccia with classic Mediterranean taste.
- Garlic Powder: For that irresistible aromatic garlic kick.
For the Veggie Art Decorations:
These fresh vegetables will become your creative palette for spooky designs.
- Orange Bell Peppers: Perfect for carving into vibrant pumpkins or Jack-O’-Lanterns.
- Fresh Parsley: Ideal for creating leafy vines, pumpkin stems, or adding a touch of green freshness.
- Mushrooms: Sliced mushrooms can be cleverly shaped into eerie skulls or other ghostly figures.
- Olives: Black olives are fantastic for making creepy spiders or monster eyes, while green olives can add a contrasting pop of color.
Creative Variations: Easy Swaps & Add-Ons
While the classic Halloween Focaccia is wonderful on its own, feel free to experiment with these simple variations to customize it to your taste:
- Cheesy Swirl: For an extra layer of savory goodness, sprinkle a generous amount of grated Parmesan, mozzarella, or a blend of Italian cheeses over the dough after you’ve oiled and seasoned it, just before adding your vegetable designs. The cheese will melt and slightly crisp, adding a delightful texture.
- Herb Boost: Elevate the aromatic profile by adding finely minced fresh rosemary or thyme to the olive oil before brushing it over the dough. The fresh herbs will release their oils and perfume the entire focaccia as it bakes.
- Spicy Kick: For those who enjoy a bit of heat, a sprinkle of red pepper flakes over the seasoned dough can add a subtle warmth that complements the savory flavors beautifully.
- Gluten-Free Option: If you or your guests have dietary restrictions, look for a gluten-free frozen roll dough. Keep in mind that proofing times and dough texture may vary, so always follow the specific instructions on the gluten-free product packaging.
- Other Topping Ideas: Consider cherry tomato “bloody eyeballs,” thinly sliced red onion for web patterns, or even small pieces of cooked bacon or pepperoni for a meatier twist. Just ensure any added ingredients are relatively small and not overly wet to prevent the focaccia from becoming soggy.
Step-by-Step Guide: Crafting Your Halloween Focaccia Bread
1. Prepare & Proof the Dough:
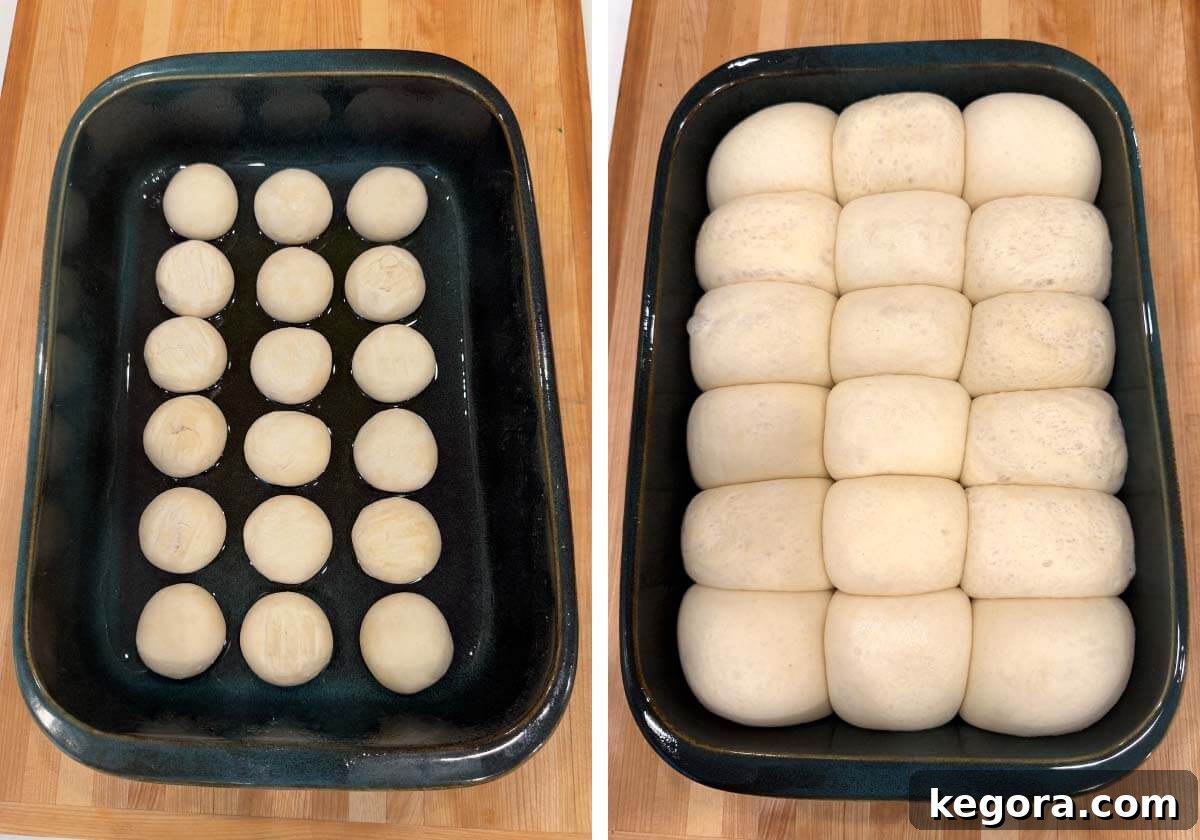
- Begin by generously spraying a 9×13-inch baking dish (or a similar-sized pan) with cooking spray. Follow with a light drizzle of olive oil across the bottom of the dish. This ensures the focaccia won’t stick and contributes to a delicious crust.
- Arrange the frozen dough balls in a single, even layer within the prepared dish, leaving a slight space between each roll. They will expand as they thaw and rise.
- Cover the dish tightly with plastic wrap. This traps moisture and creates a warm, humid environment essential for proper proofing.
- Place the covered dish in a warm spot. A fantastic trick is to place it in your oven with just the oven light on (ensure the oven itself is *not* turned on). The light provides just enough gentle warmth. Allow the dough to thaw and roughly double in size. This crucial step typically takes 3-4 hours, depending on your room’s temperature. It’s important to avoid over-proofing, as this can cause the bread to bake up flat and dense.
2. Prepare Your Festive Decorations:
- While your dough is busy rising, take this time to slice, chop, and prep all your vegetable “art” pieces. Think about the designs you want to create (pumpkins, spiders, ghosts) and cut your vegetables accordingly.
- Crucial Tip: After slicing, gently pat all your prepped vegetables dry with paper towels. Excess moisture can steam the focaccia during baking, preventing a lovely golden-brown crust and causing your decorations to look dull. Dry veggies will bake beautifully and retain their vibrant colors.
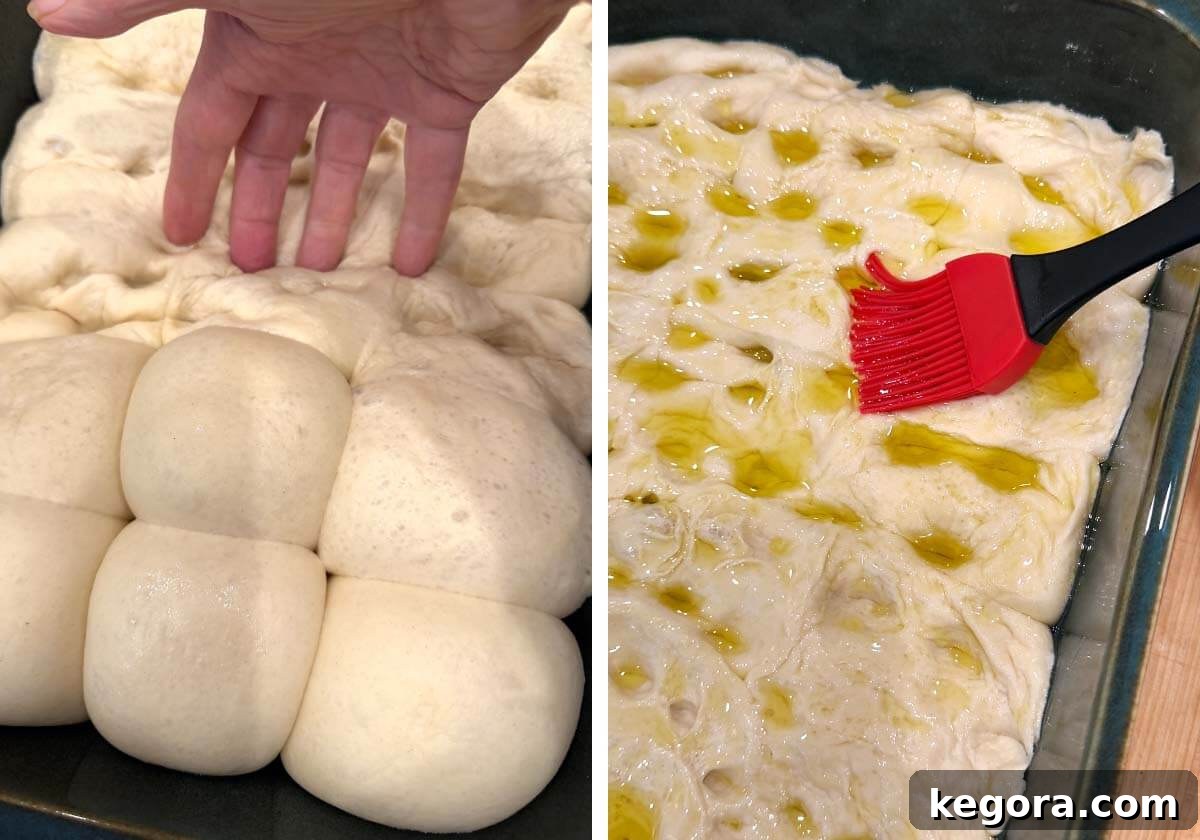
3. Dimple & Season the Dough:
- About 15-20 minutes before your dough is fully proofed, preheat your oven to 375°F (190°C). If you proofed the rolls in the oven, make sure to remove them first! It’s important that the oven is fully preheated before baking to ensure the best “oven spring” and a perfectly puffed focaccia.
- Once the dough has doubled, gently remove the plastic wrap. With clean fingers, form a “claw” shape and press deep dimples all over the surface of the dough. Don’t be alarmed if the dough deflates a bit; this creates those characteristic focaccia pockets for olive oil and seasonings.
- Generously brush 1 to 2 tablespoons of olive oil over the entire dimpled surface of the dough. This contributes to flavor, moisture, and that coveted golden crust.
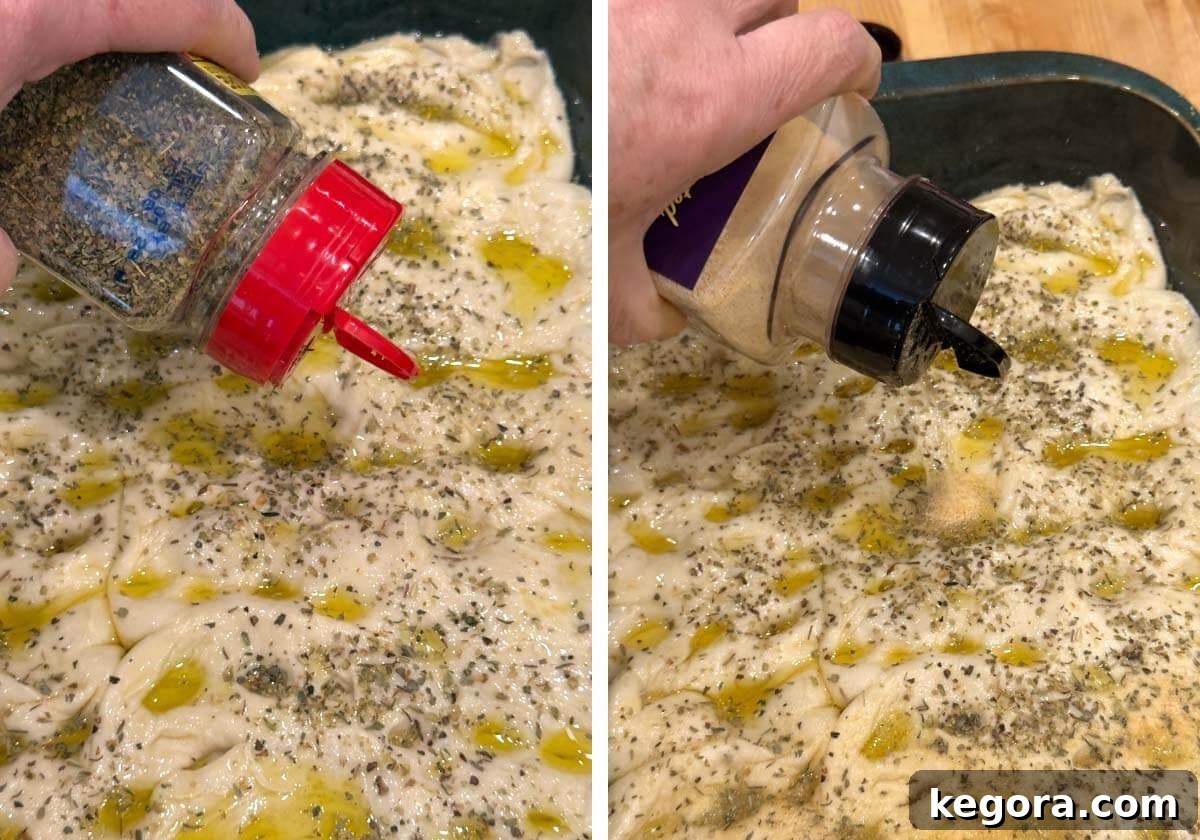
- Evenly sprinkle the dough with Italian seasoning and garlic powder, adjusting the amounts to your taste preferences.
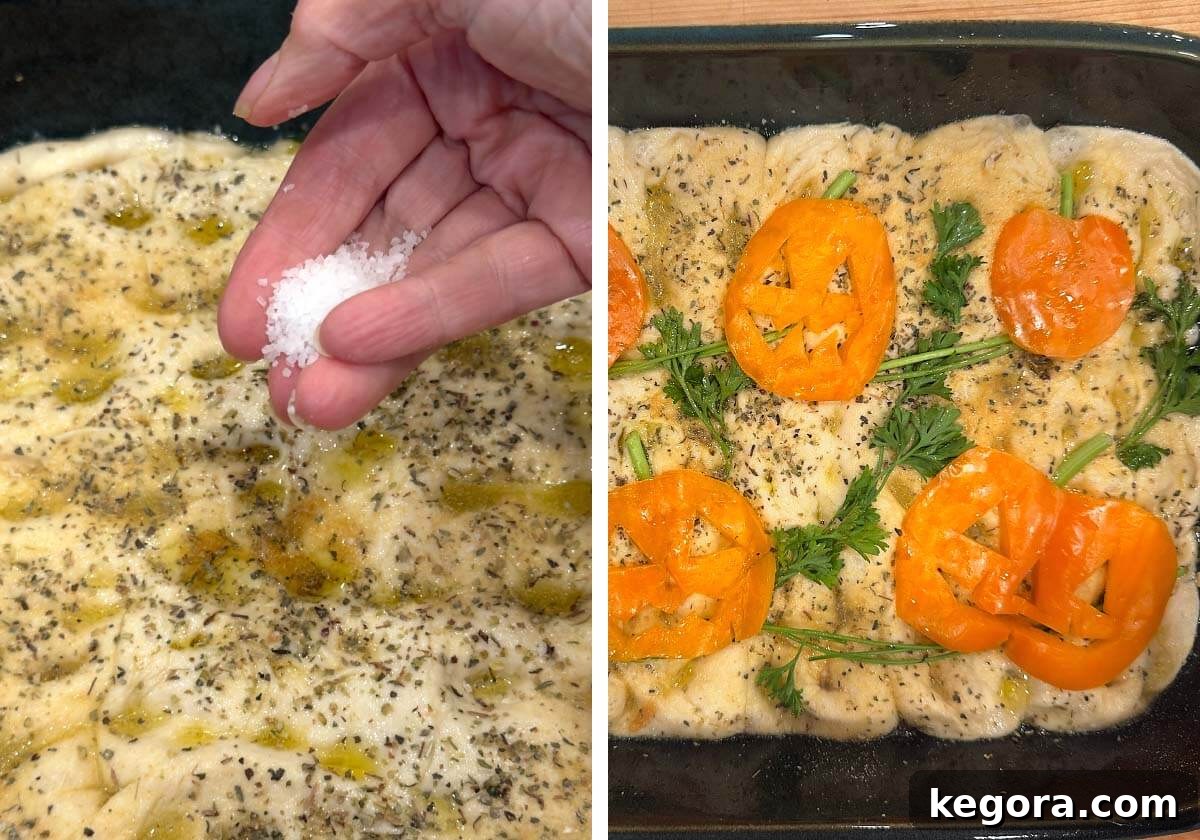
- Finally, season evenly with kosher salt. A flaky sea salt can also be used for a lovely textural contrast.
4. Decorate Your Spooky Scene:
- Now for the fun part! Arrange your prepped Halloween-themed vegetable designs on top of the seasoned dough. Press the toppings gently but firmly into the dough so they adhere well during baking. Remember the tip about keeping your veggies dry for the best browning and crispiest results!
5. Bake to Golden Perfection:
- Transfer your decorated focaccia to the preheated 375°F (190°C) oven. Bake for approximately 20 to 25 minutes, or until the bread is beautifully puffed, deeply golden brown on the edges, and lightly golden on top.
- Once baked, remove the pan from the oven and allow the focaccia to cool in the pan for 10 to 15 minutes. This helps it set and makes it easier to remove.
- After cooling slightly, run a thin metal spatula carefully under the bread to loosen it from the pan. You can then transfer it to a cutting board for serving or simply serve slices directly from the baking dish.
6. Serve & Enjoy:
- Slice the warm or room-temperature focaccia into squares or strips. It’s incredibly delicious served with marinara sauce, ranch dressing, or a simple garlic butter for dipping. It also makes a fantastic accompaniment to a Halloween charcuterie board, adding a savory, homemade touch. This easy focaccia bread is especially delightful alongside a hearty Slow Cooker Turkey Chili or a comforting Crockpot Vegetable Beef Soup!
Expert Cooking Tip: The Perfect Proofing Poke Test
For the absolute best bake, it’s crucial not to let the dough rise for too long. The rolls only need to double in size, not triple or quadruple. To accurately check if your dough is perfectly proofed, perform a quick poke test: gently press a clean fingertip into the dough about half an inch deep. If the indentation slowly springs back halfway and leaves a small, lasting dent, your dough is ready to go into the oven. If it springs back completely, it needs more time. If it collapses completely, it’s over-proofed, but still bakeable!
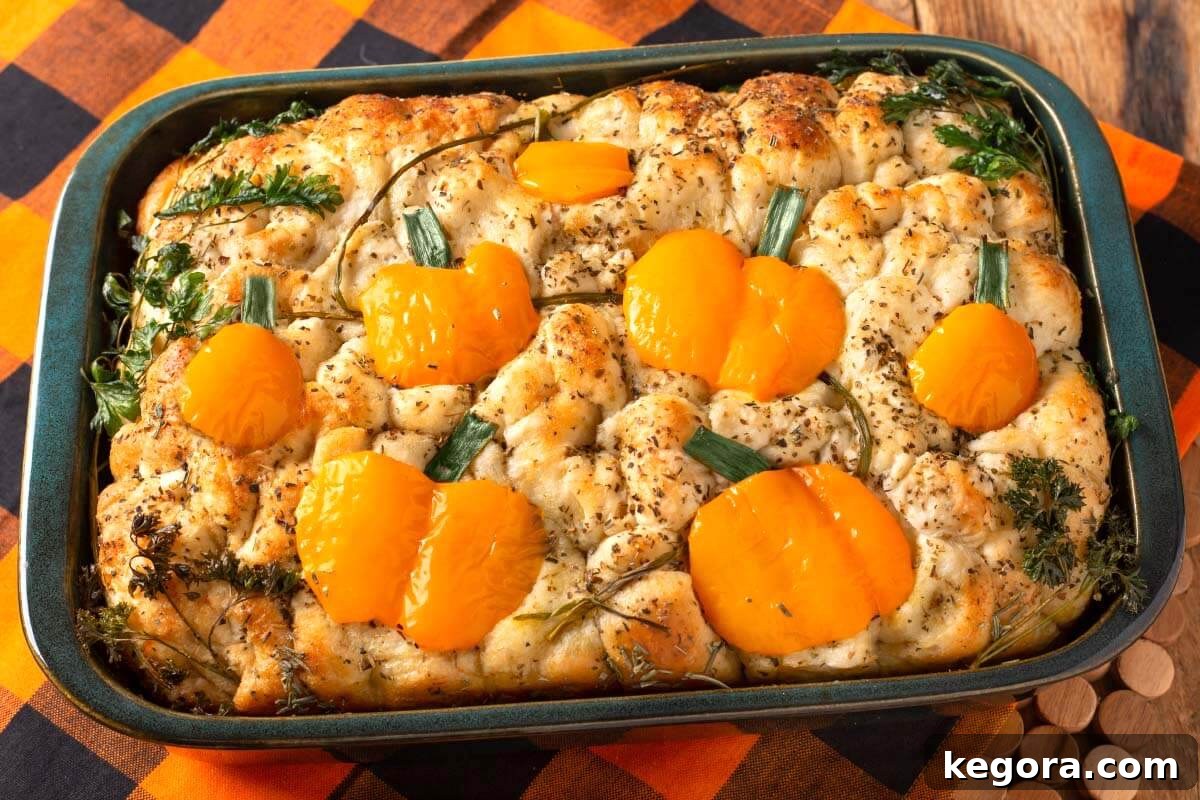
Unleash Your Creativity: Halloween Focaccia Decorating Ideas (Veggie Art)
The beauty of this Halloween focaccia lies in the ability to transform simple vegetables into edible works of art. Here are some detailed ideas to inspire your spooky designs:
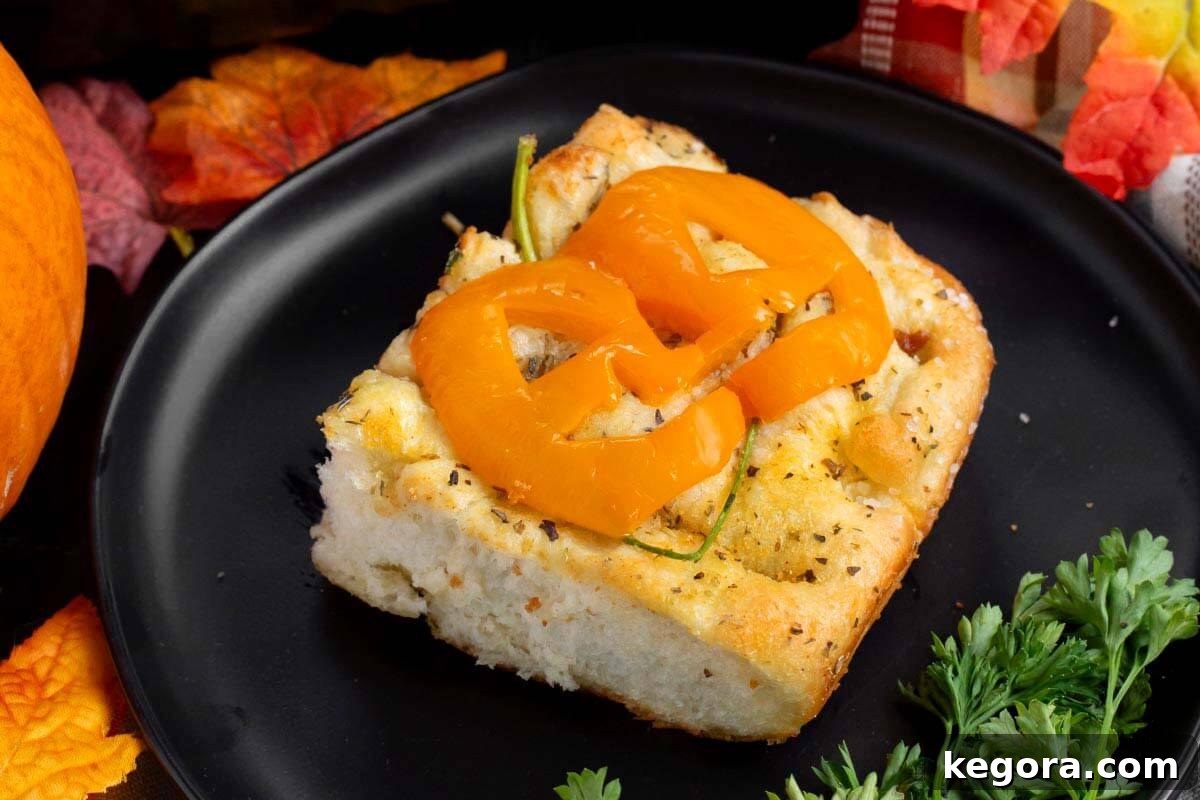
- Orange Bell Pepper Pumpkins / Jack-O’-Lanterns: This is a classic! Take an orange bell pepper, halve it from the stem to the base, and carefully remove all seeds and membranes. Flatten each half gently. Using a small, sharp paring knife, trim the edges into charming pumpkin shapes. Then, get creative by carving simple triangular eyes, a jagged mouth, or other classic Jack-O’-Lantern faces. For an extra touch of realism, add small pieces of fresh parsley or thinly sliced green onion as “stems” and “vines” emerging from your pumpkin patch.
- Creepy Black Olive Spiders: To make adorable (or terrifying!) spiders, use half an olive for the plump body of the spider. Then, thinly slice the other half of the olive into several delicate “legs.” Arrange the legs around the body for a multi-legged arachnid crawling across your focaccia.
- Eerie White Mushroom Skulls: For a truly spooky effect, use white button or cremini mushrooms. Halve them lengthwise. With a small spoon or the tip of a knife, carefully scoop out shallow “eye sockets” in the mushroom cap. Then, score a few small, vertical lines in the stem to mimic a “jaw” or teeth. Each mushroom half yields one skull, so you can create a whole graveyard!
- Intricate Onion Spider Webs: Achieve a delicate spider web pattern using very thin rings of red onion. Arrange the rings in concentric circles to form the web, and place a whole black olive in the center to represent a lurking spider. The purple hue of the onion adds a fantastic visual contrast.
- Sweet Pepper “Candy Corn”: Capture the iconic Halloween candy motif using colorful bell pepper strips. Use strips of orange and yellow bell pepper, and pair them with strips of white mozzarella cheese to create a fun, edible candy corn design.
- “Eyes Everywhere” Monster Mash: For a delightfully monstrous look, slice green olives crosswise (the ones with pimiento centers work best). These instantly become silly, staring monster eyes. Arrange them randomly or in clusters for a truly unsettling (and tasty) effect!
- Ghostly Mozzarella: Use a small cookie cutter or a knife to cut slices of mozzarella cheese into ghost shapes. Place them on the focaccia after it’s baked for a few minutes, so they soften but don’t completely melt away. Use tiny olive pieces for eyes.
Make-Ahead, Storage & Reheating for Convenient Halloween Hosting
Planning ahead for a Halloween party is key, and this focaccia is wonderfully accommodating. Here’s how to manage it for maximum convenience:
- Make-Ahead: You can prepare the dough and vegetables well in advance. Once the dough has proofed (risen), cover the baking dish tightly with plastic wrap and refrigerate it for up to 4 hours before baking. Before dimpling and decorating, let it sit at room temperature for 20-30 minutes to take the chill off. All your vegetable “art” can also be prepped several hours ahead of time. Store the pre-cut veggies in airtight containers or bags in the refrigerator, ensuring they remain dry to prevent sogginess.
- Storage: Allow any leftover focaccia slices to cool completely to room temperature. Store them in an airtight container at room temperature for up to 1 day. If you need to keep them longer, refrigerate for up to 3 days. Proper airtight storage helps maintain its softness and prevents it from drying out.
- Reheating: To bring your focaccia back to its warm, delicious glory, preheat your oven to 350°F (175°C). Place the slices on a baking sheet and warm for 8–10 minutes, or until heated through and slightly crispy. If you have an air fryer, it works wonders for quick reheating: set it to 320°F (160°C) and cook for 3–5 minutes, checking frequently to prevent over-browning.
- Freezing: Focaccia freezes surprisingly well! Once the baked focaccia has cooled completely, wrap individual slices tightly in plastic wrap, then place them in a freezer-safe bag or container. Freeze for up to 1 month. When you’re ready to enjoy, reheat from frozen at 350°F (175°C) for 12–15 minutes, or until thoroughly warmed and lightly crisped.
More Spooktacular Halloween Recipes to Try
Looking for more festive treats to complete your Halloween feast? Explore these other fantastic recipes:
- Dark Chocolate Halloween Cookies
- Spooky Halloween Party Punch
- Halloween Jello Brain Recipe
- Halloween Witch Hat Cupcakes
- White Chocolate Halloween Ghosts
- Halloween Hot Dog Mummies
- Halloween Eyeball Hot Cocoa Bombs
- Mini Pumpkin Cheesecakes
Don’t forget to save this incredible Halloween Focaccia Bread recipe to your favorite Pinterest board for easy access next year!
We hope you have a blast making and decorating this Halloween Focaccia Bread from frozen dinner rolls. It’s truly a creative and delicious addition to any Halloween party spread, guaranteed to bring smiles and spooky cheer. Happy Halloween! We’d love to hear how your focaccia turned out and what creative designs you came up with!
Recipe: Easy Halloween Focaccia Bread
By Sandy Clifton
Festive Halloween Focaccia is made incredibly easy with the shortcut of frozen dinner rolls! Decorate this soft, herby bread with vibrant bell pepper pumpkins, whimsical olive spiders, and spooky mushroom skulls. A cute, savory Halloween party recipe idea that everyone, from kids to adults, will absolutely love.
- Prep Time: 25 minutes
- Cook Time: 20-25 minutes
- Proof (Rising) Time: 3-4 hours
- Total Time: Approximately 3 hours 45 minutes (including proofing)
- Yields: 12 servings
Equipment
- 13”x9” Baking Dish
- Plastic Wrap
- Cooking Spray
- Sharp Paring Knife (for decorating)
- Paper Towels
Ingredients
For the Focaccia:
- Olive Oil (for pan and brushing)
- 18 Frozen Dinner Rolls (such as Rhodes® or similar brand)
- Kosher Salt, to taste
- Italian Seasoning, to taste
- Garlic Powder, to taste
For the Veggie Art (See Decorating Ideas Section):
- 2 Orange Bell Peppers
- Fresh Parsley
- Mushrooms (white button or cremini)
- Olives (black and/or green with pimiento)
- Optional: Thinly sliced red onion, mozzarella cheese slices
Instructions
Part 1: Prep and Proof the Dough
- Generously spray a 9×13-inch baking dish with cooking spray, then add a small drizzle of olive oil to the bottom of the pan.
- Arrange the frozen bread roll dough pieces in a single layer in the prepared pan, leaving a slight space between each roll to allow for expansion.
- Cover the dish tightly with plastic wrap. Place the dish in a warm area to proof. A great spot is inside a turned-off oven with just the oven light on, providing gentle warmth.
- Let the rolls thaw and rise until they have approximately doubled in size. This can take 3-4 hours. Be careful not to let them over-proof, as this can lead to a flatter bread. Perform a gentle poke test: if the dent slowly springs back halfway and leaves a small mark, it’s ready.
Part 2: Prepare Your Designs
- While the bread dough is rising, prepare your vegetable decorations. Slice and cut your chosen veggies into the shapes needed for your Halloween scene (e.g., bell pepper pumpkins, olive spiders, mushroom skulls).
- Pat all prepped vegetables thoroughly dry with paper towels. This step is crucial to ensure they bake properly and develop a nice color, rather than steaming on the focaccia.
Part 3: Season the Dough
- Once the rolls have risen, remove the plastic wrap. Preheat your oven to 375°F (190°C). (If proofing in the oven, remove the pan first!)
- Using clean fingers in a “claw” position, press deep dimples all over the surface of the dough. The dough will deflate slightly, which is normal.
- Brush 1 to 2 tablespoons of olive oil evenly over the top of the dimpled dough.
- Sprinkle Italian seasoning and garlic powder generously over the dough, according to your taste.
- Finally, sprinkle kosher salt evenly over the dough.
Part 4: Decorate
- Arrange your prepped Halloween-themed vegetable designs on the seasoned dough. Gently press the toppings into the dough to help them adhere. Remember to keep your vegetables as dry as possible for the best results.
Part 5: Bake & Cool
- Bake the focaccia in the preheated oven at 375°F (190°C) for 20 to 25 minutes, or until the top is puffed and a beautiful golden brown.
- Allow the focaccia to cool in the pan for 10 to 15 minutes. This helps it firm up and makes it easier to handle.
- Run a thin metal spatula around and under the focaccia to ensure it’s loosened from the pan, as it can stick slightly. Transfer to a cutting board, or serve directly from the dish.
Part 6: Serve
- Slice the focaccia into individual servings.
- Serve warm or at room temperature. It’s fantastic with marinara sauce, ranch dressing, garlic butter for dipping, or as part of a festive Halloween charcuterie board. It also makes a wonderful accompaniment to your favorite soups or chilis.
Recipe Notes & Expert Tips
- Proofing Time Variability: Dough proofing times can vary significantly based on your room temperature and humidity. Expect it to take anywhere from 2½ to 4½ hours. A consistently warm, draft-free spot is ideal.
- Oven Preheating: Start preheating your oven to 375°F (190°C) about 15-20 minutes before you anticipate the dough being fully proofed. The dough should go directly from decorating to a hot oven to achieve maximum “oven spring” and puffiness.
- Quick Decorating: Aim to decorate your focaccia within 5-10 minutes once the dough is dimpled. This minimizes the time the dough spends out of its optimal temperature range before baking, helping to capture that coveted oven spring.
- Browning Boost: For enhanced browning, ensure your vegetable toppings are very dry, apply enough olive oil to the surface, and bake on the middle rack of your oven. For a deeper golden color right at the end, you can briefly broil for 1-2 minutes, watching it very closely to prevent burning.
Nutrition Information (Approximate per serving)
(Calculations are automatic and should be used as an approximation.)
- Calories: 170 kcal
- Carbohydrates: 24g
- Protein: 4g
- Fat: 6g
- Sodium: 260mg
- Fiber: 1g
- Sugar: 2g
Additional Info
- Course: Appetizer, Bread
- Cuisine: American, Halloween
We’d love to hear about your experience! If you tried this recipe, consider sharing your creations on social media and mentioning @simply_happy_foodie. Happy baking!
Halloween Focaccia Bread Frequently Asked Questions
Yes, you absolutely can! If using pizza dough, press about 1 to 1¼ pounds of fresh or thawed pizza dough evenly into your prepared baking pan. Proceed to dimple, oil, season, and decorate it as instructed. Bake for 20–25 minutes at 375°F (190°C). The resulting focaccia will be a bit chewier and slightly less airy than one made with dinner rolls, but still delicious.
Certainly! A quarter or half sheet pan works perfectly fine. Lightly oil the sheet pan before arranging the dough. Keep in mind that the bread might bake a bit flatter on a larger, shallower pan. Start checking for doneness a little earlier, around 18–20 minutes, to prevent over-baking.
Yes, this is a great make-ahead option! Arrange the frozen rolls in your prepared pan, cover tightly with plastic wrap, and refrigerate for 8–12 hours. The cold temperature will slow down the proofing process. Before baking, remove the pan from the fridge and let it sit at room temperature for 30–60 minutes to warm up slightly. Then, proceed to dimple, decorate, and bake for 20–25 minutes at 375°F (190°C).
Don’t despair! While ideal proofing is best, an over-proofed dough will still be tasty. Simply proceed to dimple, add your toppings, and bake as directed. The focaccia might not rise as high or be as airy, but it will still be enjoyable. For next time, try proofing in a slightly cooler spot or keeping a closer eye on it, checking earlier than anticipated.
Absolutely! Adding cheese or small pieces of cooked meats can be a fantastic way to enhance flavor. Just ensure that any pieces are kept relatively small and not too heavy. This allows the dough to rise properly around them without being weighed down. For cheese, sprinkle it after oiling and seasoning. For meats, distribute them evenly with your veggie decorations.
No, any brand of frozen roll dough should work well for this recipe. The key is to use pre-portioned frozen dough that thaws and proofs. Keep in mind that proofing times can vary slightly depending on the size of the rolls, the specific brand, and the ambient temperature of your kitchen, so always observe the dough’s progress closely.
For a beautifully golden and crispy crust, several factors contribute to better browning. First, make sure all your toppings, especially vegetables, are as dry as possible to prevent steaming. Second, don’t skimp on the olive oil – a generous brushing is key for flavor and crust development. Third, ensure you bake the focaccia on the middle rack of your oven where heat circulates best. Finally, for an extra touch of color, you can briefly broil the focaccia for 1–2 minutes at the very end of baking, but watch it extremely closely to avoid burning!