
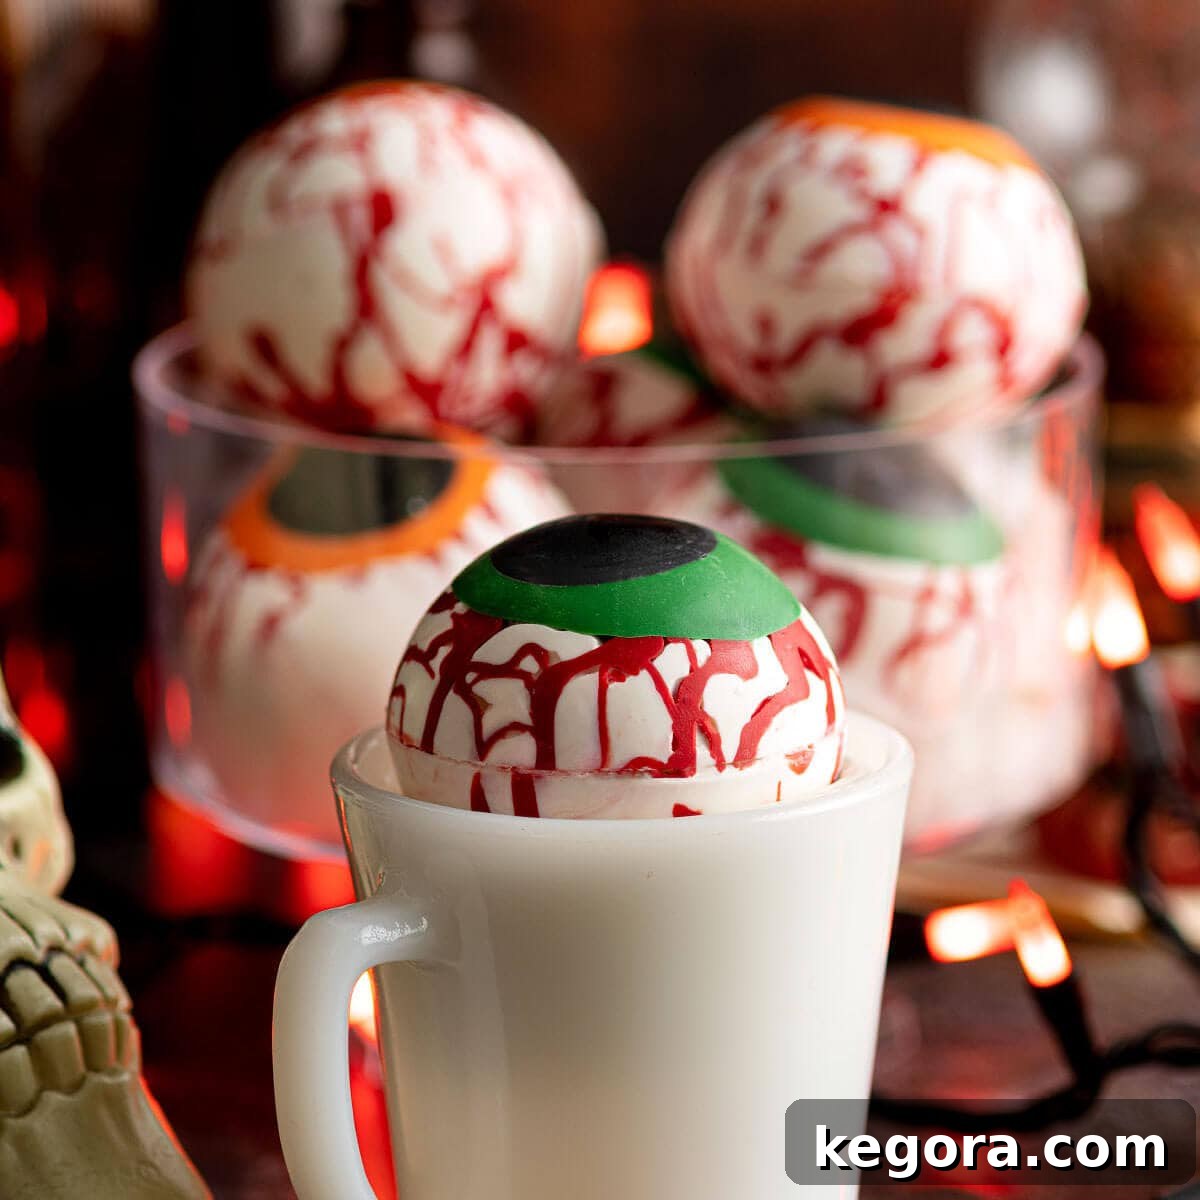
Get ready to infuse your Halloween celebrations with a touch of spooky delight and a comforting hug in a mug! Our Halloween Eyeball Hot Cocoa Bombs are not just a beverage; they’re an experience, a captivating blend of chilling aesthetics and heartwarming flavor. Perfect for adding a magical, ghostly glow to any Halloween party, or simply as a fun and delicious treat for you and your family after a long night of trick-or-treating adventures.
Imagine the smiles (and maybe a few delighted shrieks!) as these creative cocoa bombs, adorned with eerie eyeball designs, melt away in a cascade of hot milk, revealing a treasure trove of rich chocolate and fluffy mini marshmallows. This step-by-step guide will walk you through creating these edible masterpieces, ensuring your Halloween is both deliciously memorable and wonderfully spooky.
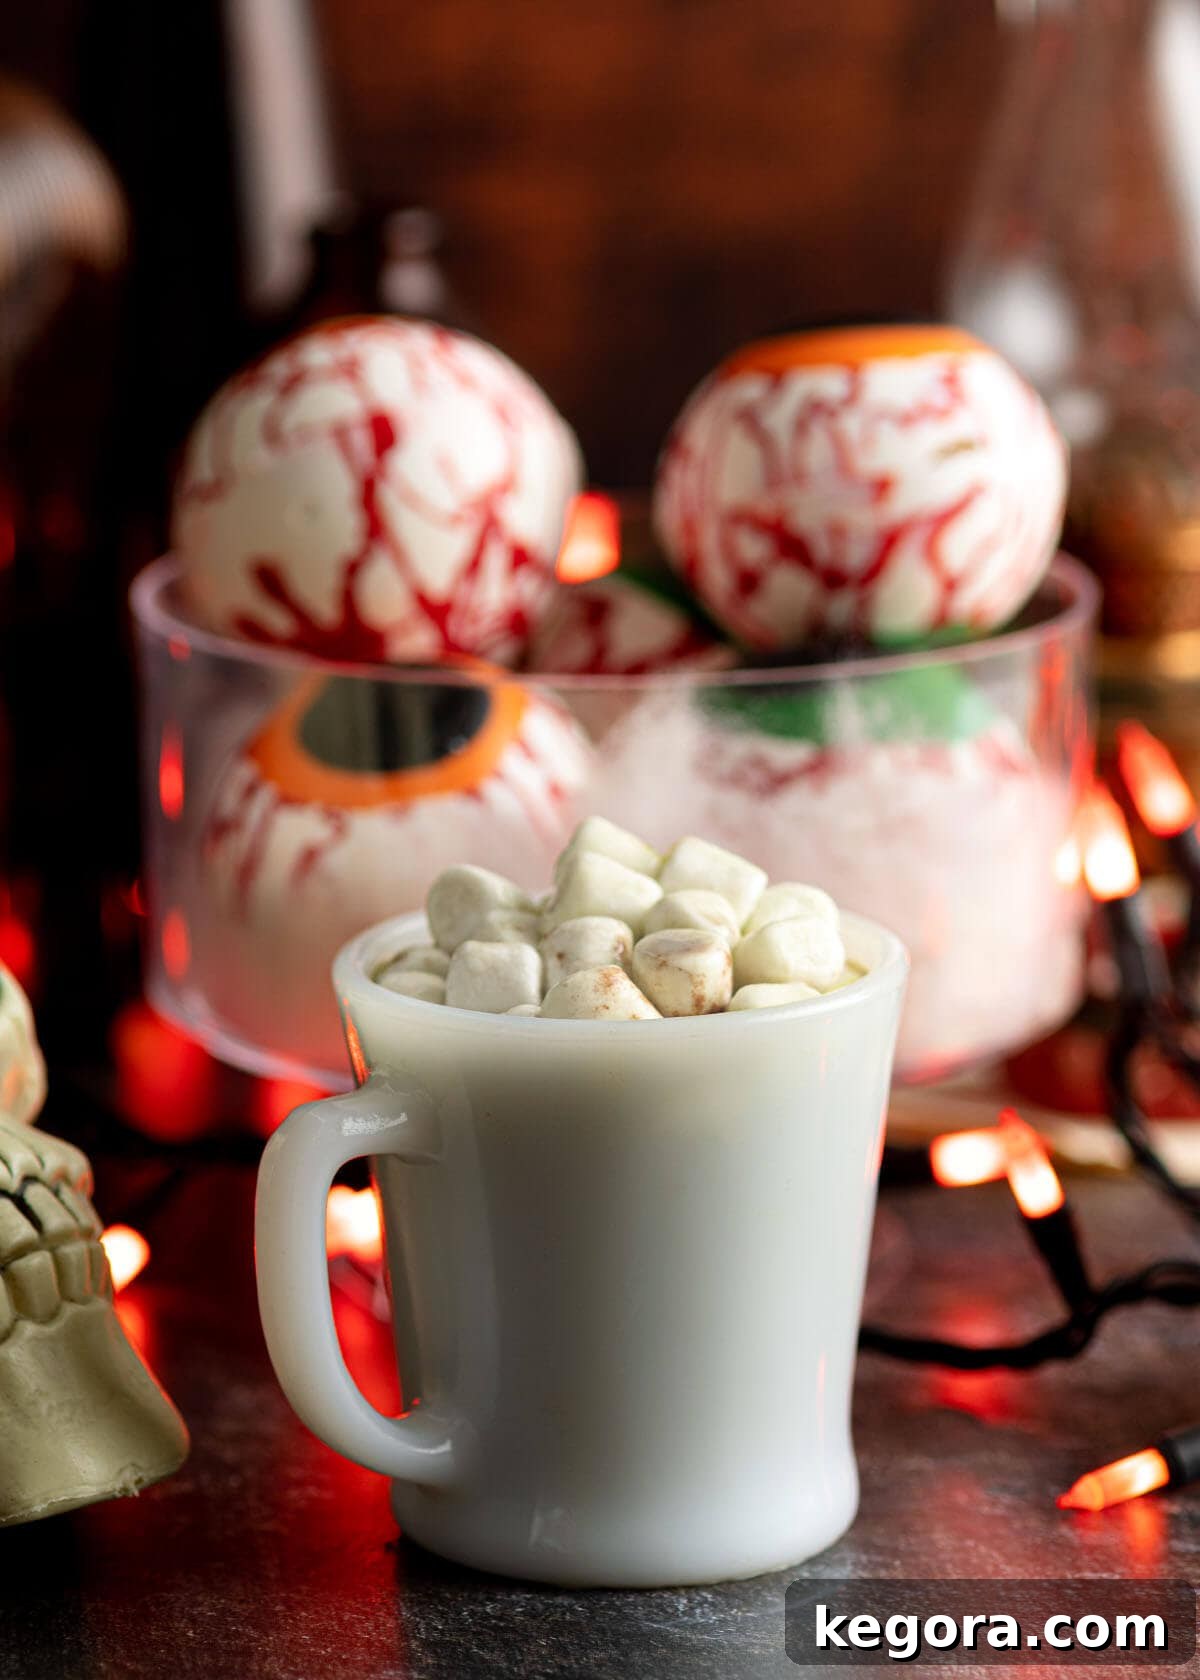
Spooky & Sweet: Crafting Halloween Eyeball Hot Cocoa Bombs
As autumn leaves fall and the air grows crisp, there’s nothing quite like a warm, comforting mug of hot cocoa. But this Halloween, we’re elevating that classic comfort to a whole new level of seasonal excitement. Whether you’re hosting a ghoulish gathering for friends, planning a cozy family movie night, or seeking the perfect sweet reward after an exhausting evening of trick-or-treating, our Halloween Eyeball Hot Cocoa Bombs are the ultimate festive indulgence. They’re an imaginative twist on a popular treat, designed to be as visually captivating as they are delicious.
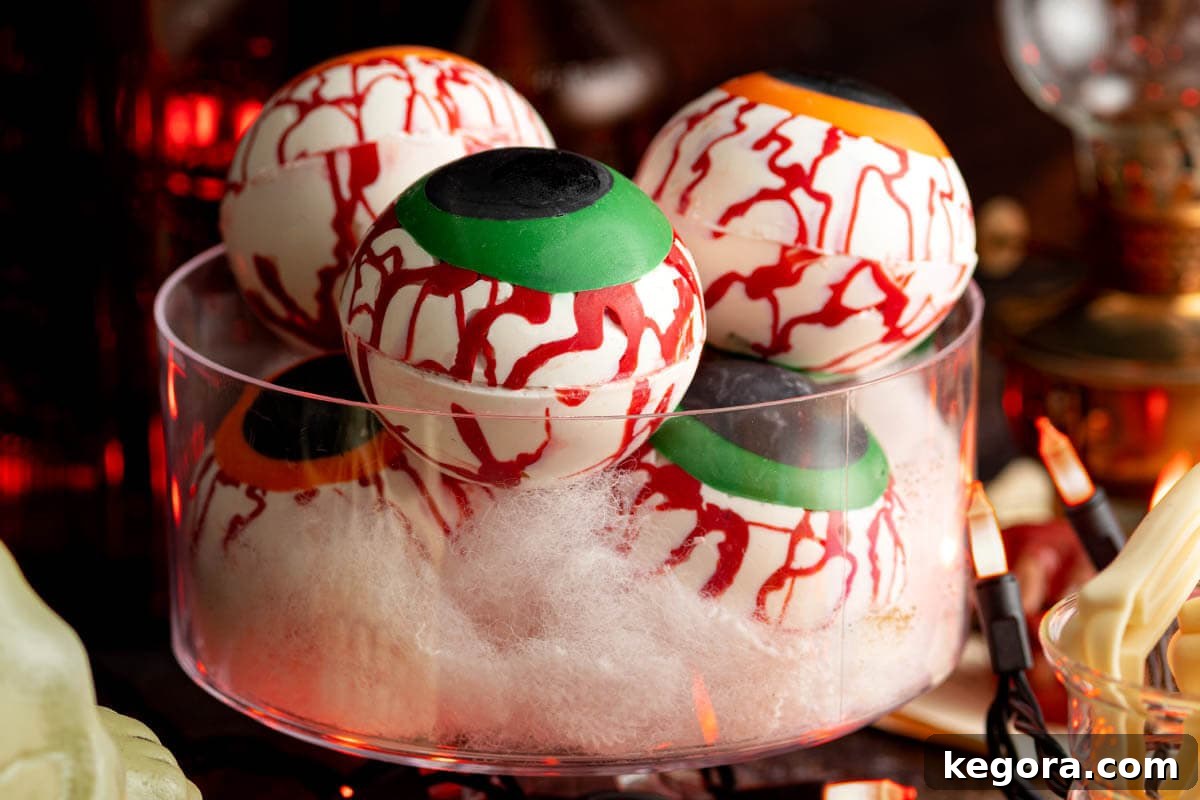
Beyond their delicious taste, these Halloween Eyeball Hot Cocoa Bombs serve as fantastic decorative elements for your Halloween party table. Their intricate, bloodshot eye design instantly transforms an ordinary dessert spread into an extraordinary, themed display. Imagine them nestled amongst other Halloween candies and treats, eagerly awaiting their moment to shine as they “come to life” in a mug of warm milk.
Unveiling the Magic: What Exactly is a Hot Cocoa Bomb?
For those new to the delightful world of hot cocoa bombs, prepare for a revelation! A hot cocoa bomb is essentially a hollow sphere of chocolate or candy melts, meticulously crafted to contain a delightful surprise within. The magic happens when you place one of these edible wonders into a mug and pour steaming hot milk over it. The warm liquid gently melts the candy shell, causing it to “explode” open, releasing a burst of rich hot cocoa mix and an abundance of fluffy mini marshmallows that float to the surface. Once stirred, these ingredients emulsify, creating a smooth, incredibly rich, and utterly spooky hot chocolate drink that’s perfect for the season.
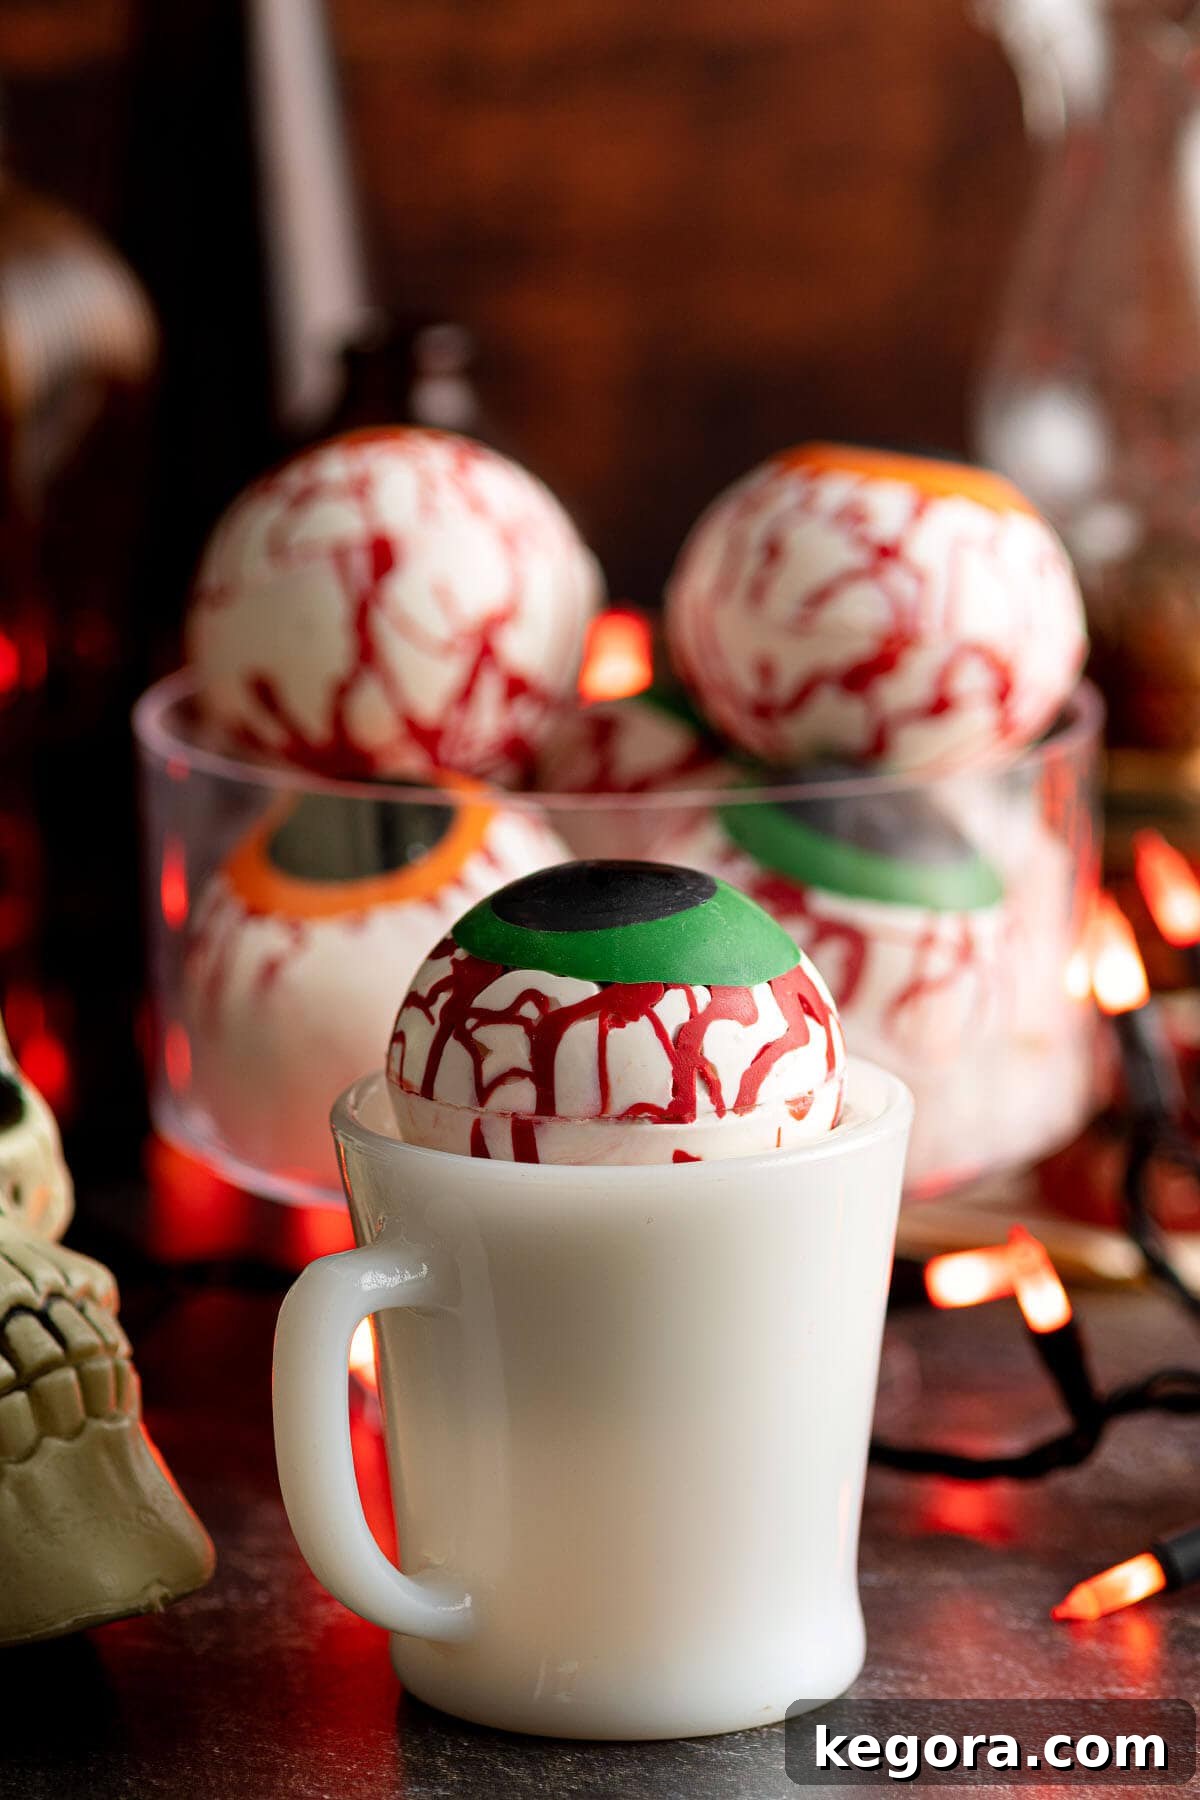
The process is simple yet captivating: just heat your favorite milk, pour it over the cocoa bomb, and watch the enchantment unfold before your eyes. Allow a few moments for the shell to fully melt and for the ingredients to mix, then give it a gentle stir. In an instant, you’ll have a perfectly blended, deliciously spooky beverage ready to enjoy. For younger children, adult supervision is recommended when handling hot milk to ensure safety and prevent any accidental burns.
Sourcing Your Supplies: Where to Find Cocoa Bomb Molds & Ingredients
Embarking on your hot cocoa bomb journey requires a few key tools and ingredients. The most important tool is, of course, a good quality silicone mold. These typically come in half-sphere shapes, allowing you to create two halves that you’ll later join together. While various sizes are available, standard sizes are usually 2.5 to 3 inches in diameter, perfect for a single mug of cocoa. You can often find these molds at craft stores, baking supply shops, or readily available online. We recommend silicone molds for their flexibility, which makes demolding your delicate chocolate spheres much easier.
This post contains Affiliate links. As an Amazon Associate I earn from qualifying purchases.
To help you get started, we’ve provided some convenient Amazon links for essential supplies:
Hot Cocoa Bomb Mold: A good quality silicone mold is crucial for perfectly shaped cocoa bombs.
Melting Chocolate: Candy melts are ideal for their ease of use, vibrant colors, and smooth melting properties. They come in a wide array of shades, making them perfect for our eyeball design.
Oil Based Food Coloring for Chocolate: If you decide to color white candy melts yourself, an oil-based food coloring is non-negotiable. Water-based dyes can cause chocolate to seize and become unusable. This oil-based option ensures a smooth, consistent color.
In addition to these, you’ll also need zipper-style storage baggies or piping bags for controlled chocolate application, and a pastry brush for evenly coating your molds. A microwave-safe bowl for melting and a small plate for sealing the bomb halves are also indispensable.
Mastering the Craft: Step-by-Step Halloween Eyeball Cocoa Bombs Tutorial
Creating these spooky treats is a delightful process that combines a bit of artistry with simple confectionery techniques. Follow these detailed steps to bring your Halloween Eyeball Hot Cocoa Bombs to life:
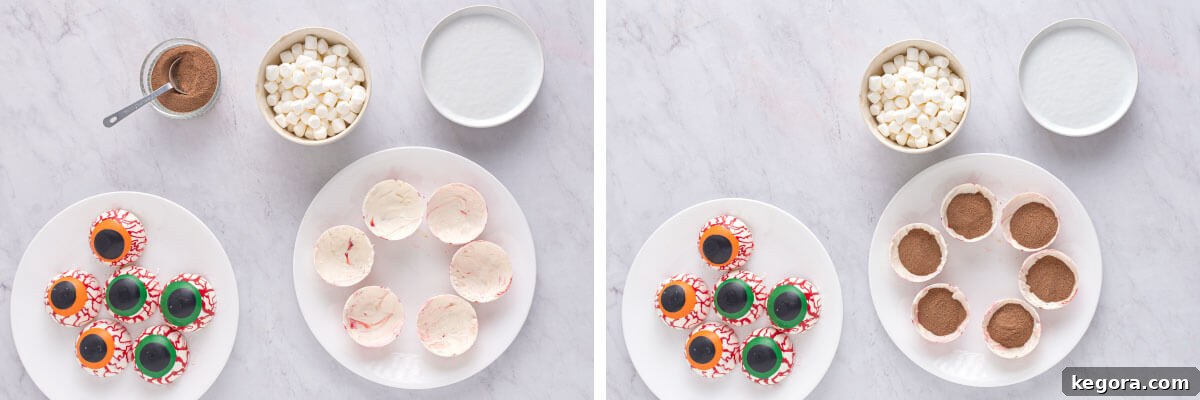
Once your chocolate half-spheres are perfectly formed and removed from their molds, you’re ready for the exciting assembly phase. Carefully pick up one of the bloodshot white chocolate halves that will serve as the bottom of your eyeball cocoa bomb. Into this half, spoon in precisely 1 tablespoon of your favorite milk chocolate hot cocoa mix. This is the heart of your bomb, so choose a quality mix for the best flavor experience.
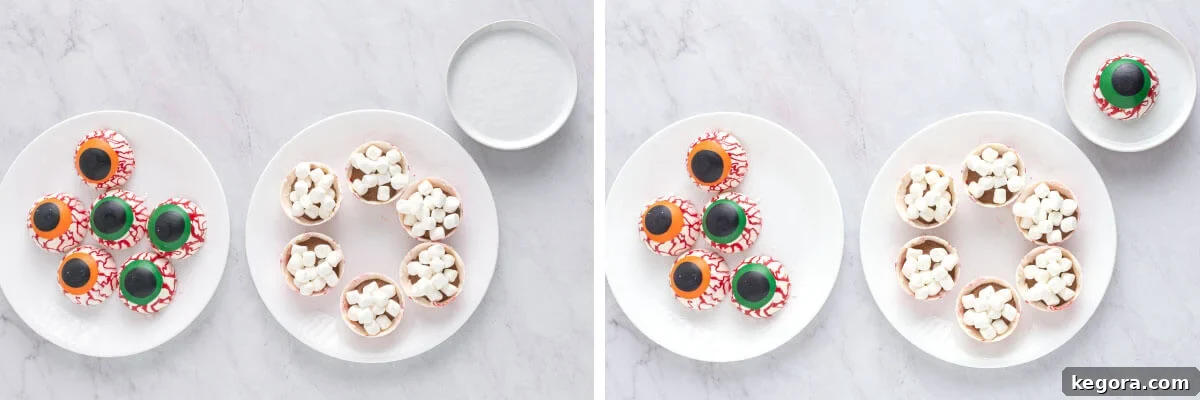
Next, generously sprinkle a handful of mini marshmallows over the cocoa mix. These tiny, fluffy clouds will magically appear when the bomb melts, adding to the visual appeal and creamy texture of your hot chocolate. To join the two halves, warm a small, clean plate in the microwave for about 45 seconds to a minute until it’s comfortably warm to the touch. Quickly place the rim of a top eyeball half onto the warm plate for just a few seconds. This will gently melt the edge, creating a perfect “glue” for sealing.
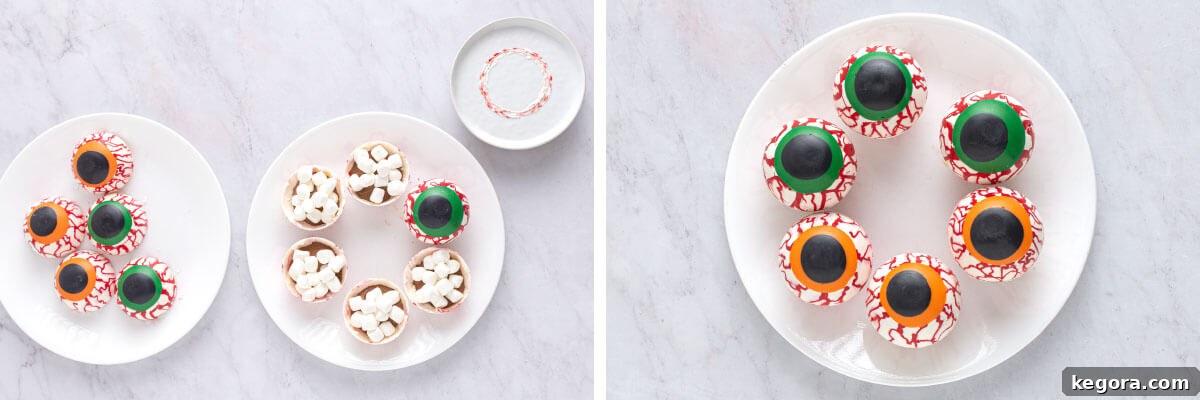
Carefully and quickly place the melted rim of the top eyeball half onto the filled bottom half, aligning them to form a complete sphere. Gently smooth the seam with your clean finger to create a seamless, sturdy bond. Repeat this process for all your remaining cocoa bombs, taking care with each one. Once assembled, allow them to set for a few minutes at room temperature or in the fridge to ensure the seal is firm.
Expert Tips for Perfect Hot Cocoa Bombs
- **Melting with Care:** When working with candy melts, especially white ones, they can be prone to burning if overheated. Always warm them in the microwave in short bursts, no more than 30 seconds at a time. After each interval, stir thoroughly to distribute the heat evenly. If the melts do burn (they’ll become grainy or stiff and smell burnt), it’s best to discard them and start fresh. Ensure your bowl is perfectly clean and dry before each batch to prevent any burnt flavor contamination. If you find even 30 seconds is too long, reduce intervals to 15 seconds. Alternatively, consider using a double boiler method for more controlled, gentle melting, especially for larger quantities.
- **Shell Thickness Matters:** Resist the urge to add excessive amounts of candy melt to your molds. An overly thick shell will not only be harder to fill but will also take longer to melt in your mug, potentially impacting the overall hot cocoa experience. Aim for a coating that is sturdy enough to handle but still relatively thin, allowing for a quicker and more dramatic melt.
- **The Marshmallow Balance:** When assembling your hot cocoa bombs, be mindful of the amount of marshmallows you add. While tempting to overstuff, too many marshmallows can prevent the two halves from sealing properly, leading to a weak bond or a bomb that falls apart. If you’re struggling to “glue” the halves together, try removing a couple of marshmallows and attempting to seal again. The goal is a full but not bursting interior.
- **Humidity & Temperature:** Chocolate and candy melts are sensitive to humidity. On very humid days, they might be stickier and harder to work with. If this happens, try working in a cooler, drier environment. Also, ensure your molds are at room temperature or slightly cool, not cold, to prevent the chocolate from seizing or cracking.
- **Cleanliness is Key:** Always use clean, dry utensils and bowls when working with candy melts. Even a tiny drop of water can cause chocolate to seize and become thick and unusable.
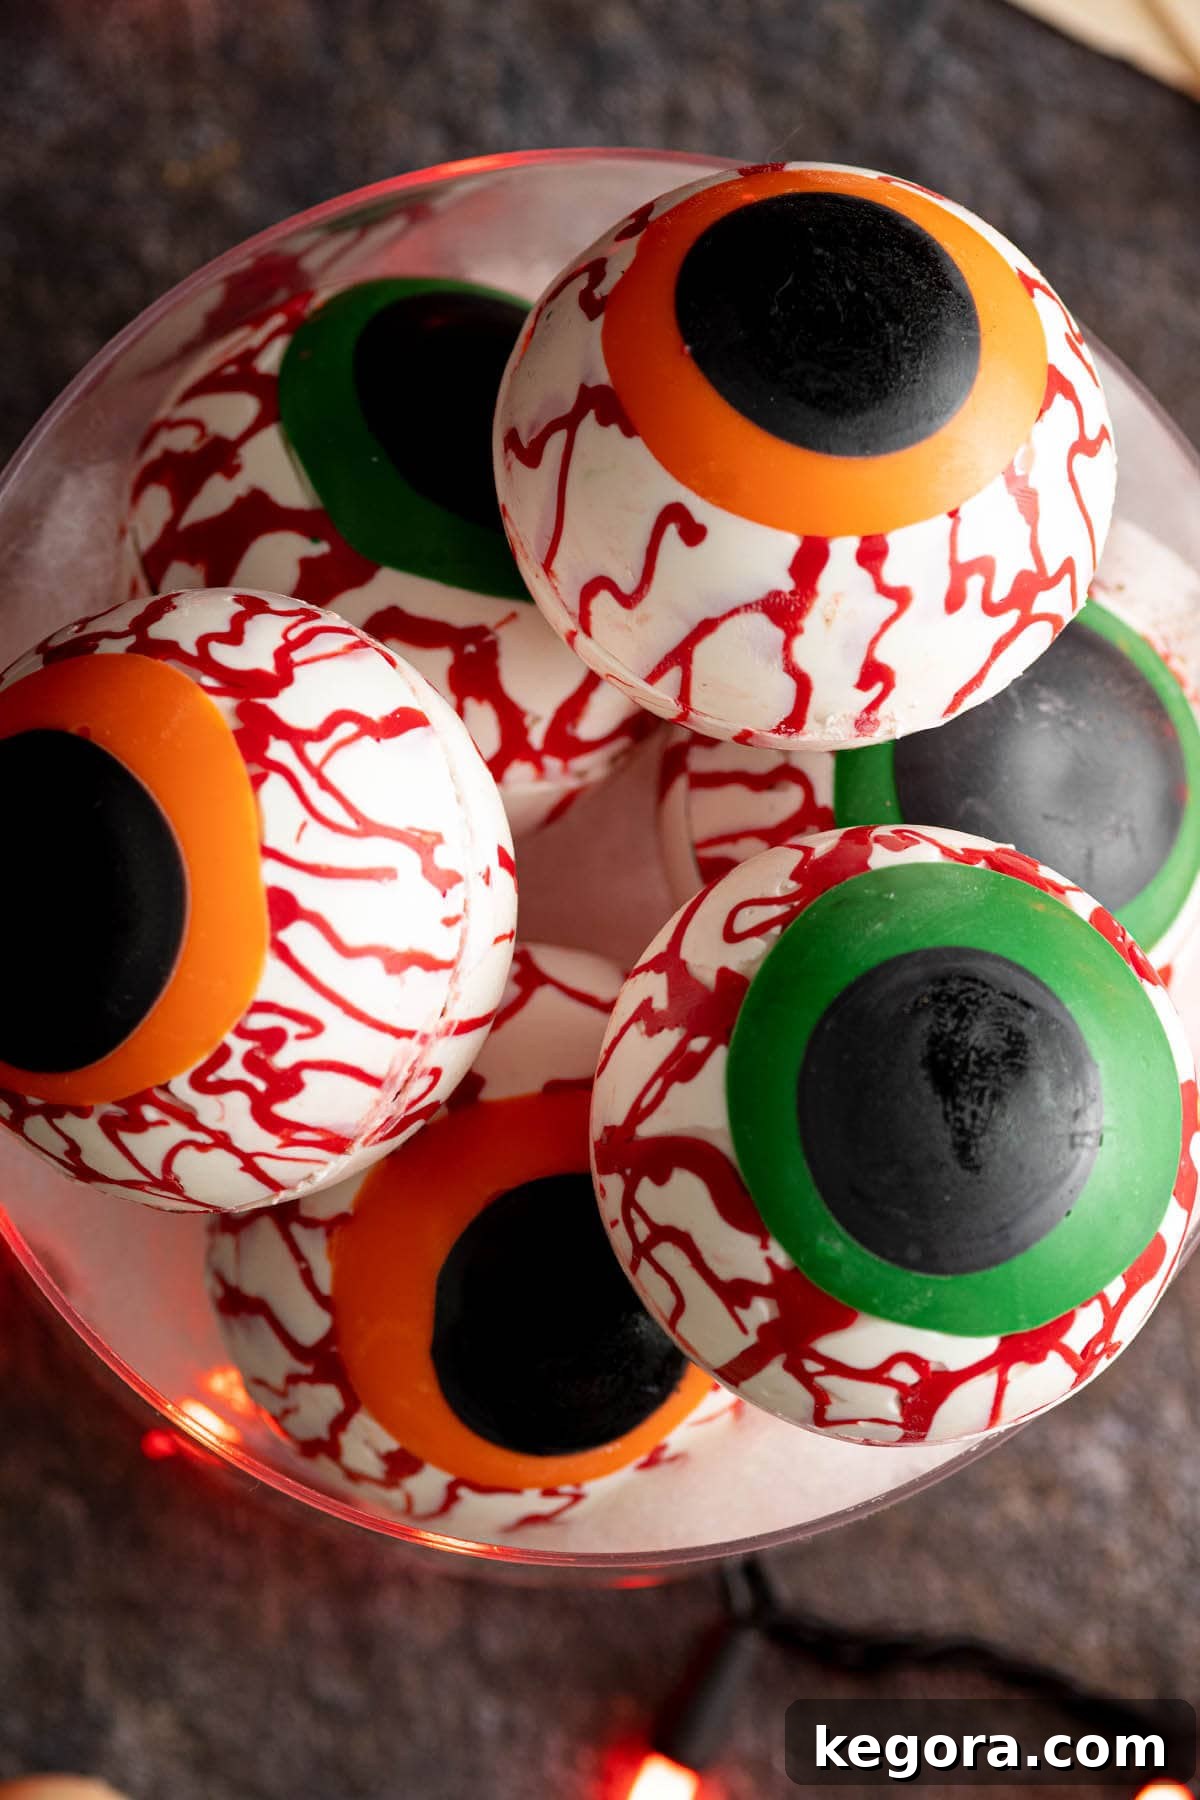
We are incredibly excited for you to try these fun and spooky Halloween Eyeball Hot Cocoa Bombs! They are sure to be a hit with everyone who tries them, bringing both a fright and a delight to your Halloween celebrations. If you decide to make them, please don’t hesitate to share your creations and experiences with us!
Just leave a comment below with a star rating to let us know how much you loved these festive treats. Your feedback not only helps us but also inspires other home bakers in our community. We’d absolutely love to hear how you enjoyed these unique hot cocoa bombs!

**Craving more Halloween magic? Explore some of our other spine-chillingly good recipes:**
White Chocolate Halloween Ghosts
Halloween Witch Hat Cupcakes
Halloween Hot Dog Mummies
Dark Chocolate Halloween Cookies
Halloween Jello Brain Recipe
Spooky Halloween Party Punch
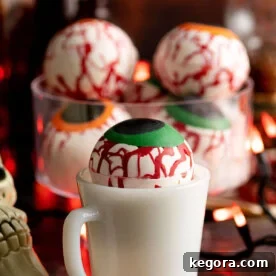
Halloween Eyeball Cocoa Bombs
Print Recipe
Equipment
-
Coco Bomb Molds (silicone half-sphere molds)
-
Oil-Based Food Coloring (if coloring white melts)
-
Zipper Style Storage Baggies or Piping Bags
-
Pastry Brush
-
Microwave-Safe Bowls
-
Small Plate
Ingredients
- ¼ cup Black Chocolate Candy Melts
- ¼ cup Green Chocolate Candy Melts
- ¼ cup Orange Chocolate Candy Melts
- ¼ cup Red Chocolate Candy Melts
- 1 cup White Chocolate Candy Melts
- 6 Tablespoons Milk Chocolate Hot Cocoa Mix
- ½ cup Mini Marshmallows
See Notes About Food Dye for Chocolate (if needed)*
Instructions
-
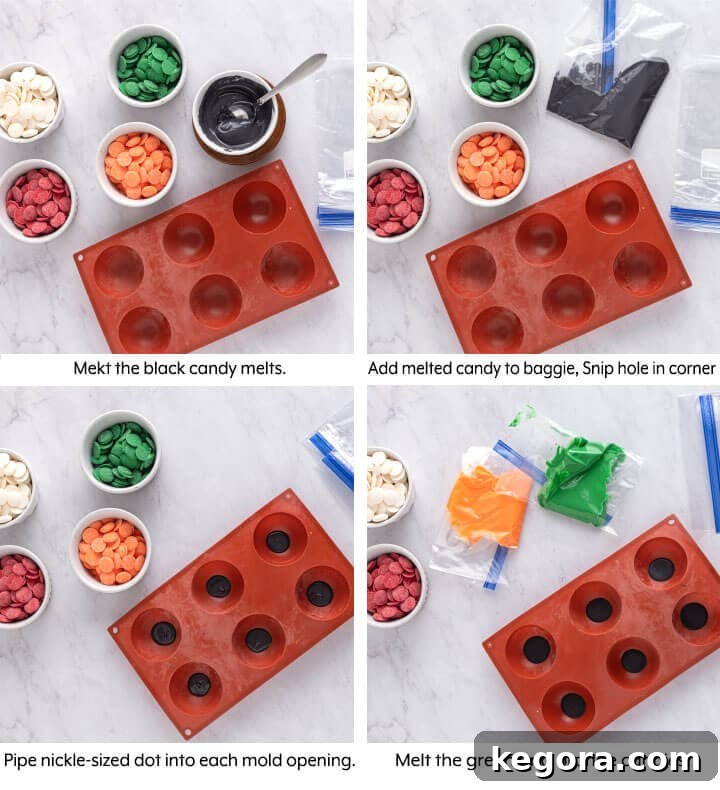
In a small, microwave-safe bowl, gently warm the black candy melts in 30-second intervals, stirring thoroughly after each. This usually takes 30-60 seconds until completely melted and smooth. Transfer the melted black candy into a zipper baggie or piping bag. Snip a small corner to create an opening roughly the size of a nickel. Carefully pipe a quarter-sized circle into the center of 6 half-sphere silicone mold openings. These will form the pupils of your eyeballs. Place the mold into the freezer for 5 minutes to quick-set the chocolate.
-
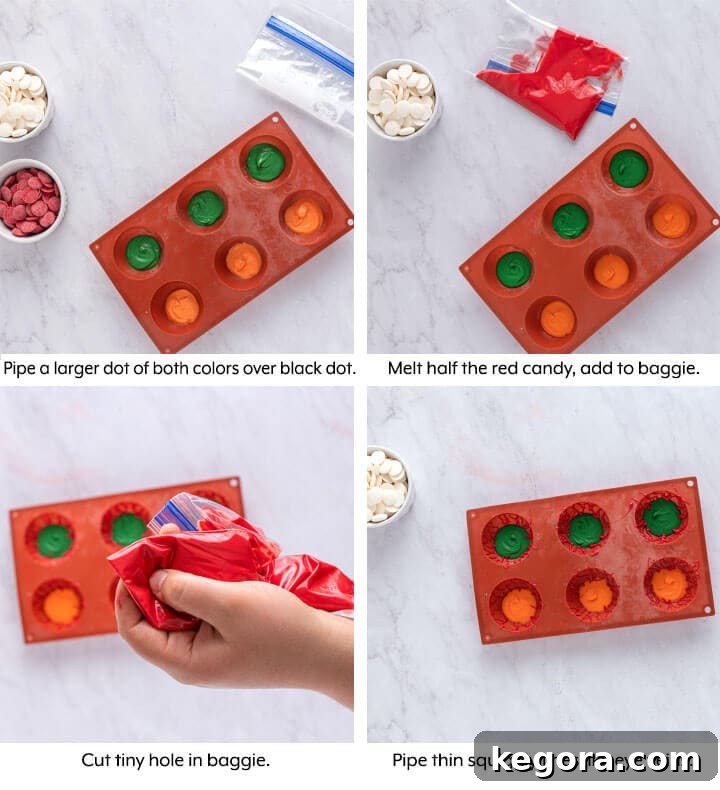
Repeat the melting process for the green and orange candy melts, warming them in two separate bowls in 30-second intervals until smooth (30-60 seconds total for each color). Spoon each melted color into its own baggie and snip a nickel-sized hole in the corner. Pipe a 1-inch round circle of either orange or green on top of each black candy melt pupil. Ensure the colored circle is large enough to form a distinct iris but proportionate to the overall eye. Once all eyes have their irises, return the mold to the freezer for another 5 minutes to quick-set.
-
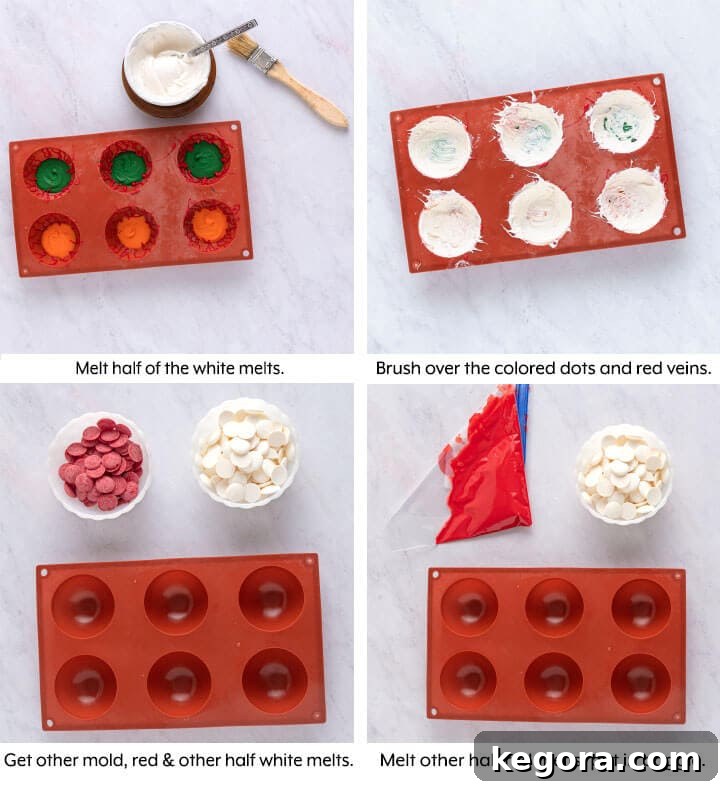
Melt half of the red candy melts using the same 30-second interval method (30-60 seconds total). Once melted, transfer to a baggie and snip a very small hole in one corner – thinner than the previous holes. Now, carefully pipe a pattern of thin, squiggly lines radiating upwards from the iris onto the sides of each half-sphere mold. This creates the “bloodshot” effect. You can adjust the intensity of the bloodshot look by piping more or fewer lines, but avoid over-piping to maintain a realistic appearance. Place the mold back into the freezer for 5 minutes to quick-set the red lines.
-
Melt half of the white candy melts in 30-second intervals, stirring each time, until fully melted and smooth (this may take 60-90 seconds). Using a soft pastry brush, gently but thoroughly brush a thick layer of white candy melt over the entire surface of each mold, covering the pupil, iris, and bloodshot lines. Be particularly gentle and quick when brushing over the thin red lines, as the warmth of the white chocolate can cause them to melt and smudge. Pay special attention to coating the top edges of the molds well, as these will be delicate once removed. Return the mold to the freezer for 5 minutes to set. Once firm, carefully remove the half-spheres from the silicone molds and set aside on a clean surface.
-
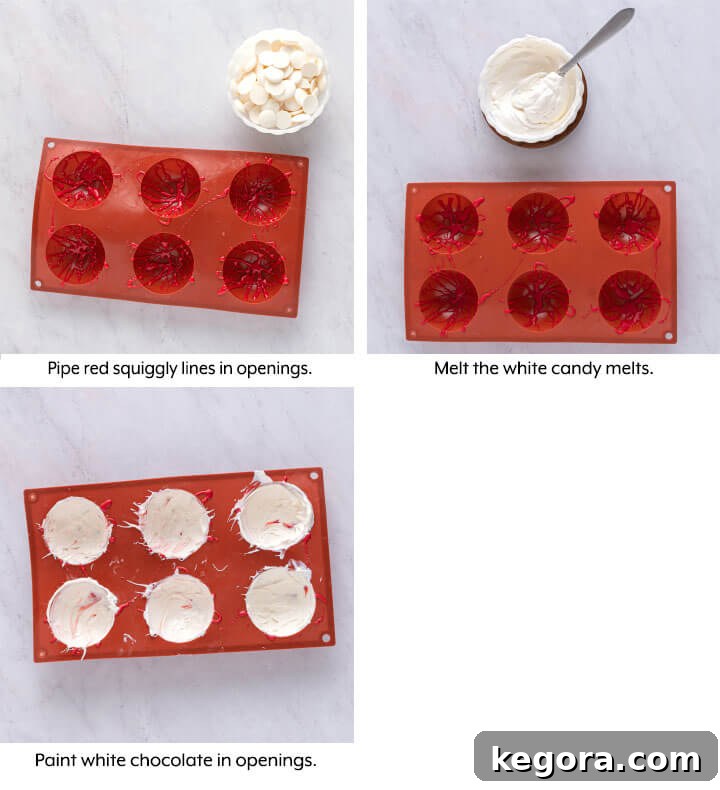
To prepare the bottom halves of your cocoa bombs, melt the remaining red candy melts and repeat the piping process to create the bloodshot squiggly lines within 6 empty half-sphere molds. Freeze for 5 minutes. Next, melt the remaining white candy melts and use a pastry brush to completely coat the entire surface of these half-sphere molds. Freeze for 5 minutes. Once completely set and firm, gently remove these plain white, bloodshot half-spheres from the silicone mold.
-
Now for assembly! Take each plain white, bloodshot half-sphere (these are your bottoms) and fill with 1 tablespoon of milk chocolate hot cocoa mix. Top generously with a few mini marshmallows. Warm a small, clean plate in the microwave for 45 seconds to a minute until warm. Place the rim of a decorative eyeball top half-sphere onto the warm plate for just a few seconds to gently melt its edge. Quickly place the melted edge of the top half onto the filled bottom half, aligning them carefully. Run a clean finger around the seam to smooth and seal the two halves together. Repeat this process for all your remaining spheres.
-
To enjoy your Halloween Eyeball Hot Cocoa Bomb, simply place one into the bottom of your favorite mug. Carefully pour about 8-10 ounces of warm milk over the bomb. Allow the chocolate shell to melt for several seconds, revealing the cocoa mix and marshmallows, before stirring gently to emulsify all the ingredients into a rich, creamy, and wonderfully spooky hot chocolate.
Notes
You will want to use an oil-based food dye for coloring chocolate. It’s crucial to avoid water-based food coloring or gel, as these can cause your chocolate to seize and become unusable, ruining its smooth texture.
Additional Tips:
-
- When warming up the candy melts, particularly white varieties, they are prone to burning at the bottom of the bowl. To prevent this, never warm them for more than 30 seconds at a time in the microwave. After each interval, stir the melts thoroughly to ensure even heat distribution. If the candy melts do burn (they will look grainy, feel stiff, and smell acrid), it’s important to discard them immediately and start over with fresh melts. Before starting a new batch, make sure to wash and completely dry your bowl to prevent any lingering burnt flavor from transferring. If you find that 30-second intervals are still causing burning, reduce the time to 15 seconds and stir diligently after each interval.
- Avoid overfilling the molds with candy melt. Adding more than the recommended amount will create a bomb shell that is too thick. A thick shell will not only be difficult to fill with cocoa mix and marshmallows but will also take a significantly longer time to melt when hot milk is poured over it, diminishing the “bomb” effect.
- If you encounter difficulty “gluing” both halves of your cocoa bomb together securely, the most common culprit is too many marshmallows packed into the middle. The excess filling prevents the melted chocolate edges from making good contact. Simply remove a couple of marshmallows to create enough space for a strong seal, then try to join the halves again.
Storage: These Halloween Eyeball Hot Cocoa Bombs can be stored in an airtight baggie or container at room temperature for up to 2 weeks. For longer storage, you can keep them in the refrigerator for up to 3-4 weeks, or even freeze them for up to 2-3 months. Just ensure they are well-wrapped to prevent moisture and freezer burn.
Nutrition
Nutrition information is automatically calculated, so should only be used as an approximation.