
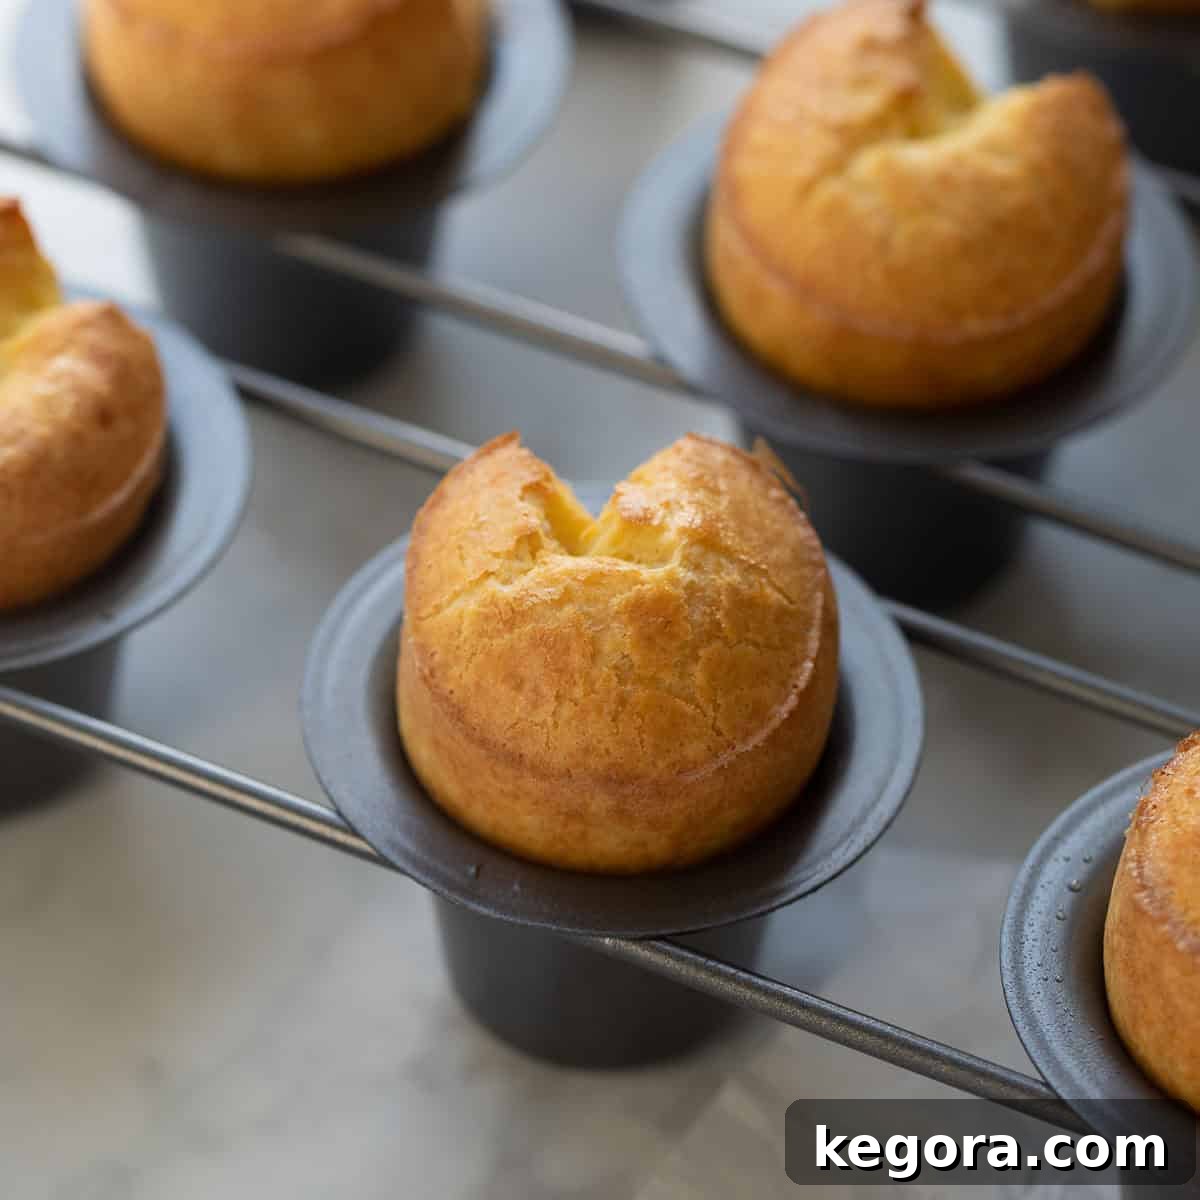
Unlocking the Perfect Gluten-Free Popovers: Erin’s Essential Guide
Welcome to my culinary corner! If you’ve been searching for a foolproof recipe for gluten-free popovers that truly live up to their name, you’ve found it. These delightful, airy creations are a staple in my kitchen, and I’m thrilled to share all my secrets to achieving popover perfection, even without gluten.
Taste and Texture: A Symphony for Your Senses
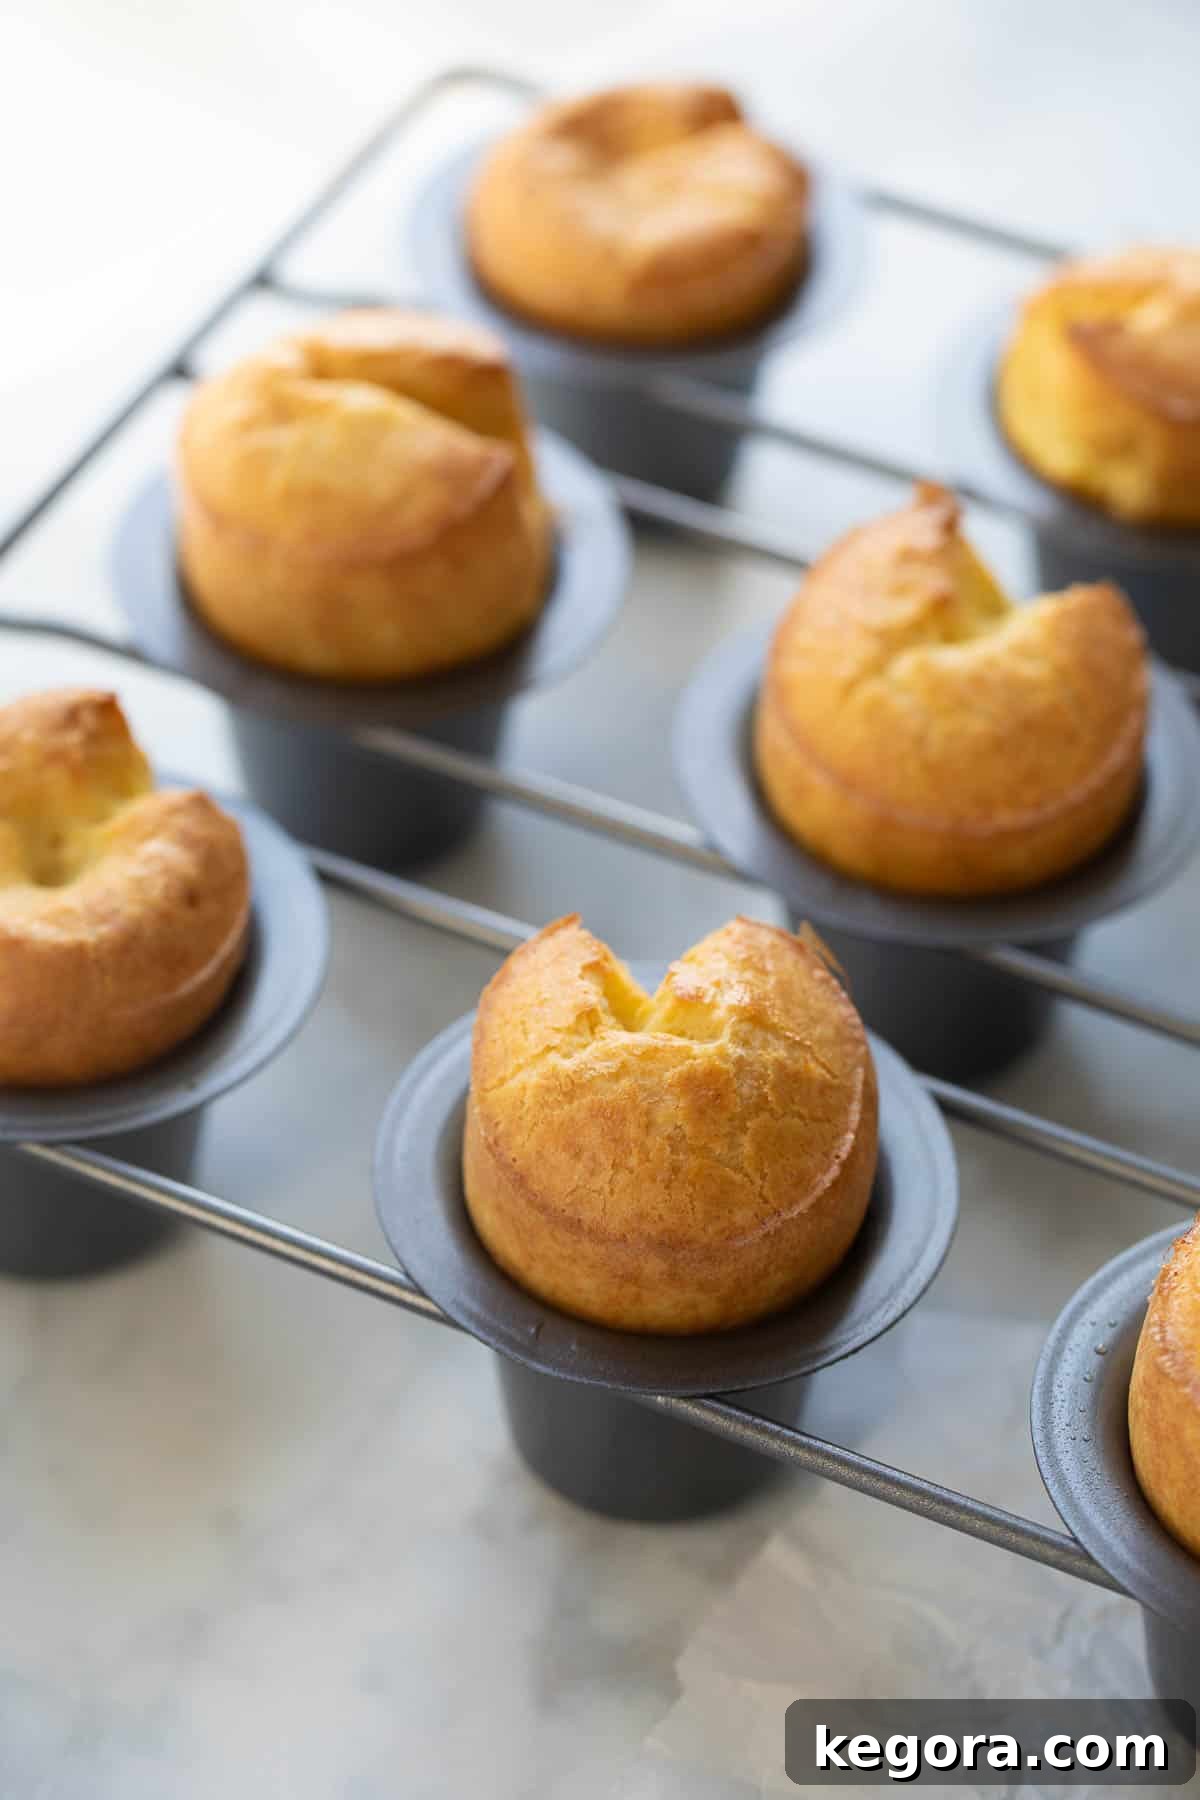
Texture: Imagine a cloud-like interior, incredibly delicate and moist, encased in a beautifully crisp, golden-brown shell. That’s the signature texture we’re aiming for with these gluten-free popovers. The contrast between the tender, custardy inside and the slightly crunchy exterior is what makes popovers so irresistible and distinct from ordinary bread rolls. Each bite offers a satisfying crunch followed by a melt-in-your-mouth experience.
Taste: These popovers boast a rich, creamy flavor profile, perfectly balanced with just the right touch of saltiness. They’re savory enough to complement any meal, yet mild enough to be adorned with sweet toppings. The subtle hints of butter and milk create a comforting, wholesome taste that will have everyone reaching for seconds, completely unaware they’re enjoying a gluten-free treat.
Effortless Baking: Simplicity with Pantry Staples
Ease: You’ll be amazed at how simple these homemade popovers are to whip up. This recipe relies on common pantry staples, meaning you likely have most ingredients on hand already. No need for exotic flours or complex techniques. Plus, don’t worry if you don’t own a specialized popover pan! A regular muffin pan works wonderfully, allowing you to enjoy these delightful baked goods without any extra equipment.
My Top Tips for Popover Success
Top Tips: The secret to popovers that rise dramatically and cook evenly all the way through lies in a specific baking technique. We start the oven at a higher temperature to create an initial burst of steam, which forces the batter upwards, resulting in those characteristic tall, hollow centers. Then, we reduce the temperature to ensure they bake thoroughly without burning the exterior. This two-stage baking process is absolutely crucial for achieving the perfect popover structure and is easier than it sounds!
Choosing the Best Gluten-Free Flour Blend
Recommended GF Flour: For the ideal texture and rise in these gluten-free popovers, the right flour blend makes all the difference. I consistently achieve excellent results using King Arthur Flour Gluten-Free Measure-for-Measure Flour. This blend is reliable and typically includes xanthan gum, which is vital for gluten-free baking as it provides structure. To further enhance the crumb and moisture, I add a touch of Bob’s Red Mill Gluten-Free Oat Flour. This combination creates a perfect balance, ensuring your popovers are light, airy, and flavorful.
A Recipe You’ll Cherish
Would I make these again? Absolutely, without a doubt! These gluten-free popovers may appear fancy and elaborate, but their ease of preparation makes them a joy to bake repeatedly. They are total crowd-pleasers, suitable for any occasion – from a relaxed Sunday breakfast to an elegant dinner side, or even a comforting snack. Once you try them, they’ll become a beloved part of your culinary repertoire!
xoxo erin
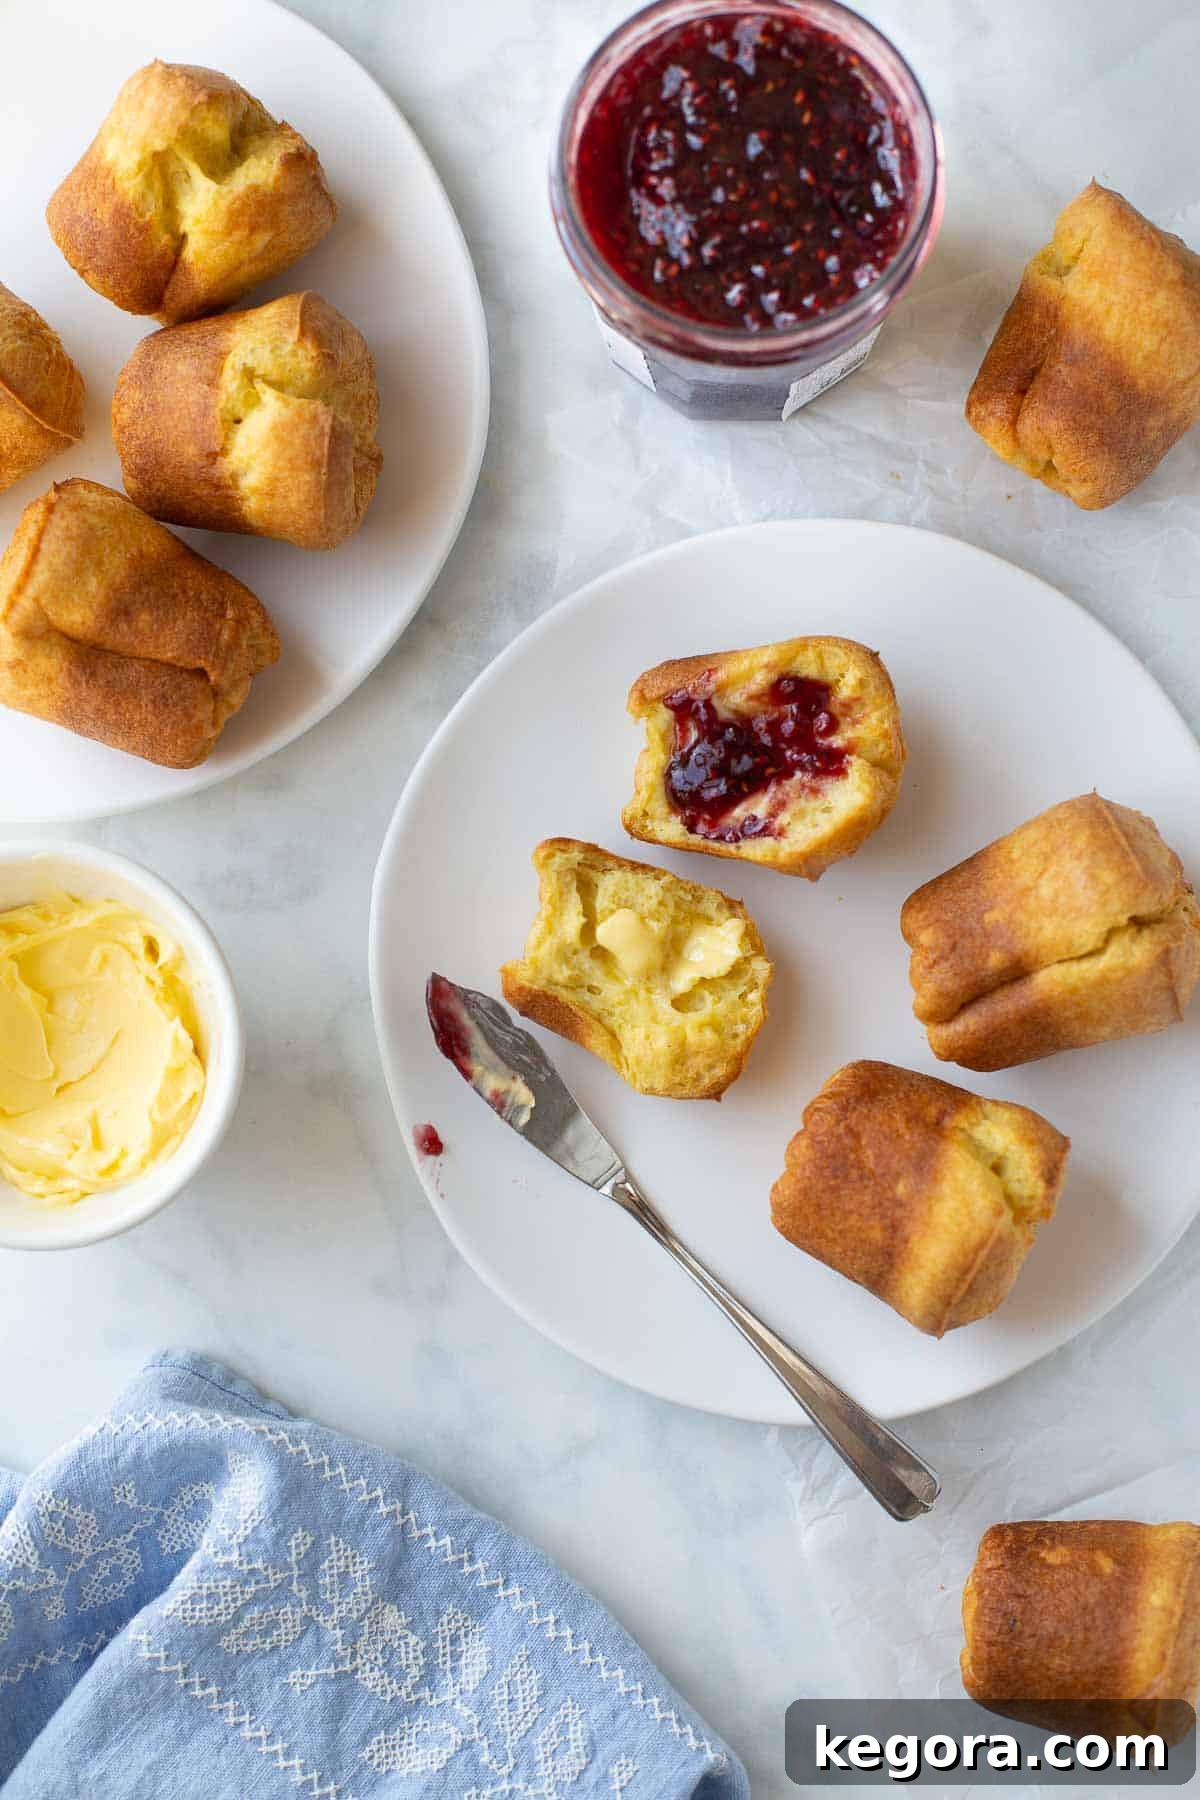
Discover the Magic of Gluten-Free Popovers
Popovers are a unique and delightful alternative to traditional dinner rolls, offering an unparalleled lightness and a distinct custardy interior. Far from dense and heavy, these savory pastries rise dramatically in the oven, creating impressive, airy shells. Imagine a delicate, almost hollow center that’s wonderfully tender, contrasting beautifully with a crisp, golden-brown exterior. They are truly a culinary marvel, and with this easy popover recipe, you can enjoy them even if you’re following a gluten-free diet.
This gluten-free popovers recipe is a testament to the fact that you don’t have to sacrifice flavor or texture when avoiding gluten. We’ve perfected a method that yields all the classic popover characteristics—the towering height, the crispy crust, and that wonderfully custardy inside—without a trace of gluten. In fact, most people won’t even realize they’re gluten-free, making them an ideal choice for entertaining or simply enjoying with family.
The versatility of these homemade gluten-free popovers is one of their greatest strengths. They’re perfect for any meal or occasion. Start your day with them alongside a warm cup of coffee, perhaps with a smear of jam for a comforting gluten-free breakfast. They make an excellent accompaniment to a hearty lunch, adding a touch of elegance to your midday meal, or serve them as a unique and cozy side dish with dinner. They’re even fantastic as a quick, satisfying snack. Their delicate flavor profile means they pair beautifully with both sweet and savory toppings, making them a truly adaptable addition to your menu.
Featured Comment from Our Community
From Gayle: “These are absolutely delicious! Popovers are one of the things I have missed the most since going GF. I think they are just as good as a flour version. Thank you for sharing this awesome GF recipe!”
See 28 more comments
Table of Contents
- Unlocking the Perfect Gluten-Free Popovers: Erin’s Essential Guide
- Essential Ingredients for Gluten-Free Popovers
- Step-by-Step Guide: How to Make Gluten-Free Popovers
- Make-Ahead, Storage, and Freezing Tips
- Can these Gluten-Free Popovers Be Made Dairy-Free?
- Troubleshooting: Why Did My Popovers Deflate?
- Serving Suggestions for Your Gluten-Free Popovers
- Pro Tips for Achieving Perfect Popovers Every Time
- More Delightful Gluten-Free Breakfast Recipes
- Gluten-Free Popovers Recipe Card
Essential Ingredients for Gluten-Free Popovers
Crafting these delectable gluten-free popovers requires a few key ingredients, each playing a crucial role in achieving that perfect rise and tender texture. Here are some detailed notes on the stars of our recipe. For precise measurements, be sure to jump to the full recipe card below.
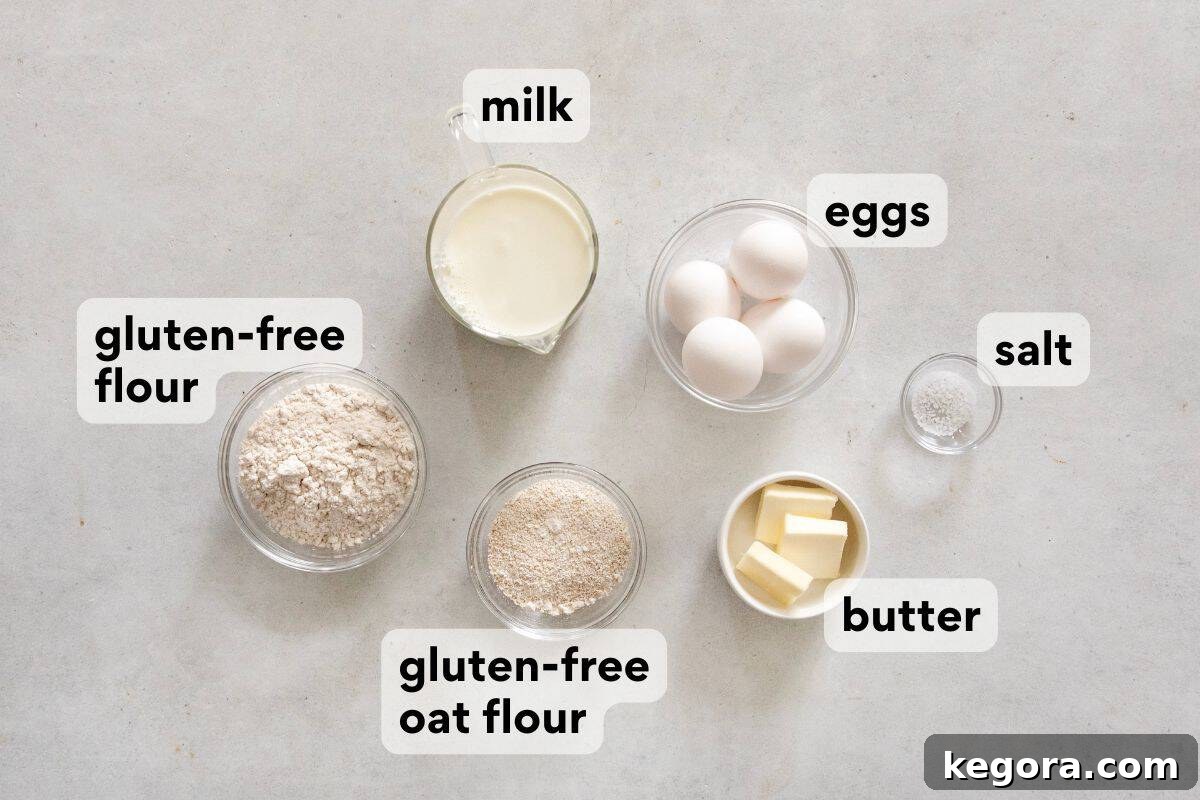
- Gluten-Free Flour Blend: The foundation of our gluten-free popovers. I highly recommend using King Arthur Flour Gluten-Free Measure-for-Measure Flour. This particular blend is fantastic for many baked goods because it’s designed to substitute traditional wheat flour in equal measure. Crucially, it contains xanthan gum, a vital ingredient in gluten-free baking that mimics the elasticity and binding properties of gluten, providing structure and preventing your popovers from crumbling. Using a high-quality blend will ensure the best possible rise and texture.
- Gluten-Free Oat Flour: While the measure-for-measure blend provides structure, a small addition of gluten-free oat flour contributes significantly to the popovers’ moisture and tenderness. It helps to create a softer, more balanced crumb and prevents the final product from being too dry or dense. This subtle addition makes a noticeable difference in the overall eating experience, giving the popovers a pleasant, wholesome flavor.
- Milk: I prefer to use 2% milk for this recipe. The moisture content is obvious, but the fat in 2% milk is equally important. It helps ensure the insides remain wonderfully custardy and decadently tender. Cold milk can shock the batter and hinder the rise, so it’s essential that your milk is at room temperature before mixing it with the butter and eggs. For those needing a dairy-free option, any unsweetened dairy-free milk alternative, such as almond milk or soy milk, can be used successfully.
- Eggs: Eggs are critical for structure and lift in popovers. They provide volume and richness, contributing to the airy texture. Just like the milk, it is absolutely vital to bring your eggs to room temperature before incorporating them into the batter. Room temperature eggs emulsify more easily with other ingredients, creating a smoother batter and allowing for a better rise. A quick trick is to place them in a bowl of hot tap water for about 10 minutes to speed up the warming process.
- Butter: Melted butter adds a delightful savory depth to the flavor profile of the popovers. Beyond taste, butter plays a significant role in achieving that desirable golden-brown and crisp exterior while keeping the interiors soft and rich. The fat content contributes to the tender crumb. If you’re making dairy-free popovers, simply substitute with a good quality vegan butter. Keep in mind that vegan butter might not brown as intensely as dairy butter, but the popovers will still taste absolutely amazing.
Step-by-Step Guide: How to Make Gluten-Free Popovers
Making gluten-free popovers is a straightforward process that yields impressive results. Follow these steps carefully to ensure your popovers are tall, airy, and perfectly golden. For complete and detailed instructions, remember you can jump to the full recipe card.
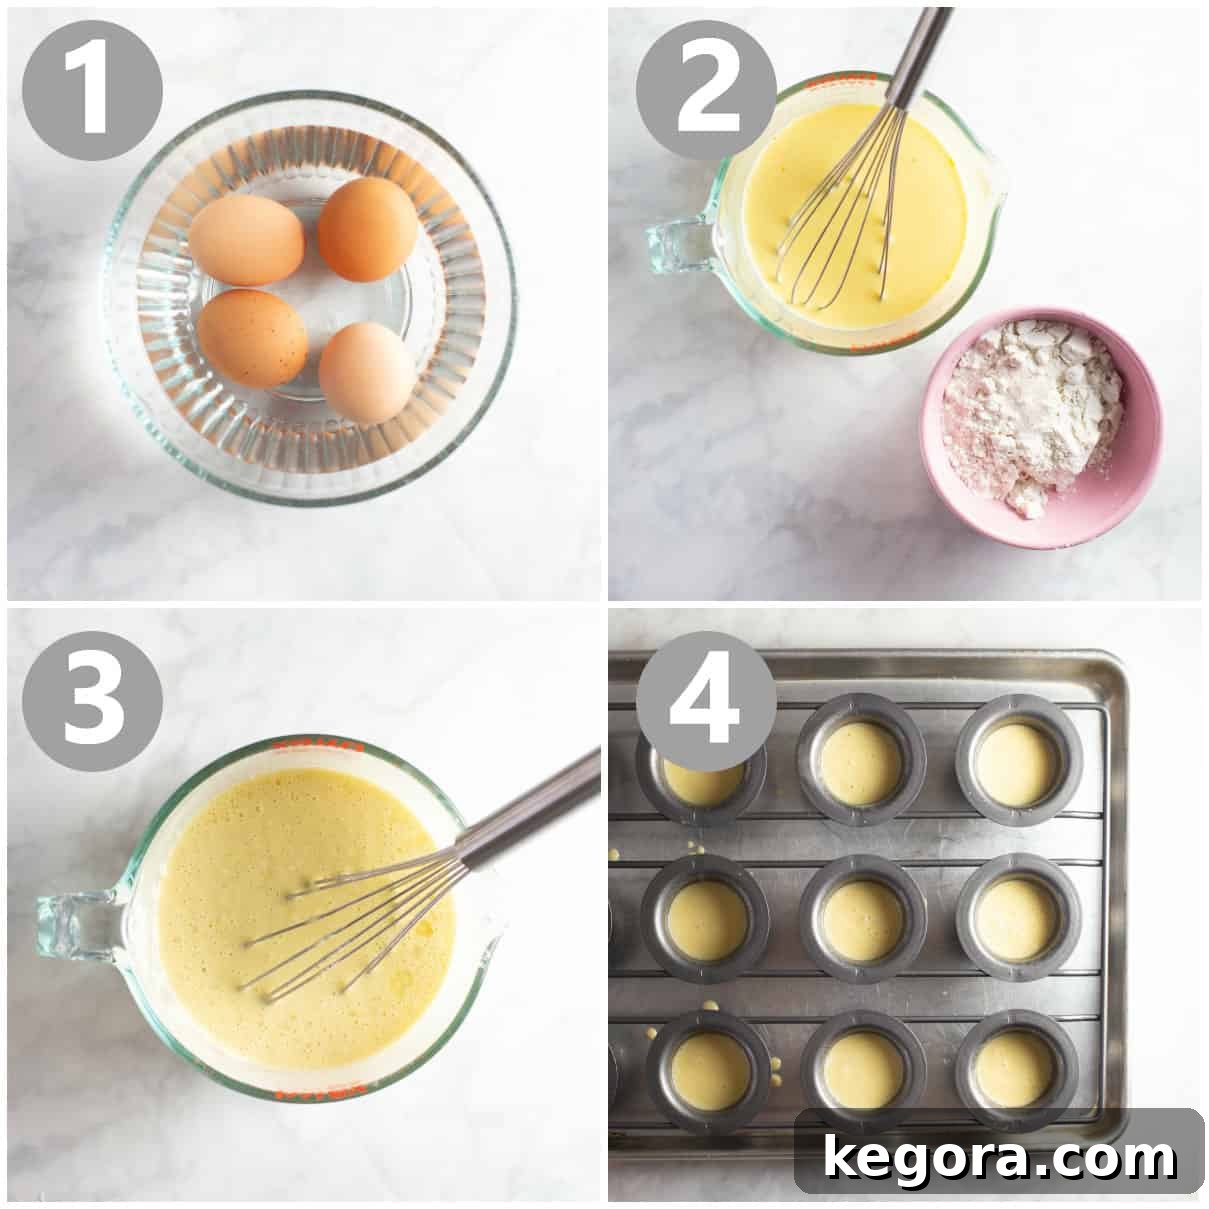
- Prepare Ingredients to Room Temperature: This is a critical first step for achieving the best rise. Room temperature eggs and milk emulsify better, creating a smoother, more uniform batter that traps air efficiently. If you forget to set out your eggs in advance, a quick trick is to place uncracked eggs in a medium bowl and cover them with hot tap water. Let them sit for about 10 minutes. For the milk, you can gently microwave it for a short burst until it’s just warm to the touch, not hot. This preparation ensures all ingredients are at an optimal temperature for mixing.
- Combine the Wet Ingredients: In a blender jar, combine your room temperature eggs, milk, and melted butter. Pulse the mixture briefly, just a few times, until everything is smooth and well-incorporated. The goal here is to combine, not to aerate excessively. Alternatively, you can whisk these ingredients together in a large measuring cup or bowl. The key is to avoid overmixing the batter at this stage, as too much agitation can hinder the popovers’ ability to rise.
- Incorporate the Dry Ingredients: To the wet ingredient mixture, add both the gluten-free measure-for-measure flour and the gluten-free oat flour, along with the kosher salt. If using a blender, pulse again very briefly, just until the dry ingredients are barely combined with the wet. If hand-whisking, gently fold the dry ingredients into the wet mixture until no streaks of dry flour remain. I cannot stress this enough: do not overmix the batter! Overmixing, even with gluten-free flour, can lead to tougher popovers and can compromise their signature light, airy texture. A few small lumps are perfectly fine and even desirable.
- Prepare Your Pan and Bake: Preheat your oven to a high temperature of 450°F (230°C). Thoroughly spray your 12-count petite popover pan with cooking spray to prevent sticking. If you don’t have a popover pan, a regular 12-cup muffin pan works as an excellent substitute, though your popovers may not achieve the same dramatic height. Pour the prepared batter into each cup, filling them approximately two-thirds full. Bake at 450°F for 15 minutes. This initial high heat creates intense steam, which is responsible for the rapid, dramatic rise of the popovers.
- Finish Baking and Serve: After the initial 15 minutes at high heat, reduce the oven temperature to 350°F (175°C) without opening the oven door. Continue baking for an additional 10-15 minutes, or until the popovers are deep golden brown and firm. It’s crucial not to open the oven door during baking, especially during the first phase, as this can cause them to deflate. Once baked, remove the popovers from the oven immediately. Using a sharp knife, carefully poke a small hole in the side of each popover. This allows the trapped steam to escape, preventing them from collapsing as they cool. Serve these incredible easy homemade popovers piping hot for the very best texture and flavor!
Make-Ahead, Storage, and Freezing Tips
While popovers are undeniably best enjoyed fresh from the oven, there are a few strategies you can employ to minimize prep time or handle leftovers. Understanding the best practices for making ahead, storing, and freezing will help you enjoy these gluten-free delights to their fullest.
To Make-Ahead: If you’re planning a special meal and want to save time, you can prepare the popover batter up to 12 hours in advance. Simply follow the mixing instructions, then pour the batter into your prepared popover or muffin pan. Cover the pan tightly with plastic wrap and refrigerate. When you’re ready to bake, simply remove the pan from the refrigerator and proceed with the baking instructions. This flexibility allows you to enjoy freshly baked popovers with minimal last-minute effort.
To Store Leftovers: As mentioned, popovers are truly at their peak when served hot. However, if you find yourself with leftovers, they can be stored. The most important step for storing is to ensure they cool completely on a wire rack immediately after baking. This crucial step prevents moisture buildup, which can lead to soggy popovers. Once thoroughly cooled, store them in an airtight container at room temperature. They will retain their quality for up to 2 days, though their crispy exterior will soften over time.
To Reheat: To bring stored popovers back to life, you can gently reheat them in a preheated oven (around 350°F / 175°C) for a few minutes until warmed through and slightly crisp again. Be careful not to overheat, as they can dry out.
To Freeze: Freezing baked popovers is generally not recommended. The delicate, airy texture that makes popovers so special tends to change significantly after freezing and thawing. They often become dense and lose their characteristic crispness and rise. For this reason, I advise against baking these easy gluten-free popovers ahead of time with the intention of freezing them. It’s best to enjoy them fresh or store them for a short period at room temperature.
Can these Gluten-Free Popovers Be Made Dairy-Free?
Absolutely, yes! This recipe is incredibly adaptable and can be easily made dairy-free without compromising on flavor or texture. To convert this to a dairy-free popover recipe, simply swap out the traditional milk for your favorite unsweetened dairy-free milk alternative, such as almond milk, soy milk, or oat milk. Additionally, replace the butter with a high-quality vegan butter. While dairy-free popovers might not achieve the exact same level of golden-brown crispness on the exterior due to differences in fat and protein content, they will still be wonderfully delicious, light, and airy. The taste and overall experience will remain fantastic for those avoiding dairy.
Troubleshooting: Why Did My Popovers Deflate?
One of the most common issues with popovers, gluten-free or not, is deflation. There are a couple of primary reasons this can occur, but the most crucial preventative measure is simple: it is very important to immediately poke a small hole in the side of each popover as soon as they come out of the oven. This action allows the superheated steam that has built up inside the popovers during baking to escape gradually. If too much steam remains trapped within the popovers, it creates internal pressure that can cause them to collapse or deflate rapidly as they begin to cool. Using a sharp knife for this step ensures a clean, quick release of steam, helping your popovers maintain their impressive height and airy structure. Another factor could be underbaking; if the internal structure isn’t fully set, it can’t support itself once removed from the heat.
Serving Suggestions for Your Gluten-Free Popovers
The versatility of this easy popover recipe means they can be served in countless ways, adapting beautifully to both sweet and savory accompaniments. They are truly amazing simply plain, allowing their rich, subtle flavor and delightful texture to shine through. For a classic experience, a generous smothering of good quality butter is always a winner, melting into the warm, custardy interior.
If you’re looking to elevate the experience, offer additional toppings. For a sweet treat, homemade fruit jam, citrus marmalade, or a drizzle of honey are excellent choices. A sprinkle of cinnamon sugar or a dusting of powdered sugar can also add a delightful touch. For savory pairings, cream cheese, a slice of sharp cheddar, or even a dollop of herbed butter can transform your popovers into something truly special.
These gluten-free popovers are perfect alongside a wide array of dishes. They complement classic breakfast favorites like scrambled eggs, bacon, and fresh fruit. For lunch or dinner, they make an elegant and light side to roasted meats, hearty stews, or grilled fish. Don’t forget to consider them with comforting soups and fresh salads, where their delicate texture can add an interesting contrast. Whether you’re planning a casual brunch or a festive holiday meal, these popovers are sure to impress your guests and become a beloved addition to any table.
Pro Tips for Achieving Perfect Popovers Every Time
Baking perfect popovers, especially gluten-free ones, is an art form that’s surprisingly easy to master with a few key techniques. Follow these expert tips to ensure your homemade popovers are always tall, airy, and utterly delicious.
- Do Not Overmix the Batter! This is perhaps the most crucial rule for any popover recipe. Unlike traditional bread, we are not trying to develop gluten. Even with gluten-free flour, excessive mixing can incorporate too much air initially, leading to a less stable structure, or make the batter too elastic. You want the milk, melted butter, and eggs to be just combined. Once you add the flours and salt, mix them in gently and briefly until just incorporated. A few small lumps are perfectly acceptable and even preferred over an overmixed, smooth batter. Overmixing can result in tougher, shorter popovers.
- Ensure Ingredients Are at Room Temperature: As highlighted in the ingredients section, using room temperature milk and eggs is essential. Cold ingredients can make the batter lumpy and prevent proper emulsion, hindering the popovers’ ability to rise correctly. Room temperature ingredients blend smoothly, creating a uniform batter that allows for maximum steam production and an impressive rise.
- Keep the Oven Door Shut the Entire Time! This tip cannot be emphasized enough. It’s incredibly tempting to peek at those magnificent popovers as they puff up, but resisting the urge is paramount. Each time the oven door is opened, the internal temperature drops significantly, causing the popovers to cool rapidly and potentially deflate. The heat is what creates the steam that makes them “pop.” If you simply must see them, use your oven light to observe their progress through the glass.
- Preheat Your Pan: For an even better rise and a crispier bottom, consider preheating your popover or muffin pan in the oven for a few minutes before adding the batter. A hot pan helps the batter set quickly upon contact, contributing to a more dramatic initial lift and preventing a “soggy bottom.”
- Fill Cups Properly: Don’t overfill your popover cups. Filling them about two-thirds full is the sweet spot. Too little batter, and they won’t achieve maximum height; too much, and they might overflow or become too dense.
- Serve the Popovers Immediately. Popovers are truly at their peak when they are piping hot, straight out of the oven. Their crispy exterior and delicate, custardy interior begin to soften and become less distinct as they cool. For the ultimate enjoyment, have your butter and jam ready, and serve them as soon as they’re out of the oven and you’ve poked the steam holes. I particularly love them generously smothered with butter!
More Delightful Gluten-Free Breakfast Recipes
If you loved these gluten-free popovers, you’re in for a treat! We have a fantastic collection of other delicious gluten-free breakfast recipes that are just as easy and satisfying. Expand your gluten-free repertoire with these proven favorites:
- Fluffy Gluten-Free Pancakes
- Crispy Gluten-Free Oatmeal Waffles
- Delicate Gluten-Free Crepes
- Classic Gluten-Free Scones
- Versatile Gluten-Free Muffins (with endless mix-in ideas!)
- Indulgent Gluten-Free French Breakfast Puffs
Gluten-Free Popovers
Erin Collins
15
30
5
50
12
popovers
These popovers are delicious smothered with butter right out of the oven!
Comments
Print Recipe
Ingredients
-
4
large eggs
at room temperature -
1 1/4
cups
(300ml) 2% milk
at room temperature -
3
tablespoons
butter
melted -
2/3
cup
(100g) gluten-free measure-for-measure flour -
1/4
cup
(30g) gluten-free oat flour -
3/4
teaspoon
kosher salt
Instructions
-
Before you begin: Make sure your eggs and milk are at room temperature. I usually set my eggs in a bowl of hot water to bring them to room temperature quickly. You can also microwave the milk until it’s warm, but not hot.
-
Preheat the oven to 450°F (230°C). Spray a 12-count petite popover pan generously with cooking spray. (Note: This recipe makes 12 petite popovers or 6 grand popovers. I find the petite popovers turn out best. You can use a standard 12-count muffin pan if you don’t have a popover pan.)
-
Add the eggs, milk, and melted butter to a blender jar. Pulse briefly a few times until smooth and combined. Do not overmix! Add the gluten-free measure-for-measure flour, gluten-free oat flour, and salt. Pulse very briefly until just combined. Again, do not overmix. A few small lumps are perfectly fine.
-
Pour the batter into the prepared pan, filling each cup about 2/3 full.
-
Bake at 450°F (230°C) for 15 minutes. Without opening the oven door, reduce the oven heat to 350°F (175°C) and bake for an additional 10-15 minutes, until the popovers are deep golden brown and firm.
-
Remove the popovers from the oven immediately. With a sharp knife, poke a small hole in the side of each popover. (This crucial step allows the steam to escape, preventing the popovers from deflating.) Serve immediately for the best results!
Notes
Leave the oven shut: This will help them bake up nice and fluffy. Opening the door can cause a temperature drop and lead to deflation. If you want to peek, just use the oven light with the door closed.
Serve immediately: These are best piping hot, straight out of the oven. I love them smothered with butter!
No popover pan? No problem! You can easily make these in a regular muffin pan. The shape might be slightly different, but the taste and texture will still be amazing.
Dairy-free option: Use unsweetened dairy-free milk (like almond or oat milk) and vegan butter. The popovers might not brown as much, but will still be delicious and rise beautifully.
To Make-Ahead: Prep the batter up to 12 hours before baking. Pour the batter into the prepared pan, then cover with plastic wrap and refrigerate. Bake when ready to serve.
To Store: Popovers are best fresh. If storing leftovers, let them cool completely on a wire rack to prevent sogginess, then store in an airtight container at room temperature for up to 2 days. Reheat gently in the oven.
To Freeze: Freezing them tends to change their delicate texture, making them less airy and crisp. Therefore, I don’t recommend baking ahead and freezing these popovers.
Nutrition
Calories:
91
kcal
|
Carbohydrates:
8
g
|
Protein:
4
g
|
Fat:
5
g
|
Saturated Fat:
3
g
|
Polyunsaturated Fat:
1
g
|
Monounsaturated Fat:
2
g
|
Trans Fat:
0.1
g
|
Cholesterol:
64
mg
|
Sodium:
201
mg
|
Potassium:
65
mg
|
Fiber:
1
g
|
Sugar:
2
g
|
Vitamin A:
192
IU
|
Vitamin C:
0.05
mg
|
Calcium:
44
mg
|
Iron:
1
mg