
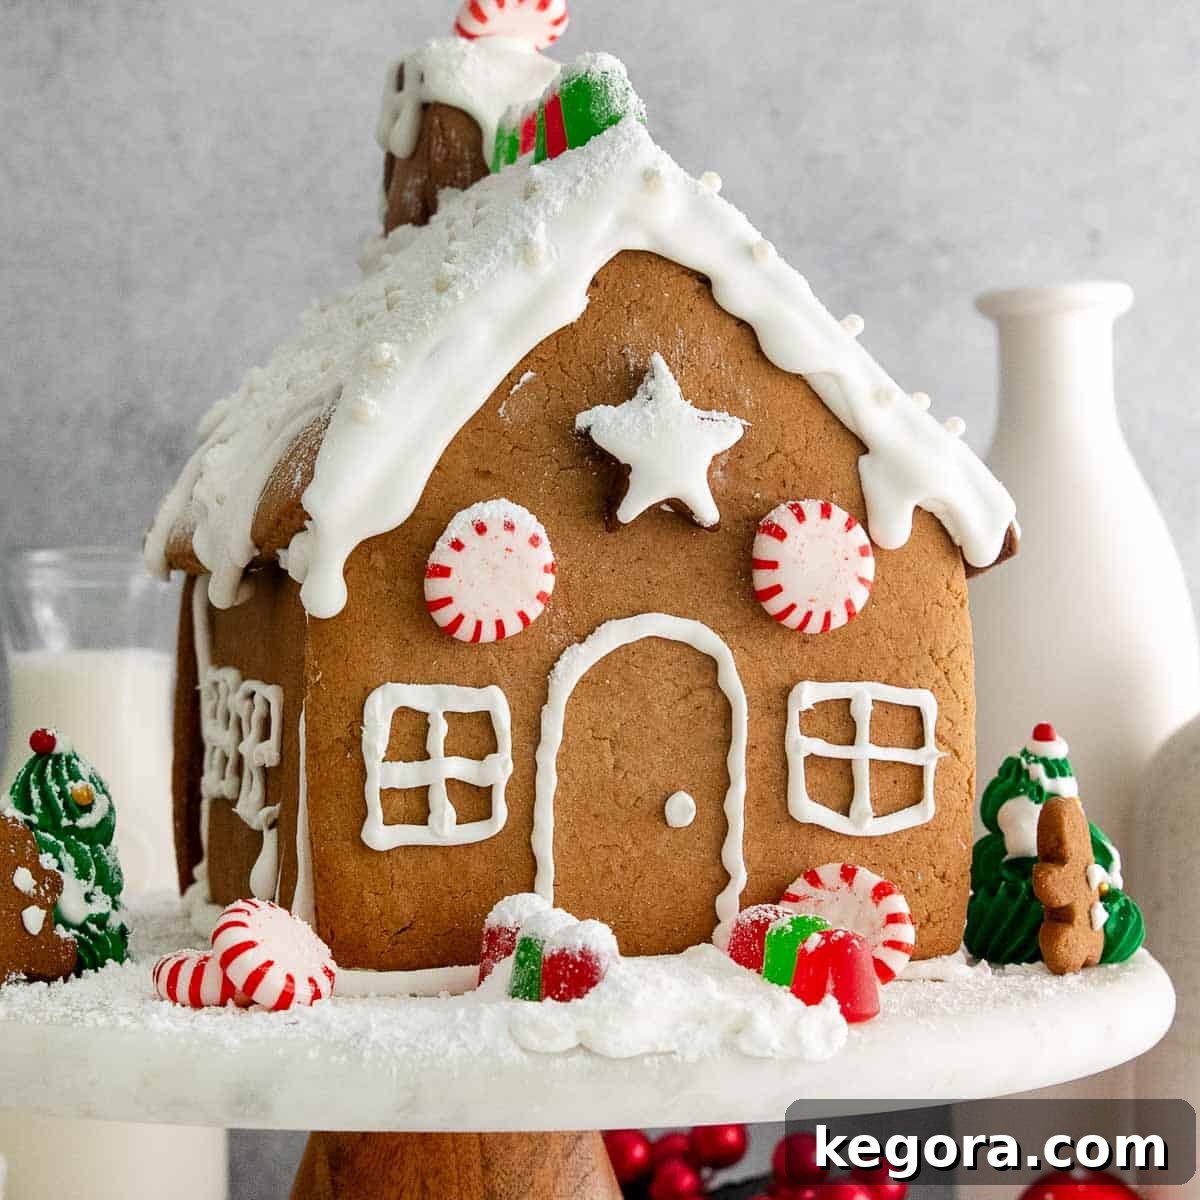
The Ultimate Gluten-Free Gingerbread House: A Festive Holiday Tradition
Welcome to the enchanting world of holiday baking, where traditions come alive with the aroma of gingerbread and the sparkle of festive decorations. This year, make your holiday season extra special with our tried-and-true recipe for a magnificent **Gluten-Free Gingerbread House**. It’s more than just a dessert; it’s a delightful activity that brings the whole family together, creating cherished memories and a show-stopping centerpiece for your celebrations.
Our gingerbread house combines the best of both worlds: a delicious, classic gingerbread flavor and a sturdy, easy-to-assemble structure that holds up beautifully. Forget the frustration of crumbling walls and runny icing – this recipe is designed for success, ensuring a fun and rewarding experience for bakers of all skill levels, especially those navigating gluten-free diets.
Erin’s Recipe Snapshot: Why You’ll Love This Gingerbread House
- Texture: Experience the perfect contrast of crisp gingerbread cookies providing a solid foundation, adorned with smooth royal icing that dries to a delightful snap. The varied textures of colorful candies add an extra layer of enjoyment to every bite.
- Taste: Each bite delivers the comforting, iconic flavor of gingerbread, expertly balanced with the sweetness of rich brown sugar and dark molasses. Warm notes of ground ginger, aromatic cinnamon, and fragrant cloves infuse the cookies, creating a truly irresistible taste of the holidays.
- Ease: This recipe is crafted to be a fun and festive activity for the entire family. While building a gingerbread house might seem daunting, our detailed instructions and helpful tips make it an enjoyable and manageable project, perfect for creating lasting holiday memories.
- Top Tips: Achieving the right icing consistency is key for both structural integrity and decorative flair. We recommend reserving some royal icing for precise piping and another portion for smooth drizzling – each requiring a distinct consistency. To streamline your holiday baking, prepare and bake the gingerbread cookies up to 48 hours in advance, storing them properly until assembly day.
- Recommended GF Flour: For optimal results, we highly recommend using King Arthur Gluten-Free Measure-for-Measure Flour. This high-quality blend includes xanthan gum, which is crucial for achieving the perfect texture and structure in gluten-free baked goods.
- Would I make these again? Absolutely, without a doubt! This gluten-free gingerbread house has quickly become an annual tradition that our entire family eagerly anticipates and loves. It’s a festive centerpiece and a delicious treat all in one!
xoxo erin

This remarkable gluten-free gingerbread house offers a delightful combination of fun, festivity, and fantastic flavor, making it the perfect holiday project for every member of your family! The gingerbread cookies boast a wonderfully soft interior contrasted with perfectly crisp edges – a testament to a well-balanced recipe. These sturdy cookie pieces are then expertly held together with a luscious, classic vanilla royal icing, providing both structure and a sweet, smooth finish. The final touch? An array of vibrant and festive candies, transforming your creation into a true edible masterpiece.
Whether you choose to enjoy this delectable treat as a family shortly after the joyous decorating process, or prefer to proudly display it as a charming holiday centerpiece throughout the festive season, it promises to bring smiles and holiday cheer. Its robust construction ensures it will stand tall and proud, making it a memorable part of your holiday décor before it’s eventually devoured!
Table of Contents
- The Ultimate Gluten-Free Gingerbread House: A Festive Holiday Tradition
- Erin’s Recipe Snapshot: Why You’ll Love This Gingerbread House
- Essential Ingredients for Your Gluten-Free Gingerbread House
- Step-by-Step Guide: Crafting Your Gluten-Free Gingerbread House
- Baking the Perfect Gluten-Free Gingerbread Pieces
- Whipping Up Flawless Royal Icing
- Assembling Your Gingerbread Masterpiece
- Storage, Make-Ahead, and Freezing Tips
- Can This Gingerbread House Be Made Dairy-Free?
- Can You Use a Different Type of Icing Instead of Royal Icing?
- What Can You Use as a Substitute for Meringue Powder?
- More Delightful Gluten-Free Holiday Recipes
- Full Recipe Card: Gluten-Free Gingerbread House
Essential Ingredients for Your Gluten-Free Gingerbread House
To help you prepare, here are a few detailed notes on some of the key ingredients that will bring your gluten-free gingerbread house to life. For precise measurements of all ingredients, please refer to the complete recipe card below.
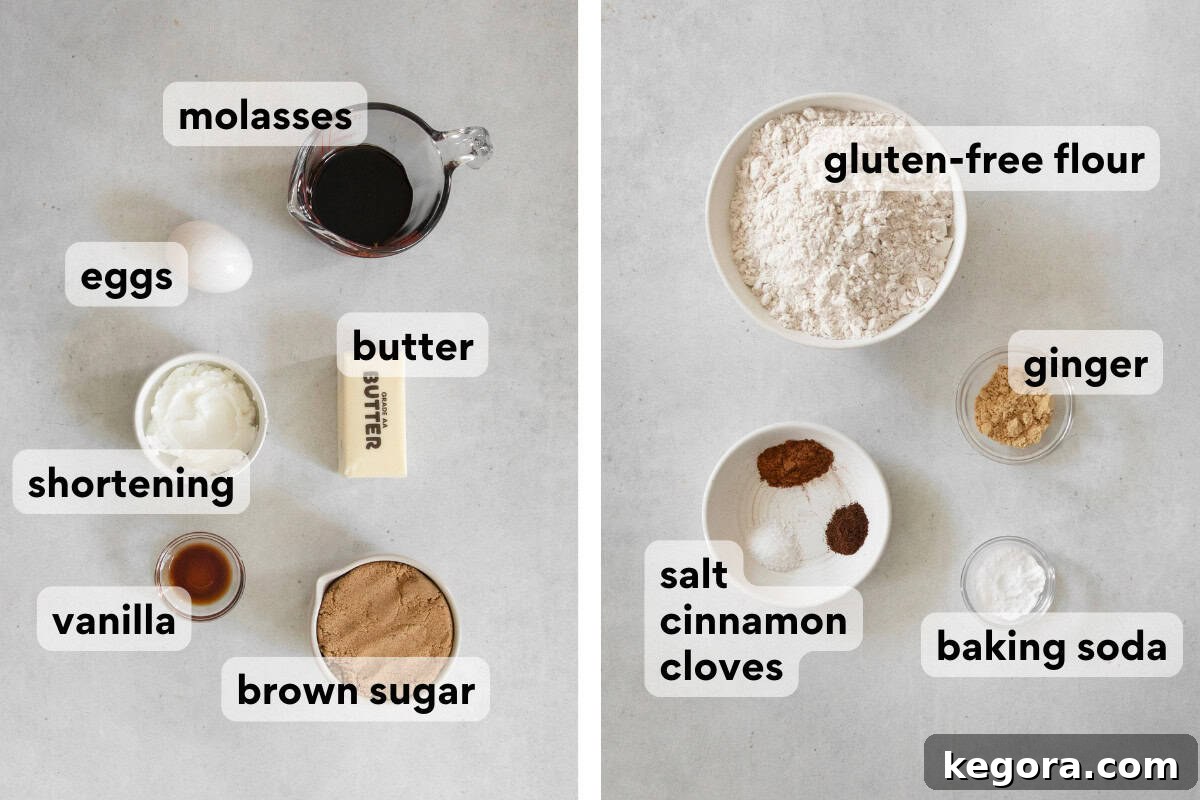
- Gluten-Free Flour Blend: The foundation of your gingerbread house is, of course, the flour. This recipe achieves its best texture and structure with King Arthur Gluten-Free Measure-for-Measure Flour. This specific blend is consistently reliable and includes xanthan gum, which is vital for providing elasticity and preventing crumbling in gluten-free baking. While other high-quality measure-for-measure gluten-free blends like Bob’s Red Mill might also work, ensure they contain xanthan gum for optimal results.
- Butter and Shortening: Our recipe utilizes a strategic combination of both butter and vegetable shortening. Butter is indispensable for imparting a rich, deep flavor to the gingerbread and contributing to its robust structure, ensuring your house stands strong. Shortening, on the other hand, plays a crucial role in helping the cookies maintain their intricate shapes during baking, preventing excessive spreading and ensuring crisp, defined edges.
- Molasses: This dark, sweet syrup is a signature ingredient for gingerbread, lending its characteristic deep color, rich flavor, and moist texture. Use unsulfured molasses for the best taste.
- Spices: Ground ginger, cinnamon, and cloves are the heart of gingerbread flavor. Ensure your spices are fresh for the most vibrant and aromatic results. Fresh spices make a significant difference!
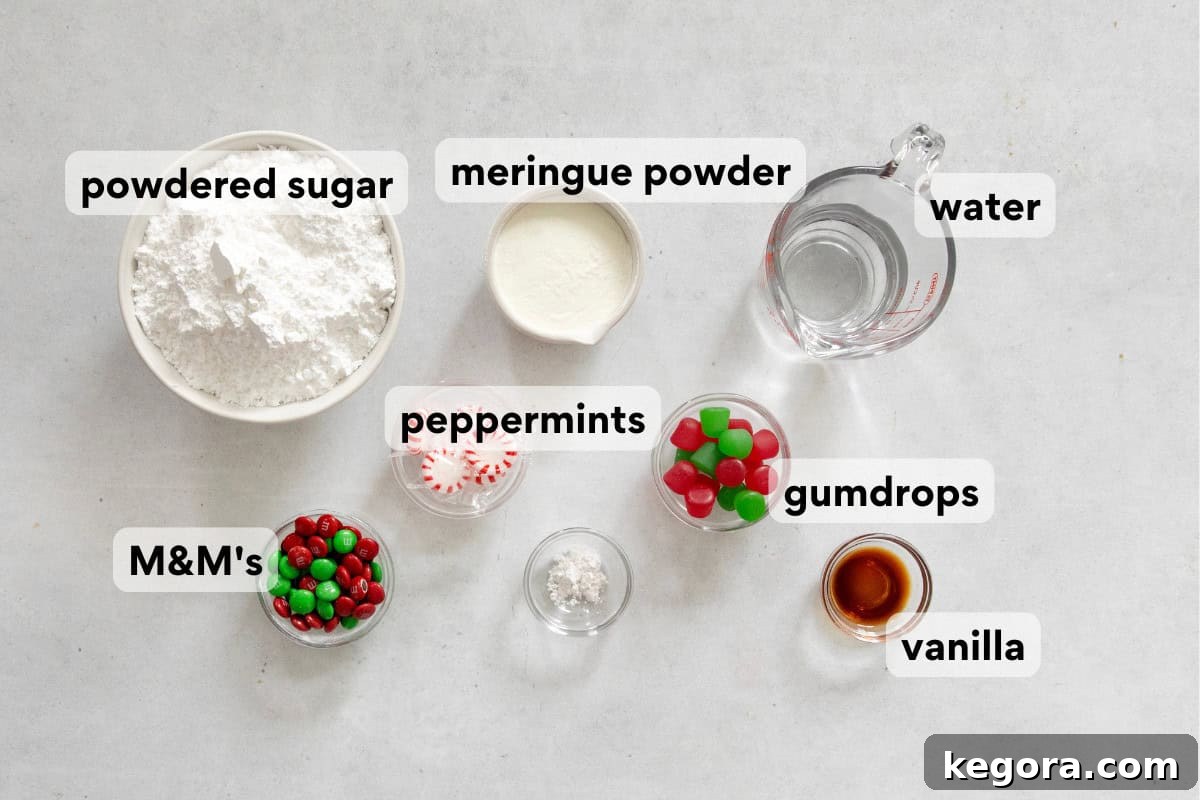
- Meringue Powder: We highly recommend using meringue powder in our royal icing recipe instead of raw egg whites. This ensures the icing is completely safe for consumption by all ages, eliminating any concerns about foodborne illness. Meringue powder creates a stable, quick-drying icing that acts like a strong adhesive for your gingerbread house. You can typically find meringue powder in the baking aisle of most well-stocked grocery stores or craft stores. I personally prefer the Wilton brand for its consistent quality.
- Candy Decorations: The beauty of a gingerbread house lies in its personalization! For this recipe, I’ve chosen classic Christmas-themed M&M’s, vibrant peppermints, and chewy gumdrops, which add wonderful color and texture. However, feel free to unleash your creativity and use any type of gluten-free candy you adore! Just remember to double-check that all your chosen decorations are certified gluten-free to maintain the integrity of your delicious holiday creation.
Step-by-Step Guide: Crafting Your Gluten-Free Gingerbread House
Embark on your gingerbread house adventure with confidence! Here’s a comprehensive overview of how to create this festive masterpiece. For all the precise measurements and complete, printable instructions, you can easily jump to the full recipe card at the bottom of the page.
Baking the Perfect Gluten-Free Gingerbread Pieces
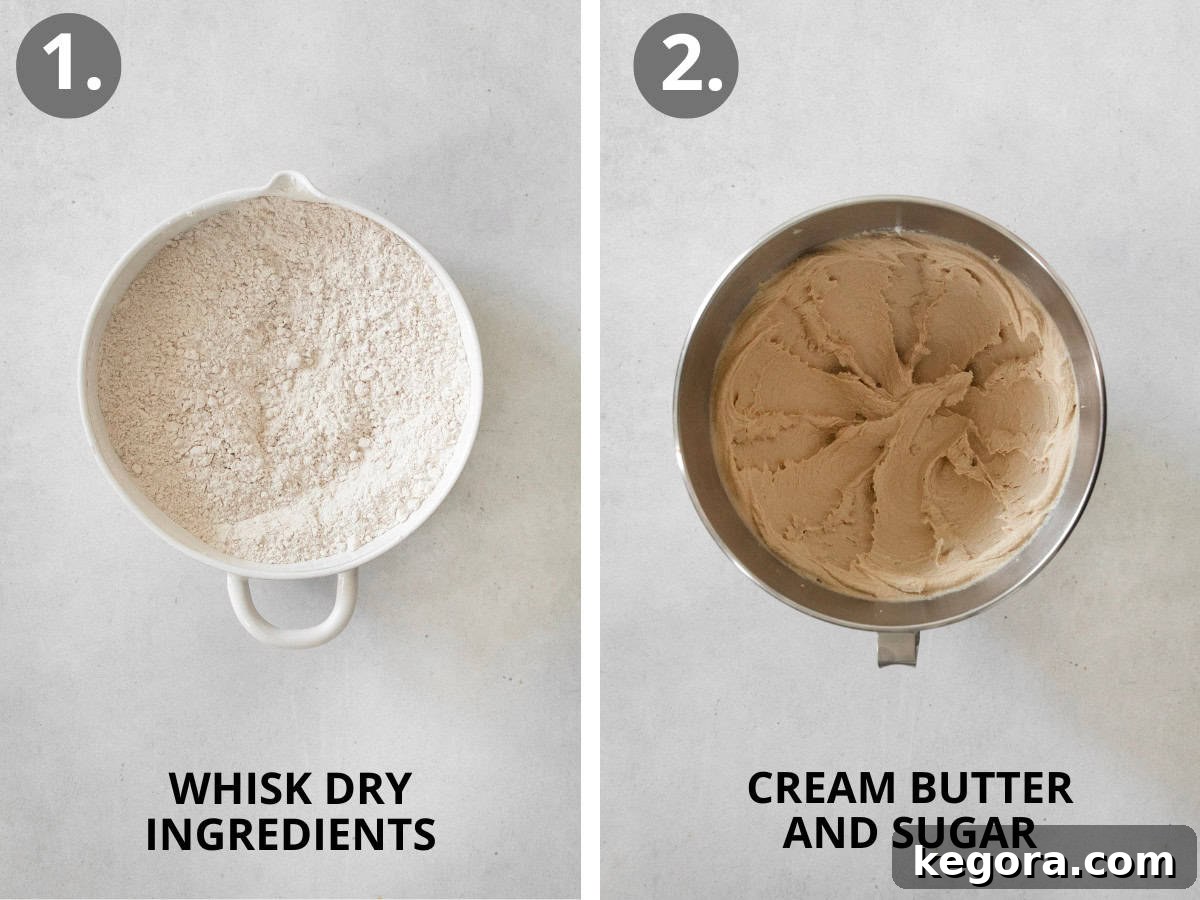
- Combine Dry Ingredients: In a medium-sized bowl, thoroughly whisk together your gluten-free flour, ground ginger, baking soda, ground cinnamon, kosher salt, and ground cloves. This ensures the spices are evenly distributed throughout the dough, guaranteeing a consistent flavor in every piece. Set this mixture aside for later.
- Cream Fats and Sugar: In the bowl of a stand mixer fitted with the paddle attachment, combine the softened butter, vegetable shortening, and light brown sugar. Beat on medium speed for approximately 2 minutes, until the mixture becomes wonderfully light and fluffy. This step incorporates air, which contributes to the cookies’ texture. Next, beat in the egg, rich molasses, and fragrant vanilla extract until well combined. Don’t forget to scrape down the sides of the bowl to ensure all ingredients are fully incorporated.
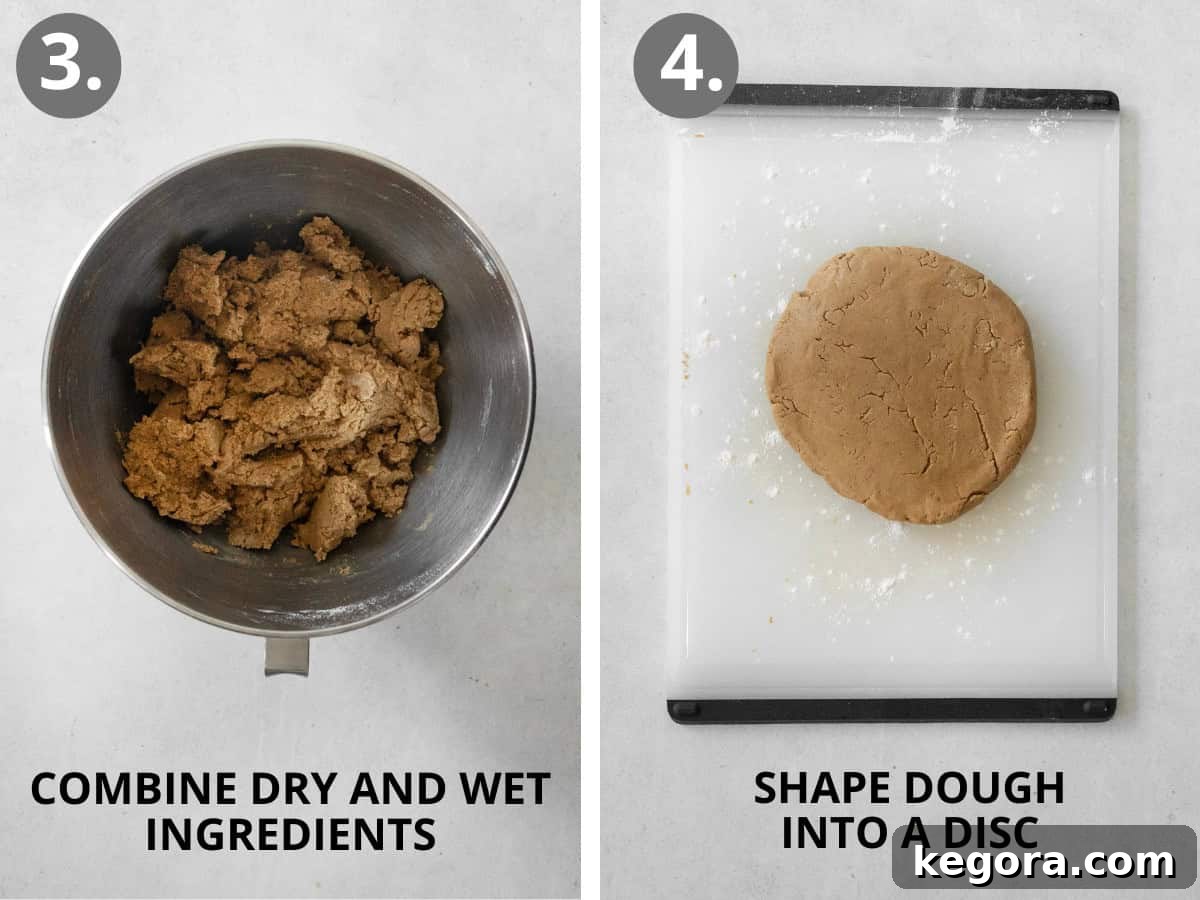
- Integrate Wet and Dry Ingredients: With your mixer set to low speed, gradually add the whisked dry ingredients to the wet mixture. Mix just until the flour mixture is fully combined and a cohesive dough forms. Overmixing can lead to tough cookies, so stop as soon as it comes together.
- Shape and Chill the Dough: Divide the gingerbread dough into two equal halves. Gently shape each half into a thick disc, about one inch in thickness. Wrap each disc tightly in plastic wrap to prevent it from drying out, then place them in the refrigerator to chill for a minimum of 30 minutes. Chilling is crucial as it stiffens the butter and shortening, making the dough much easier to roll and cut, and helps the cookies maintain their shape during baking.
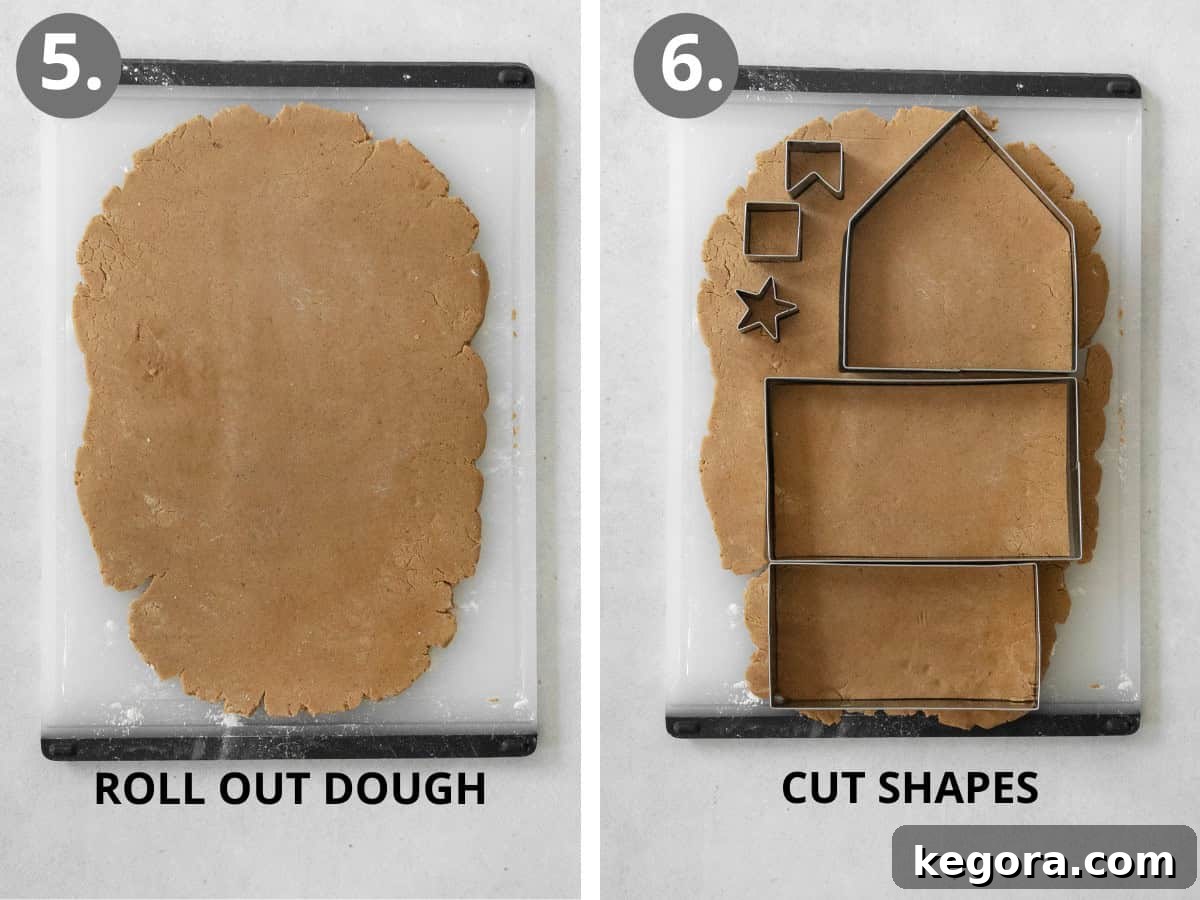
- Roll Out the Dough: Once chilled, lightly dust your work surface and rolling pin with gluten-free flour. Working with one disc at a time, roll the dough evenly until it reaches a consistent thickness of 1/4 inch. This uniform thickness is essential for ensuring all pieces bake evenly and fit together properly.
- Cut Gingerbread Shapes: Using your chosen gingerbread house templates, carefully cut out one pentagon wall (for the front/back), one side wall, and one roof piece. Don’t forget to cut out any additional decorative shapes from the remaining dough, such as charming stars, classic gingerbread men, or even a small chimney, ensuring they will fit well on your finished house. Repeat this process with the second disc of dough to get all necessary structural pieces.
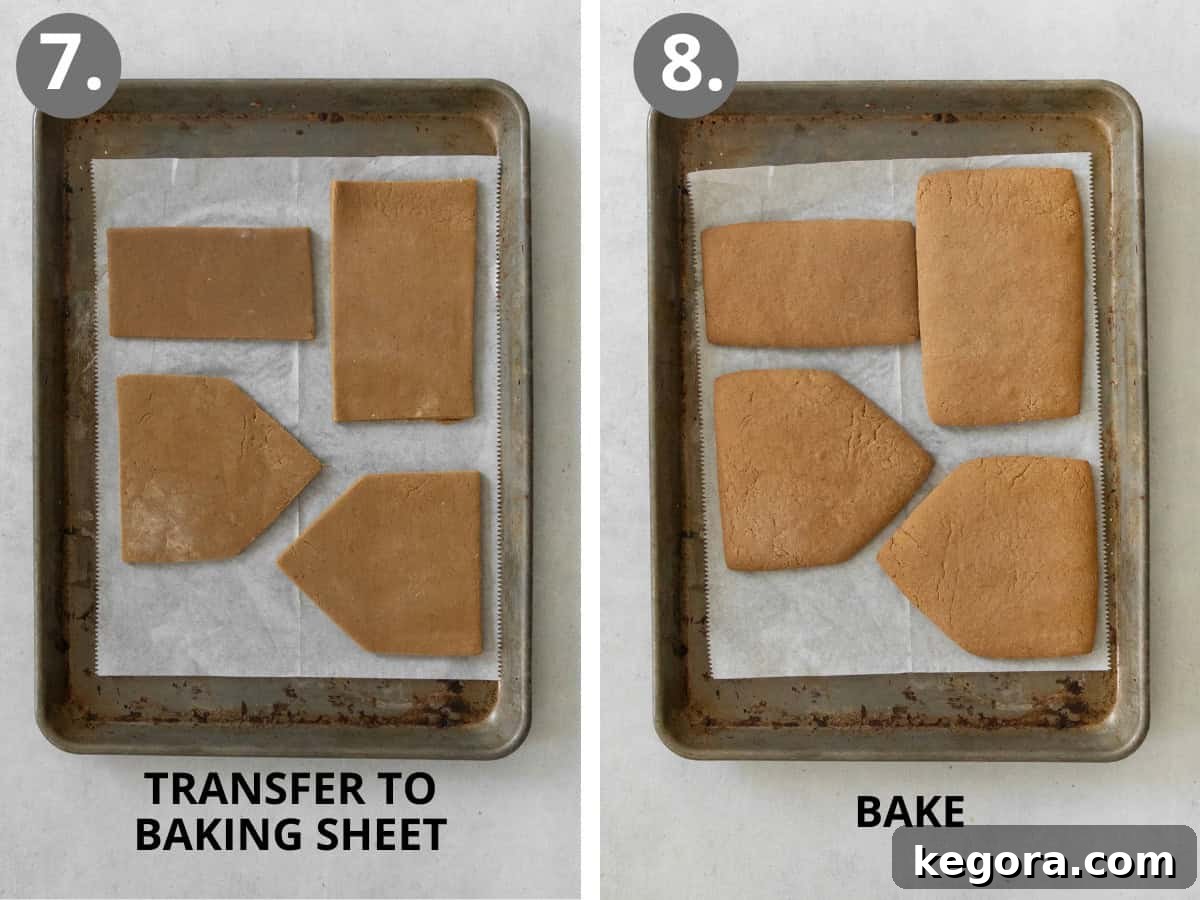
- Transfer and Chill Again: Carefully transfer your cut gingerbread pieces to a parchment-lined baking sheet, making sure to leave at least 2 inches of space between each cookie to allow for even baking. Once all pieces are on the sheets, place them in the freezer to chill for 15 minutes. This second chill prevents the cookies from spreading too much in the oven, preserving their defined shapes. While they chill, preheat your oven to 350°F (175°C).
- Bake to Perfection: Bake the cookies until they are beautifully browned and crisp around the edges. Larger pieces, such as the walls and roof, will typically require 20-22 minutes of baking time. Smaller decorative pieces, like chimneys or stars, will bake faster, needing only 12-14 minutes. Keep a close eye on them to prevent over-baking. Allow all baked cookies to cool completely on the baking sheet before attempting to handle or assemble them. They will firm up as they cool.
Whipping Up Flawless Royal Icing
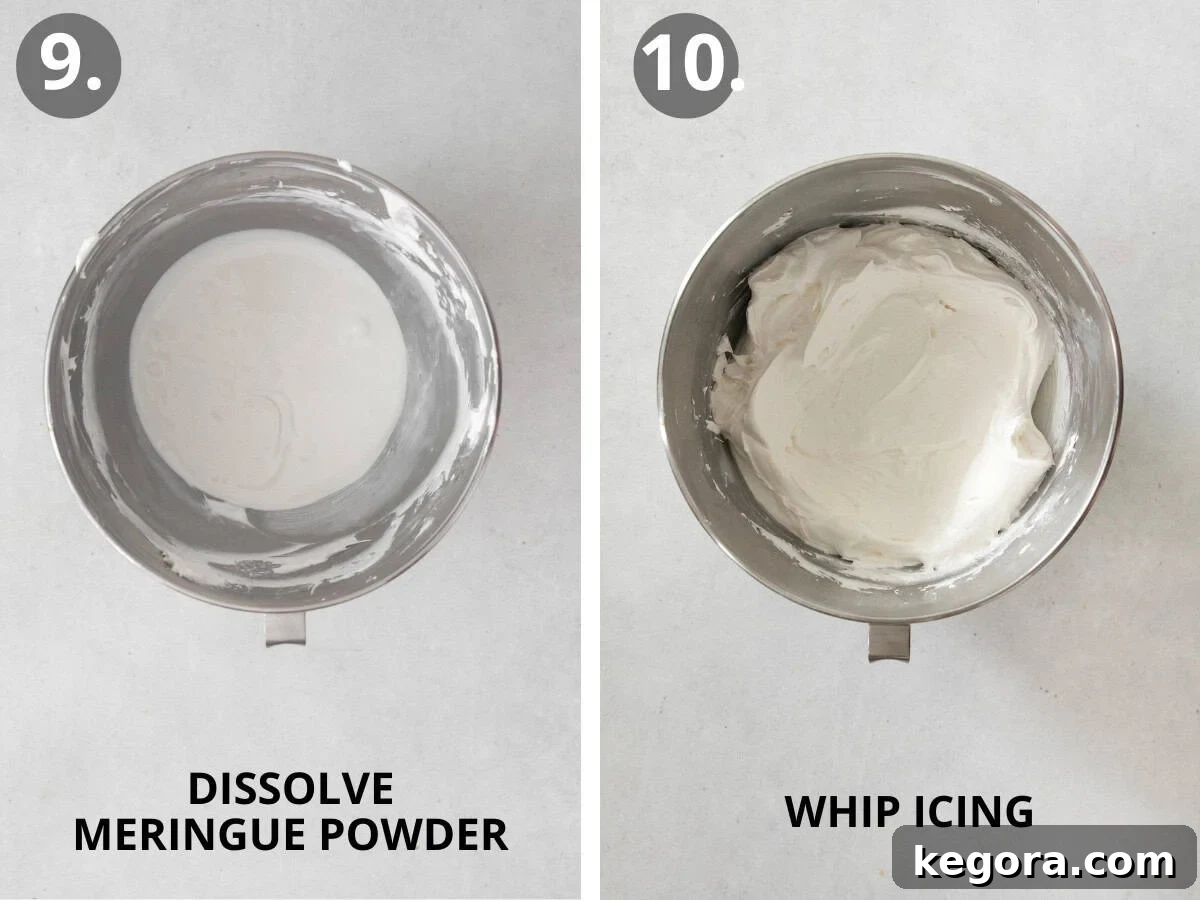
- Dissolve Meringue Powder: In the bowl of a stand mixer fitted with the whisk attachment, add the meringue powder and warm water. Mix on medium-low speed for about 30 seconds, or until the meringue powder is fully dissolved. This foundational step is crucial for the icing’s stability.
- Whip Icing to Stiff Peaks: Add the vanilla extract and mix to combine. Then, with the mixer still on medium-low speed, gradually add the powdered sugar, one cup at a time, until fully incorporated. Once all the sugar is in, scrape down the sides of the bowl, then increase the mixer speed to medium-high. Beat the icing for approximately 2 minutes, or until it forms stiff, glossy peaks and achieves a thick, toothpaste-like consistency. This firm consistency is ideal for “gluing” the house pieces together. Transfer about half of this stiff icing into a piping bag for assembly, reserving the other half in the bowl, covered with a damp cloth or plastic wrap directly on the surface to prevent it from drying out.
Assembling Your Gingerbread Masterpiece
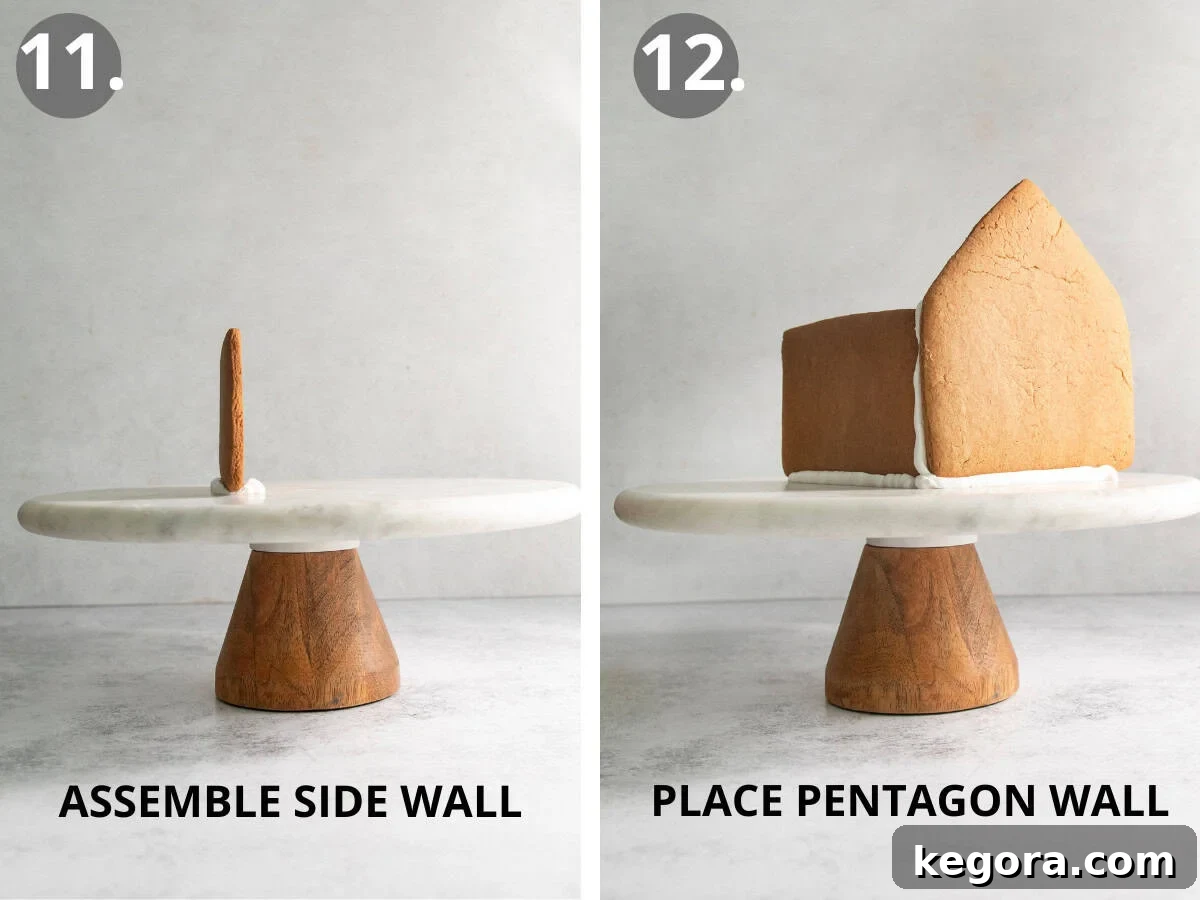
- Begin with a Side Wall: To start the assembly of your gingerbread house, first pipe a generous line of your stiff royal icing onto your chosen serving platter or sturdy base. Carefully place one of the side walls directly onto this line of icing, pressing gently to secure it.
- Attach the First Pentagon Wall: Next, pipe a line of icing perpendicular to the front edge of the side wall you just placed. Also, pipe a line of icing along the vertical edge of that side wall. Take one of your pentagon walls and carefully place it into these lines of icing, gently pressing the two pieces together to form a sturdy corner. Hold for a few moments until it feels stable.
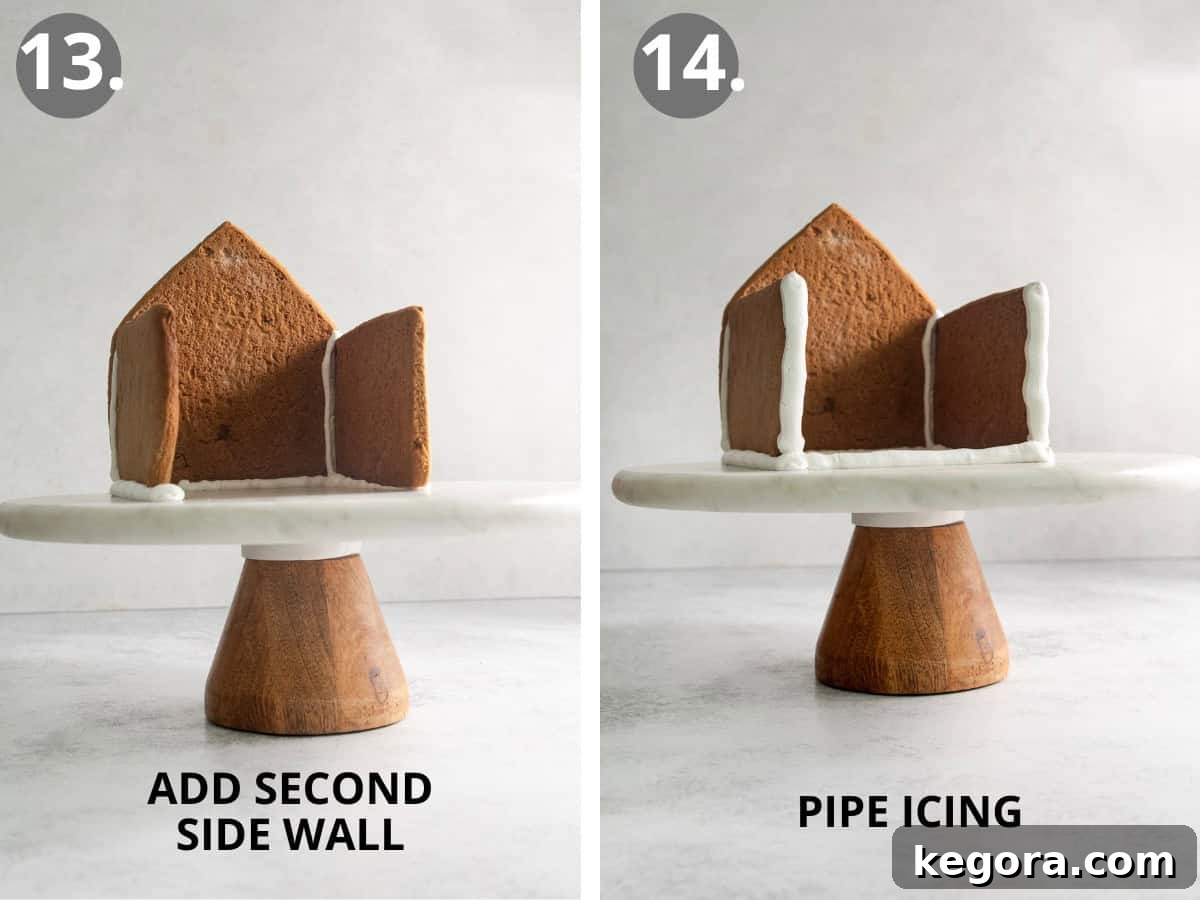
- Complete the Walls: Repeat the previous steps to attach the second side wall, piping icing on the platter and the connecting wall. Then, pipe generous lines of icing along the remaining exposed edges of the walls and along the base of the serving platter where the final pentagon wall will sit. Carefully place the second pentagon wall into position, gently pressing all connecting edges to ensure a strong bond. Allow the structure to set for at least 15-30 minutes, or longer if needed, before proceeding to the roof.
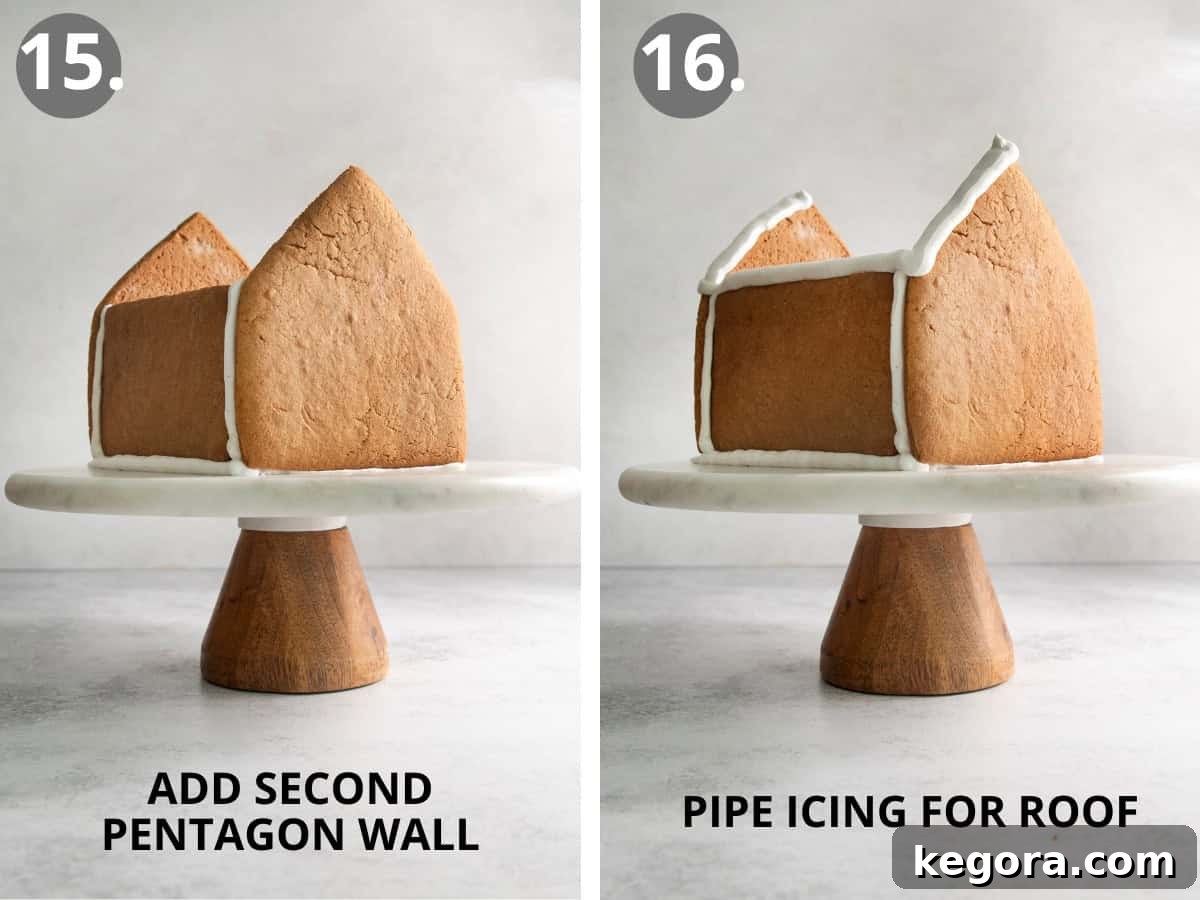
- Prepare for the Roof: Once the wall structure is stable, pipe a continuous line of royal icing along the top edges of one pentagon wall and the adjacent side wall, where the first roof panel will rest. This forms the “glue” for your roof.
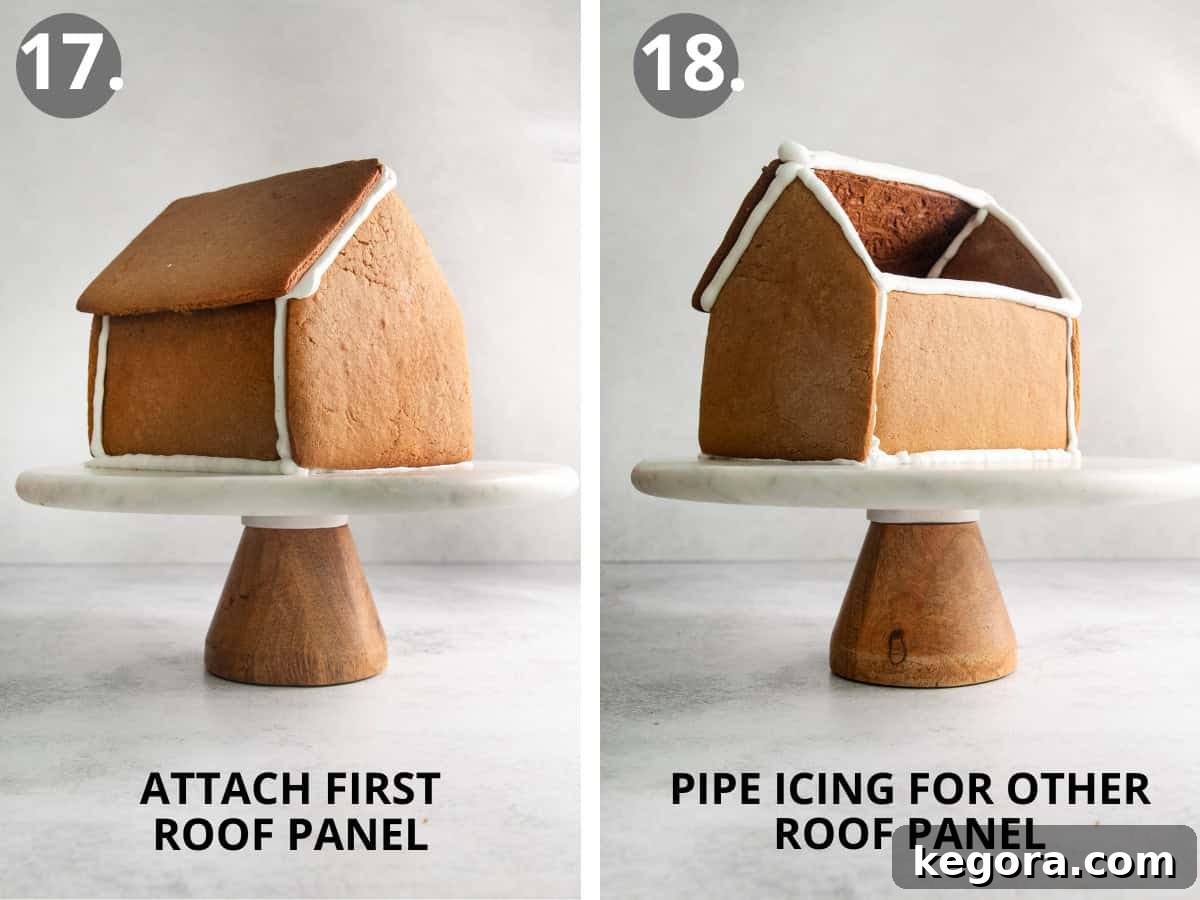
- Attach First Roof Panel: Carefully place the first gingerbread roof panel onto the piped icing lines, pressing gently to create a secure bond. Hold it in place for a moment until it feels stable.
- Attach Second Roof Panel: Repeat the piping process on the opposite pentagon wall and side wall, then carefully attach the second roof panel. Allow the entire structure ample time to dry and harden completely – at least 1 to 2 hours, or even longer for maximum stability, before you begin decorating.
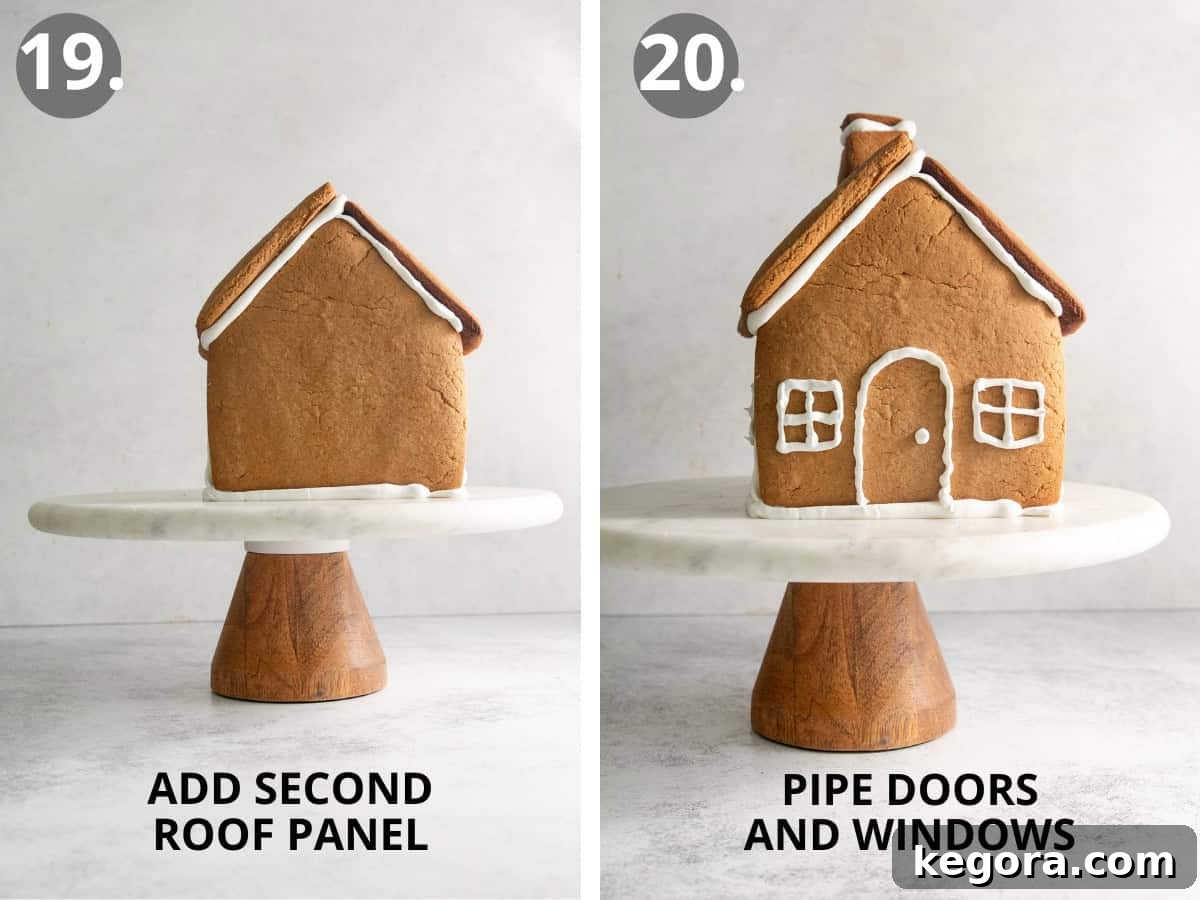
- Prepare Icing for Decoration: Retrieve the reserved icing from the bowl. Turn your mixer to low speed and gradually add water, one tablespoon at a time, until the icing reaches a smooth piping consistency. It should be thin enough to flow easily through a piping bag for smooth lines but thick enough that it doesn’t run or spread excessively. You’ll likely need about 3 tablespoons of water for this stage. If you accidentally add too much water, simply mix in more powdered sugar until you achieve the desired consistency. Divide this piping consistency icing in half, placing one half into a new piping bag. For the remaining icing, continue adding water (about 3 more tablespoons) until it reaches a flood consistency – it should flow smoothly off a whisk. Transfer this “flood” icing to another piping bag.
- Pipe Architectural Details: Using the piping consistency icing, let your creativity flow! Add charming details like a gingerbread house door, intricate windows, and any other structural elements, such as a chimney, that you’ve baked. Precision here makes a big difference in the final look.
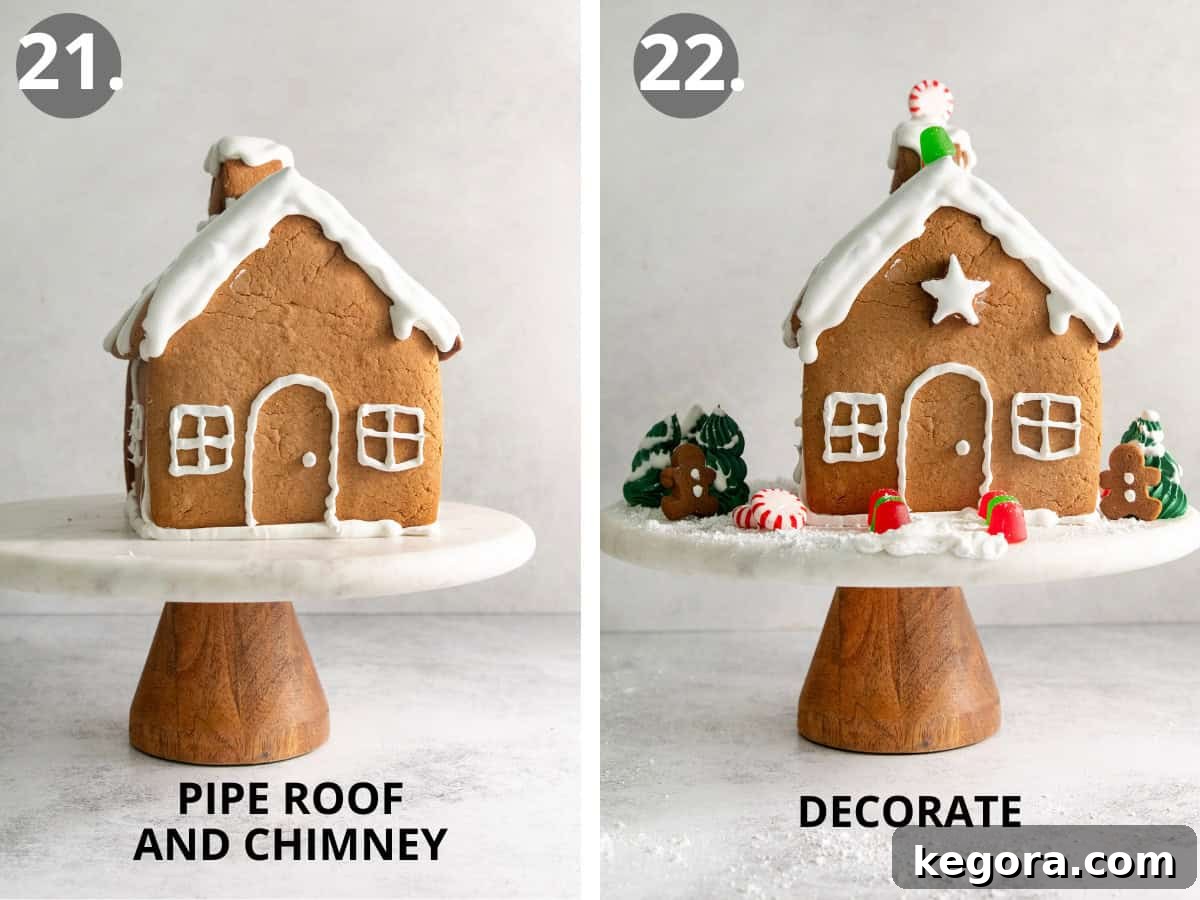
- Create a Snowy Roof and Chimney: Now, switch to your flood consistency icing. Drizzle this thinner icing generously over the top of the gingerbread house to create a beautiful, snowy effect on the roof and chimney. While the icing is still wet, quickly decorate with sprinkles, edible glitter, or other tiny candies to enhance the winter wonderland aesthetic. The wet icing will act as an adhesive.
- Final Decorations: Finally, use your piping consistency icing to attach larger decorations such as festive peppermints, colorful gumdrops, M&M’s, mini candy canes, or any other delightful candies you wish to add. Press them gently into the icing to secure. Allow the entire gingerbread house to set completely at room temperature for at least 1 hour (or longer if heavily decorated) before admiring and eventually enjoying your handcrafted holiday masterpiece!
Storage, Make-Ahead, and Freezing Tips for Your Gingerbread House
Planning ahead can make your gingerbread house project much more enjoyable and stress-free. Here’s how to manage your time and keep your creation fresh and stable:
- To Store: While the ultimate joy of a gingerbread house is in its assembly and decoration, it’s generally best enjoyed on the same day it’s put together. The cookies can become stale or overly soft if left out for extended periods after decoration. However, if you primarily intend it as a decorative centerpiece, you are welcome to display it throughout the holiday season! Just be mindful that after a day or two of sitting out, the edible quality will diminish significantly, so it’s best not to consume it if it has been on display for long. For consumption, an airtight container at room temperature for up to 24 hours is ideal.
- To Make Ahead: To alleviate some of the holiday hustle, you can prepare the gingerbread cookies up to 48 hours in advance of assembly. After baking and allowing them to cool completely, store the unfrosted cookies in an airtight container at room temperature or in the fridge. This keeps them fresh and ready for building. The royal icing, however, is best made immediately prior to assembly. Royal icing hardens quickly as it sits exposed to air, so whipping it up fresh ensures the perfect consistency for both structure and decoration.
- To Freeze: For longer-term planning, unfrosted and unassembled gingerbread cookies freeze beautifully! Store the baked, cooled pieces in an airtight container or freezer bag, separated by parchment paper, in the freezer for up to three months. When you’re ready to embark on your gingerbread house project, simply remove the cookies from the freezer and let them thaw completely at room temperature before assembly. As with the make-ahead method, prepare your royal icing just before you begin building for optimal results.
Can This Gingerbread House Be Made Dairy-Free?
Absolutely! Making this delightful gingerbread house dairy-free is surprisingly simple, ensuring that everyone can enjoy this festive treat. To adapt the gingerbread cookie dough, you just need to substitute traditional butter with a high-quality dairy-free butter alternative. Additionally, ensure that the vegetable shortening you use is also dairy-free (most are, but it’s always good to check the label). When it comes to decorations, be diligent about selecting candies that are explicitly labeled as dairy-free to maintain the integrity of your allergen-friendly creation. Many popular candy brands offer dairy-free options now, making it easier than ever to create an inclusive holiday treat.
Can You Use a Different Type of Icing Instead of Royal Icing?
For the critical task of assembling and stabilizing a gingerbread house, royal icing is truly the superior choice. Its unique properties allow it to dry hard and rigid, essentially acting as a strong, edible glue that holds the cookie pieces firmly in place, preventing collapses. Other icings simply won’t provide the necessary structural support. However, if your goal is simply to decorate flat gingerbread cookies (not building a house), then you have much more flexibility! In that case, you could certainly opt for a softer, more pliable frosting like a simple buttercream, a cream cheese frosting, or even a convenient store-bought icing. These alternatives offer a different texture and flavor profile but lack the architectural strength required for a standing gingerbread house.
What Can You Use as a Substitute for Meringue Powder?
Meringue powder is highly recommended for royal icing due to its safety and consistent results, but if it’s unavailable, you do have alternatives. You can substitute meringue powder with three large fresh egg whites for the royal icing. However, it’s crucial to be aware that raw egg whites carry a potential risk of foodborne illness. To mitigate this risk, you could opt for pasteurized liquid egg whites, which are often found in cartons in the refrigerated section of grocery stores. Another safe and convenient option is to use powdered egg white substitutes, which are typically reconstituted with water before use. Always follow the product instructions for any substitutes to ensure the correct consistency and safety for your royal icing.

More Delightful Gluten-Free Holiday Recipes
Looking for more gluten-free inspiration for your holiday baking? Explore these other fantastic recipes to fill your festive table with delicious, worry-free treats:
- Gluten-Free Christmas Cookies
- Gluten-Free Spritz Cookies
- Gluten-Free Gingerbread Bars
- Gluten-Free Ginger Snaps
- Gluten-Free Gingerbread Cookies
- Gluten-Free Peppermint Sour Cream Sugar Cookies
- Gluten-Free Chocolate Yule Log

Gluten-Free Gingerbread House
Erin Collins
2 hrs 30 mins
25 mins
1 gingerbread house
Soft gingerbread with crisp edges, classic royal icing, and all your favorite holiday candies — this gluten-free gingerbread house is a fun, festive, and delicious treat for the whole family!
Print Recipe
Ingredients
For the Gingerbread House
- 3 cups (450g) gluten-free measure-for-measure flour
- 2 1/2 teaspoons ground ginger
- 1 teaspoon baking soda
- 1 teaspoon ground cinnamon
- 1/2 teaspoon kosher salt
- 1/2 teaspoon ground cloves
- 1/2 cup (113g) butter, at room temperature
- 1/4 cup (49g) vegetable shortening
- 1 cup (213g) light brown sugar, lightly packed
- 1/3 cup (80ml) molasses
- 1 large egg
- 1 teaspoon vanilla extract
For the Royal Icing
- 1/2 cup (60g) meringue powder
- 1/2 cup (120ml) warm water, plus more as needed
- 1 teaspoon vanilla extract
- 6 cups (720g) powdered sugar
- Optional candy decorations: peppermints, gumdrops, M&M’s, candy canes, etc.
Instructions
For the Gingerbread House
- In a medium bowl, whisk together the gluten-free flour, ginger, baking soda, cinnamon, salt, and cloves.
- In the bowl of a stand mixer fitted with the paddle attachment, cream together the butter, shortening, and brown sugar until light and fluffy – about 2 minutes.
- Next add the molasses, egg, and vanilla. Scrape down the sides of the bowl and mix to combine.
- With the mixer on low speed, slowly add the dry ingredients. Mix just until the dry ingredients are combined.
- Divide the dough in half and shape each half into a 1” thick disc. Wrap the discs in plastic and place them in the fridge to chill for 30 minutes.
- When the dough has chilled, lightly dust your work surface with gluten-free flour.
- Working one at a time, roll a dough disc until it is ¼” thick. Cut out one pentagon wall, one side wall, and one piece of roof, as well as any additional shapes that will fit (stars, gingerbread men, chimney, etc.).
- Transfer the cookies to a parchment-lined baking sheet, making sure to leave at least 2” of space between the cookies. Repeat steps 6 and 7 with the second disc of dough – making sure to cut out another pentagon wall, side wall, and roof.
- Reroll any unused dough and cut out extra shapes or walls, just in case!
- Place the cookies in the freezer to chill for 15 minutes. While the cookies chill, preheat the oven to 350°F (175°C).
- Bake the cookies until they are browned and crisp around the edges. For the big pieces of the house (walls and roof) this will take 20-22 minutes. For the small pieces of the house (chimney, stars, etc.) this takes 12-14 minutes. Allow the cookies to cool completely on the tray before assembling.
For the Royal Icing
- Add the meringue powder and warm water to the bowl of a stand mixer fitted with the whisk attachment. Mix on medium-low speed until the meringue powder has dissolved – about 30 seconds.
- Add the vanilla and mix to combine.
- With the mixer on medium-low speed, add the powdered sugar 1 cup at a time. When all of the powdered sugar has been added, scrape down the sides of the bowl and then turn the mixer up to medium-high.
- Beat the icing for 2 minutes, or until it reaches stiff peaks and has a thick, toothpaste-like consistency.
- Remove half of the icing to a piping bag — leave the other half of the icing in the bowl for later, covered tightly to prevent drying.
Assembly
- To assemble the gingerbread house, pipe a line of icing on your serving platter and place one of the side walls into the icing.
- Next, pipe a line of icing perpendicular to the front of the side wall. Pipe a line of icing along the side wall to glue the two sides together. Place a pentagon wall into the icing and gently press the two pieces together. Repeat with the remaining two sides – piping icing on the serving platter and along the sides to glue the gingerbread house in place.
- To attach the roof, pipe a ring of icing along the top edges of the walls and gently place a piece of the roof on one side. Repeat on the second side. Allow to set for 1-2 hours.
- With the reserved icing from step 15, turn the mixer to medium-low speed and add water 1 tablespoon at a time until it reaches piping consistency. You’ll need about 3 tablespoons of water. The icing should be thin enough that you can easily pipe it into smooth lines but thick enough that it doesn’t run. If you end up adding too much water, just add more powdered sugar until you get back to piping consistency. Remove half of the icing and place it in a piping bag.
- With the last bit of icing, continue adding water 1 tablespoon at a time until it reaches flood consistency. You’ll need about 3 more tablespoons. The icing is flood consistency when it flows smoothly off of the whisk. Transfer the icing to a piping bag.
- Using the piping consistency icing, decorate the gingerbread house by adding a door, windows, and chimney, if using.
- Using the piping consistency icing, add peppermints, gumdrops, and any other decorations that you want to the gingerbread house.
- Using the flood consistency icing, drizzle the top of the gingerbread house with icing to create the snowy effect. Decorate with sprinkles while the icing is still wet, if desired.
- Allow the icing to set completely at room temperature (about 1 hour) before enjoying.
Notes
- To store: The gingerbread house should be enjoyed on the same day that it is assembled, but you’re welcome to put it on display for the holiday season. (Just don’t eat it after a day or two of it sitting out!)
- To make ahead: Gingerbread cookies can be made up to 48 hours in advance. Store them in an airtight container in the fridge until ready to use. The royal icing will harden as it sits, so it should be made immediately prior to assembly.
- To freeze: Store unfrosted, unassembled cookies in the freezer for up to three months. When ready to make the gingerbread house, let the gingerbread cookies thaw at room temperature. Make the royal icing just before assembly.
- To make dairy-free: Use dairy-free butter and shortening for the gingerbread cookie dough. Make sure candy decorations are also dairy-free.
Nutrition Facts (Approximate per serving for 1 house)
Calories: 6539kcal |
Carbohydrates: 1287g |
Protein: 44g |
Fat: 160g |
Saturated Fat: 73g |
Polyunsaturated Fat: 21g |
Monounsaturated Fat: 49g |
Trans Fat: 10g |
Cholesterol: 408mg |
Sodium: 3180mg |
Potassium: 2132mg |
Fiber: 39g |
Sugar: 1015g |
Vitamin A: 3083IU |
Vitamin C: 0.1mg |
Calcium: 750mg |
Iron: 22mg