
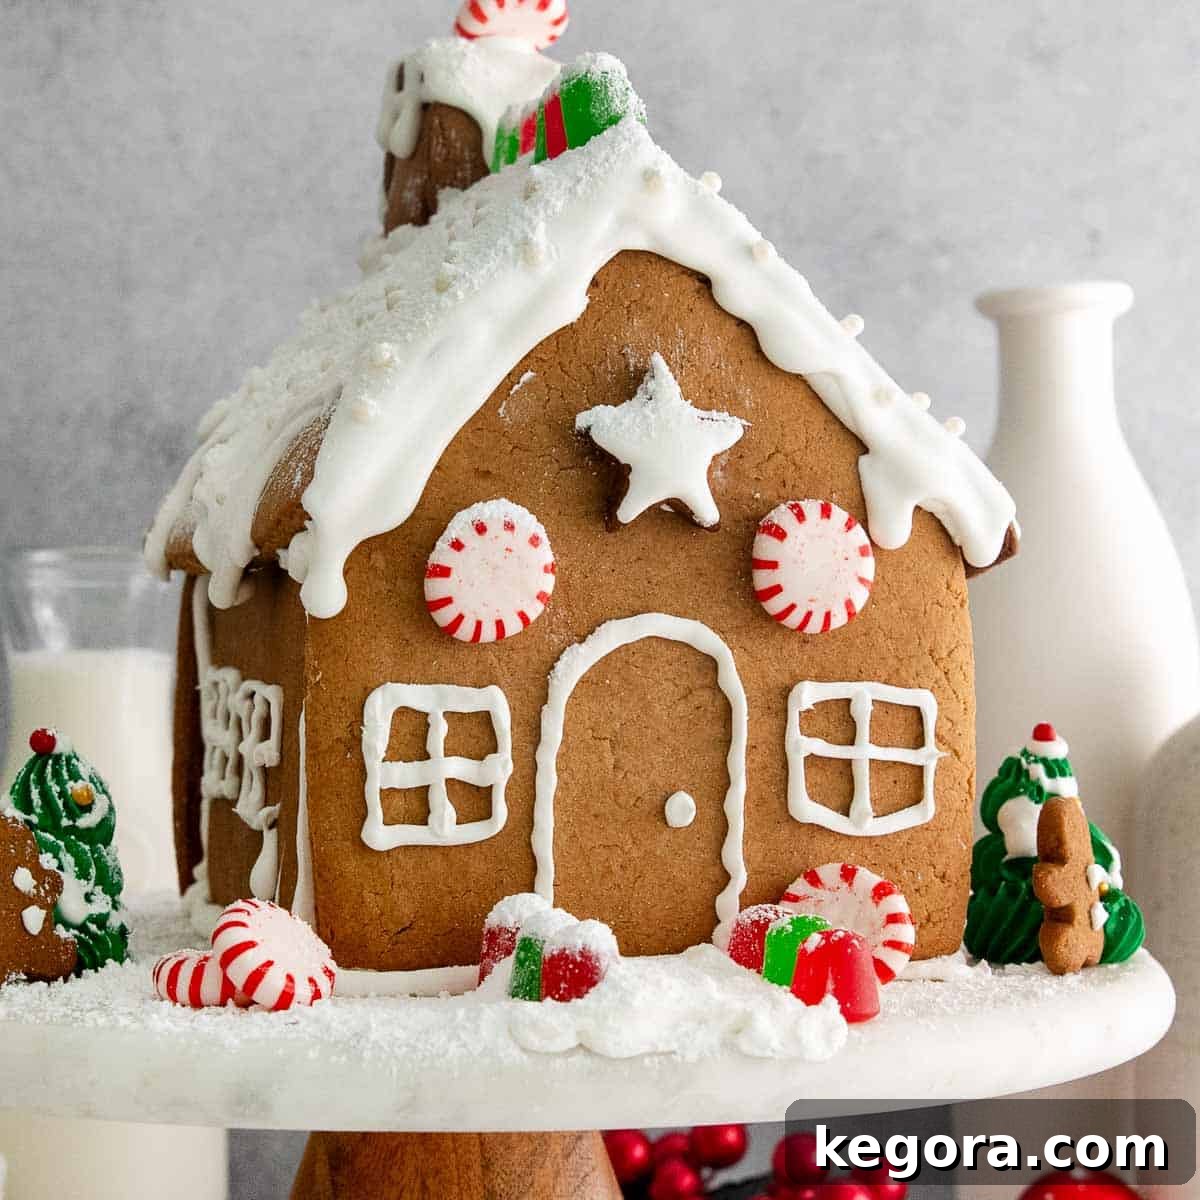
The Ultimate Gluten-Free Gingerbread House: A Festive Holiday Tradition
Welcome to a cherished holiday tradition reinvented for everyone to enjoy! Building a gingerbread house is more than just baking; it’s an enchanting activity that brings families together, sparking creativity and spreading festive cheer. This year, we’re making it accessible to all with a truly delectable **gluten-free gingerbread house recipe** that promises both structural integrity and a burst of classic holiday flavors. Get ready to embark on a delightful culinary adventure that will become a treasured annual event in your home.
This comprehensive guide will walk you through crafting sturdy, flavorful gingerbread walls, mixing the perfect royal icing “glue,” and assembling your edible masterpiece. From the initial mixing of aromatic spices to the final touches of candy decorations, every step is designed for maximum enjoyment and impressive results. Whether you’re a seasoned baker or trying your hand at a gingerbread house for the first time, this recipe ensures a fun, memorable, and delicious experience for the whole family.
Erin’s Recipe Snapshot: Why You’ll Adore This Gluten-Free Gingerbread House
Here’s a quick overview of what makes this gluten-free gingerbread house recipe an absolute holiday favorite:
- Texture: Experience the satisfying crunch of perfectly baked gingerbread that yields to a tender, subtly chewy interior. This delightful base is complemented by the crisp, sugary shell of royal icing and a whimsical array of candies, offering a varied and exciting textural experience with every bite.
- Taste: Each bite is a symphony of heartwarming spices. Our gingerbread is richly sweetened with a blend of dark brown sugar and robust molasses, creating a deep, caramelized flavor. This sweetness is perfectly balanced by the vibrant heat of ground ginger, the comforting warmth of cinnamon, and the subtle, aromatic kick of cloves, evoking the quintessential taste of the holiday season.
- Ease: More than just a recipe, this is an engaging and festive activity designed for the entire family. The steps are straightforward, making it an ideal project for all ages to participate. From mixing the dough to decorating the final structure, it’s a wonderful way to create lasting holiday memories together.
- Top Tips: To ensure your gingerbread house stands tall and looks spectacular, consistency is key for the royal icing. Reserve a portion of your icing for precision piping – this thicker consistency is essential for structural support and detailed lines. The remaining icing can then be thinned slightly for elegant drizzling and flood filling. For convenience and to manage your holiday schedule, you can prepare the gingerbread cookies up to 48 hours in advance, storing them properly until assembly day.
- Recommended Gluten-Free Flour: Achieving the perfect gingerbread texture is effortless with King Arthur Gluten-Free Measure-for-Measure Flour. This high-quality blend is specifically formulated for reliable results in gluten-free baking and includes xanthan gum, which is crucial for providing structure and elasticity in the absence of gluten, preventing crumbling and ensuring your house holds together beautifully.
- Would I make these again? Absolutely, without a doubt! This gingerbread house isn’t just a seasonal treat; it’s a beloved annual tradition that my whole family eagerly anticipates and enjoys every year. It’s a highlight of our holiday celebrations!
xoxo Erin

Crafting this **gluten-free gingerbread house** is more than just baking; it’s an immersive experience that culminates in a fun, festive, and utterly delicious centerpiece for your holiday celebrations. The gingerbread cookies themselves are a marvel: soft and tender on the inside, offering a satisfying chew, while boasting wonderfully crisp edges that provide crucial structural integrity. These perfectly spiced cookies are meticulously held together by a classic, creamy vanilla royal icing, which doubles as both a strong adhesive and a beautiful canvas for intricate decorations. The final touch? A vibrant assortment of festive candies, transforming your creation into a joyful, edible masterpiece.
This delightful treat offers versatility for your holiday enjoyment. You can gather your family to savor its deliciousness shortly after the joyous decorating session, enjoying the freshly made flavors and textures. Alternatively, its robust construction and beautiful presentation make it an ideal display piece, gracing your home throughout the entire holiday season and filling the air with the comforting aroma of gingerbread.
Table of Contents
- The Ultimate Gluten-Free Gingerbread House: A Festive Holiday Tradition
- Erin’s Recipe Snapshot: Why You’ll Adore This Gluten-Free Gingerbread House
- Essential Ingredients for Your Gluten-Free Gingerbread House
- Step-by-Step Guide to Making a Gluten-Free Gingerbread House
- Storage, Make-Ahead, and Freezing Instructions for Gingerbread
- Can This Gingerbread House Be Made Dairy-Free?
- Can I Use a Different Type of Icing Instead of Royal Icing?
- What Can Be Substituted for Meringue Powder in Royal Icing?
- More Delightful Gluten-Free Holiday Recipes
- Gluten-Free Gingerbread House Recipe Card
Essential Ingredients for Your Gluten-Free Gingerbread House
Crafting the perfect gluten-free gingerbread house starts with selecting the right ingredients. Here are some detailed notes on the key components that will ensure your creation is both delicious and structurally sound. For precise measurements, please refer to the complete recipe card below.
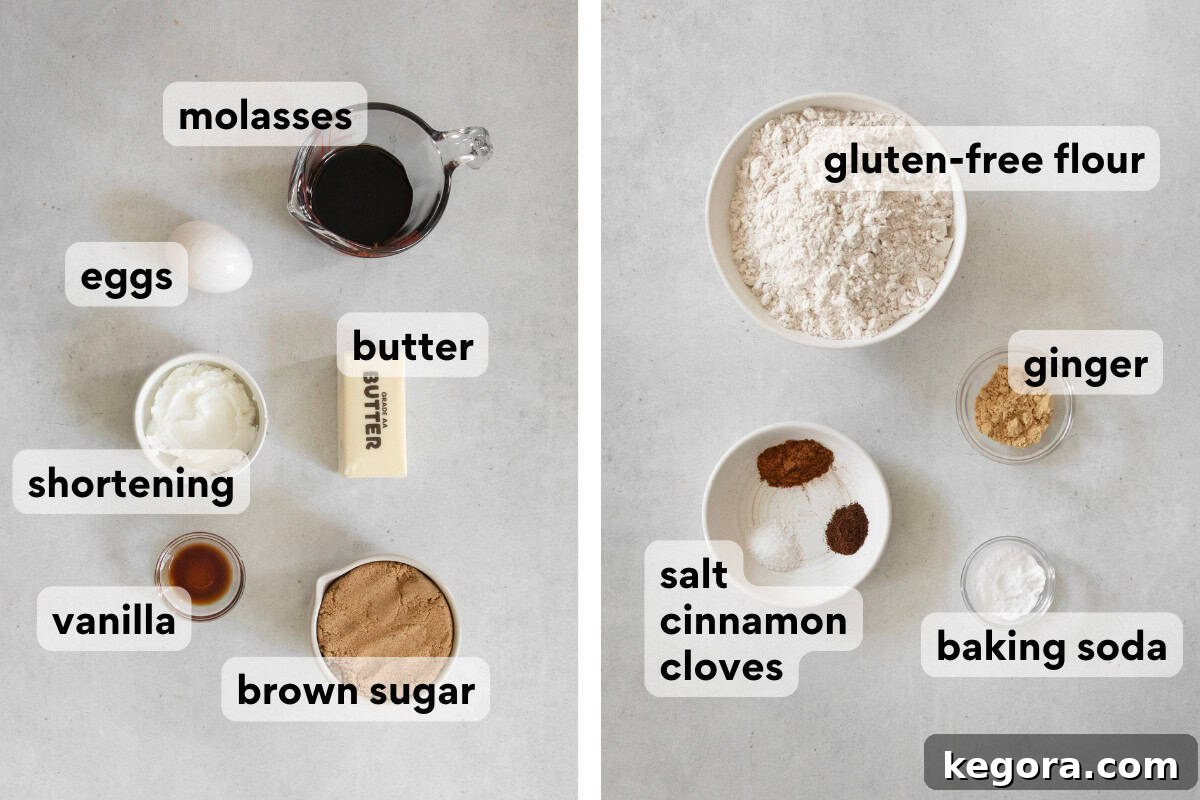
- Gluten-Free Flour: The foundation of our gingerbread house. This recipe has been meticulously tested and yields the best results with King Arthur Gluten-Free Measure-for-Measure Flour. This specific blend is highly recommended because it consistently performs well and contains xanthan gum, an essential ingredient that mimics the elasticity of gluten, preventing your gingerbread from becoming crumbly and ensuring it holds its shape during baking and assembly. Other high-quality, ‘measure-for-measure’ gluten-free flour blends that include xanthan gum, such as Bob’s Red Mill, can also be used, but King Arthur is our top pick for its reliability.
- Butter and Shortening: The secret to gingerbread that’s both flavorful and holds its shape beautifully. We use a strategic combination of both. The butter is crucial for imparting that rich, classic gingerbread flavor and contributes to the cookie’s tender crumb. Shortening, on the other hand, is a baker’s best friend when it comes to structural integrity. It has a higher melting point than butter, which means your cookies will spread less in the oven, helping them maintain their intricate shapes and crisp edges – absolutely vital for a sturdy gingerbread house!
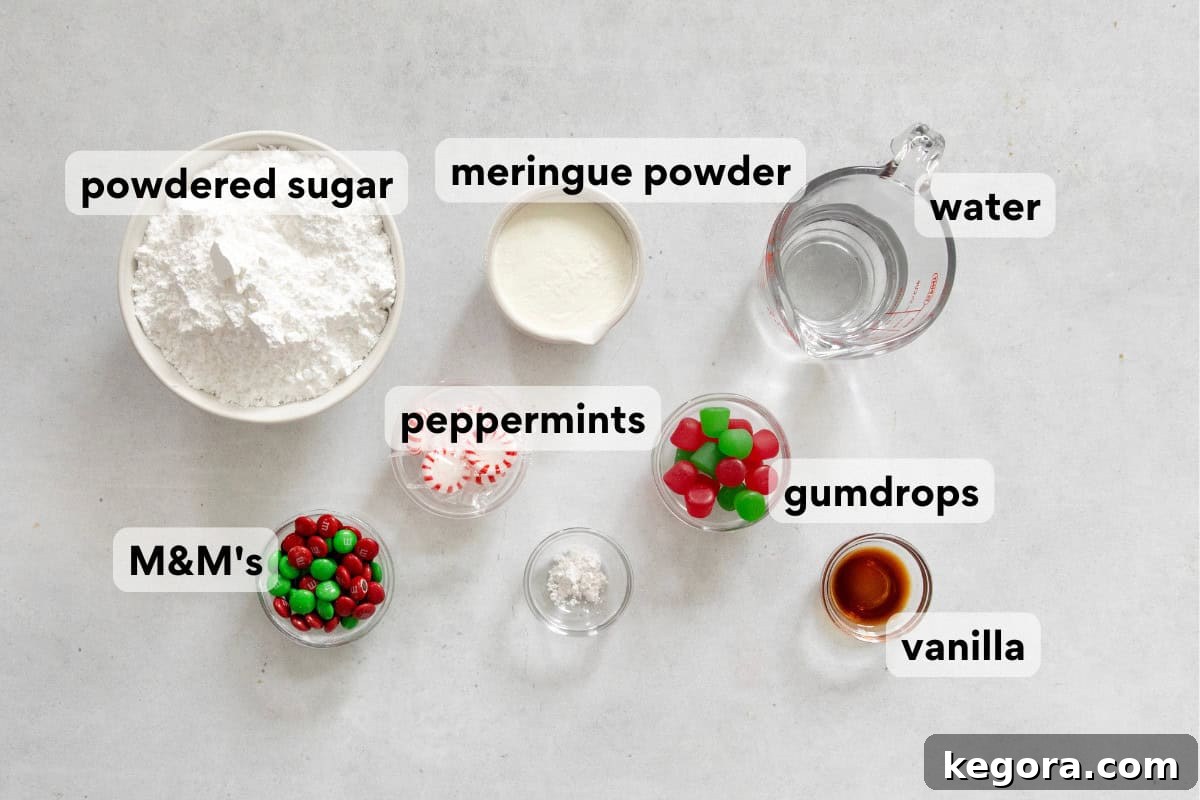
- Meringue Powder: An indispensable ingredient for our royal icing. Meringue powder is a dried egg white product that is incredibly stable and creates a strong, fast-setting icing that acts like edible glue – perfect for assembling your gingerbread house. Its use eliminates the need for raw egg whites, making the royal icing safe for everyone, including children, to enjoy without concern for foodborne illness. You can typically find meringue powder in the baking aisle of most major grocery stores or specialty craft stores. I personally recommend the reliable Wilton brand for consistent results.
- Candy: The fun part! While I’m using classic Christmas-colored M&M’s, vibrant peppermints, and chewy gumdrops for a traditional look, this is where your creativity can truly shine. Feel free to personalize your gingerbread house with any type of gluten-free candy you prefer. Just remember to double-check the labels to ensure all your chosen candies are certified gluten-free to maintain the integrity of the recipe. Think colorful sprinkles, mini candy canes, chocolate pieces, or even edible glitter to make your house truly unique!
Step-by-Step Guide to Making a Gluten-Free Gingerbread House
Creating a gluten-free gingerbread house is a rewarding multi-step process. Here’s a detailed overview of how to bring your festive creation to life. For full, precise instructions and measurements, you can always jump to the recipe card at the end of this article!
Part 1: Preparing the Gingerbread House Components
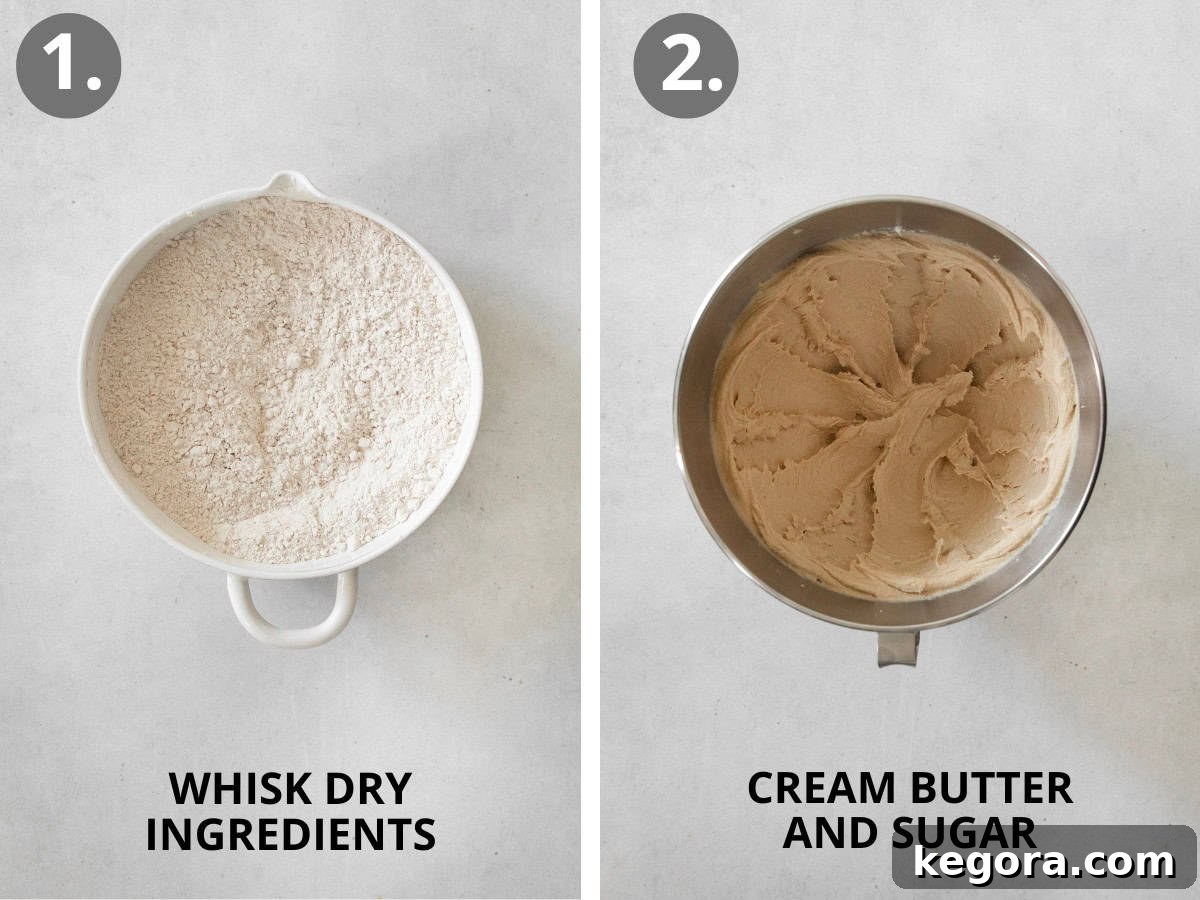
- Mix Dry Ingredients: In a medium-sized bowl, begin by thoroughly whisking together your gluten-free flour blend, ground ginger, baking soda, ground cinnamon, kosher salt, and ground cloves. This ensures all the spices are evenly distributed, leading to a consistent flavor profile throughout your gingerbread. Set this fragrant mixture aside for later.
- Cream Butter and Sugar: In the bowl of a stand mixer fitted with the paddle attachment, combine the softened butter, vegetable shortening, and light brown sugar. Beat these ingredients together on medium speed for about 2 minutes, until the mixture becomes light, fluffy, and noticeably pale. This creaming process incorporates air, which contributes to the gingerbread’s tender texture. Then, add the rich molasses, a large egg, and pure vanilla extract, mixing until just combined and scraping down the sides of the bowl to ensure everything is well incorporated.
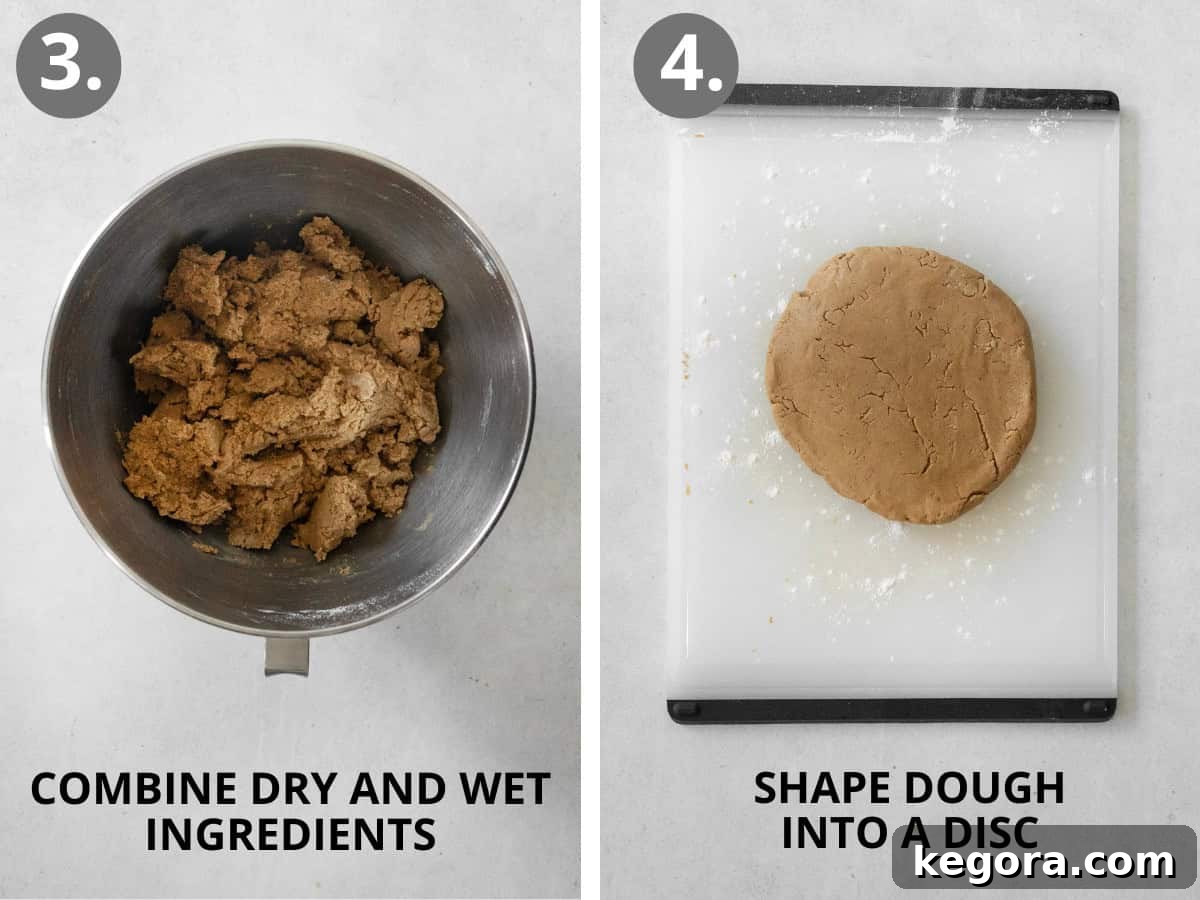
- Combine Wet and Dry Ingredients: With the mixer running on a low speed, gradually add your prepared dry ingredient mixture to the wet ingredients. Mix until the dry ingredients are just incorporated into the dough. Be careful not to overmix, as this can lead to tough cookies. The dough should come together but still be soft enough to work with.
- Shape Dough and Chill: Divide the gingerbread dough into two equal halves. Gently shape each half into a thick disc, approximately one inch thick. This disc shape makes it easier to roll out later. Wrap each disc tightly in plastic wrap and place them in the refrigerator to chill for at least 30 minutes. Chilling is crucial as it firms up the dough, making it less sticky and much easier to roll and cut without distorting the shapes. It also helps prevent the cookies from spreading excessively during baking.
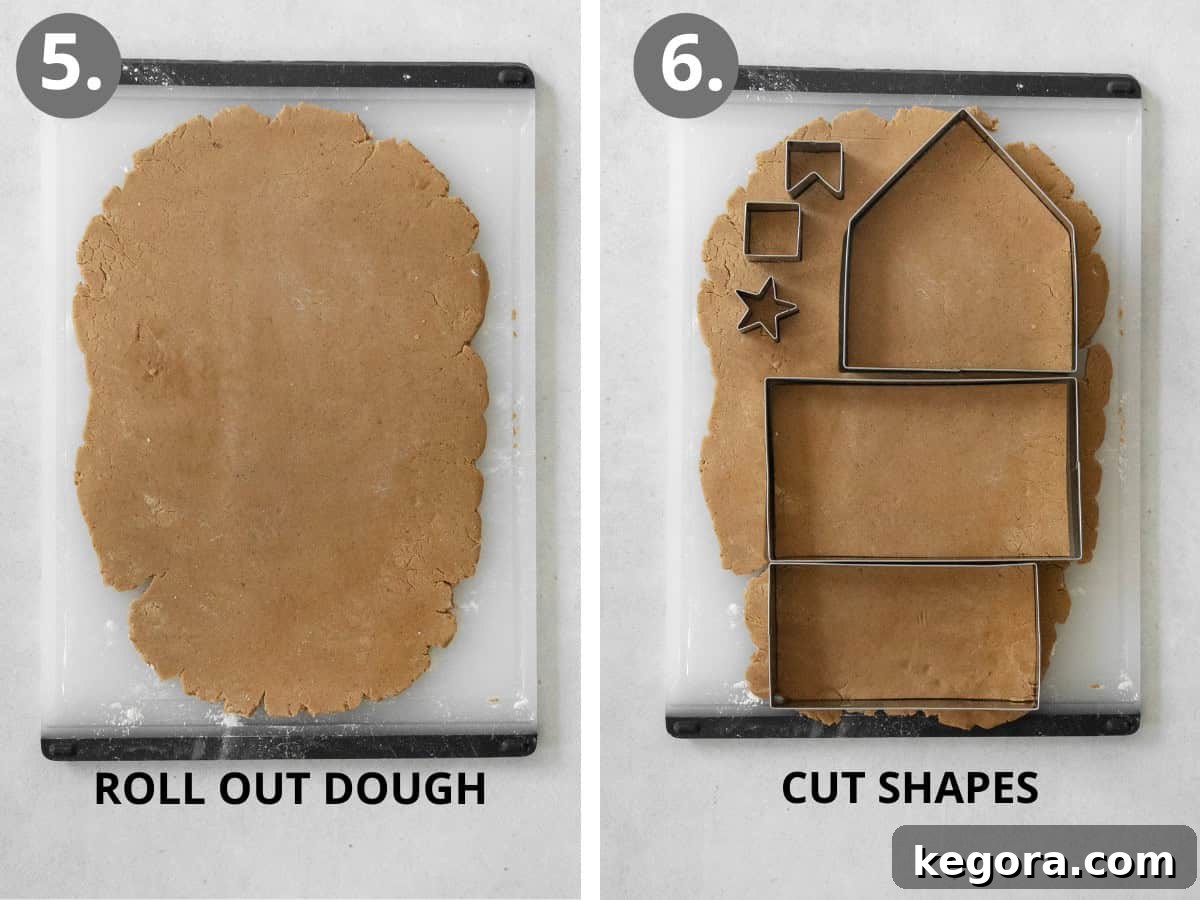
- Roll Out Dough: Once your dough is sufficiently chilled, lightly dust your work surface with a little extra gluten-free flour to prevent sticking. Take one disc of dough and roll it out evenly until it reaches a consistent thickness of 1/4 inch. For best results, use a rolling pin with thickness guides or measure carefully to ensure uniform pieces, which are essential for a stable house.
- Cut Shapes: Using your gingerbread house templates, carefully cut out one pentagon-shaped front/back wall, one rectangular side wall, and one rectangular roof piece. Additionally, cut out any smaller decorative shapes you desire, such as stars, gingerbread men, or a chimney piece, ensuring they will fit proportionally on your house. Remember to re-roll any scraps to cut out additional pieces if needed.
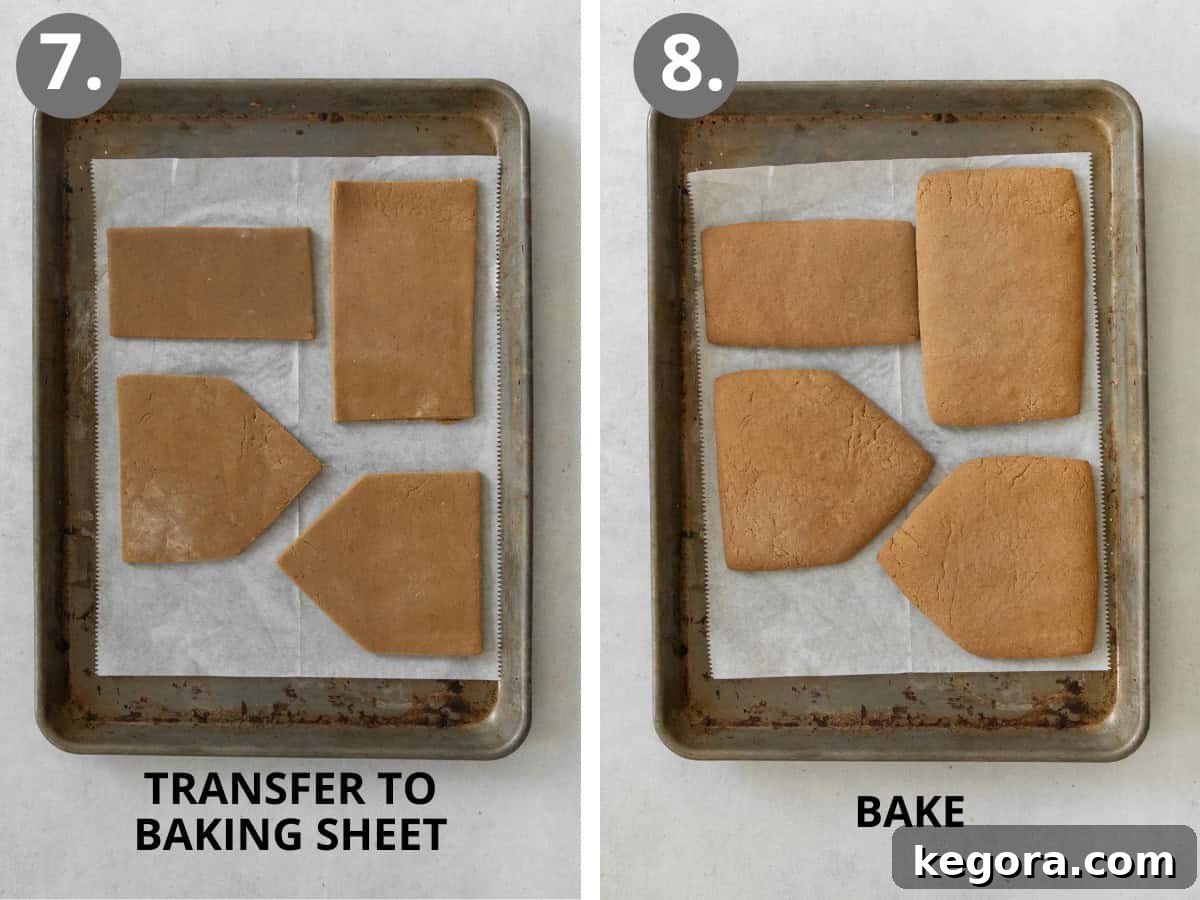
- Transfer to Baking Sheet and Chill (Again!): Carefully transfer your cut gingerbread pieces to a baking sheet lined with parchment paper, leaving at least 2 inches of space between each cookie to allow for even baking. Repeat the rolling and cutting process with the second disc of dough, cutting out the remaining pentagon wall, side wall, and roof piece. Once all pieces are on baking sheets, place them in the freezer to chill for another 15 minutes. This second chilling step is crucial for preventing the cookies from spreading and helps them maintain their sharp, defined shapes during baking, which is vital for a structurally sound house.
- Bake: Preheat your oven to 350°F (175°C). Bake the gingerbread pieces until they are golden brown and crisp around the edges. Larger pieces, such as the walls and roof, will require approximately 20-22 minutes of baking time. Smaller decorative pieces, like stars or gingerbread men, will bake faster, needing only about 12-14 minutes. Keep a close eye on them to prevent burning. Once baked, allow the cookies to cool completely on the baking sheet before attempting to move them. They will be fragile when warm but will firm up as they cool.
Part 2: Crafting the Perfect Royal Icing
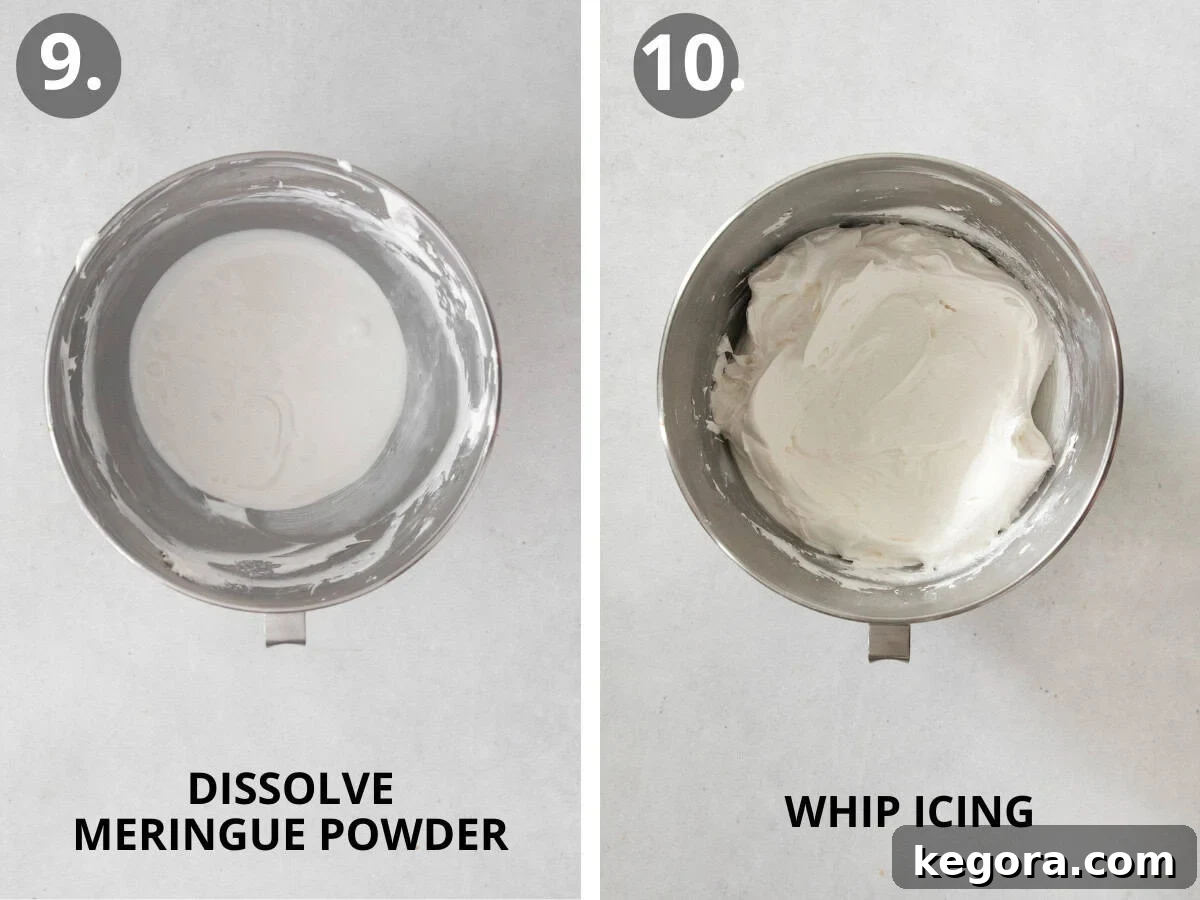
- Dissolve Meringue Powder: In the bowl of a stand mixer fitted with the whisk attachment, combine the meringue powder and warm water. Mix on medium-low speed for about 30 seconds, or until the meringue powder is fully dissolved and smooth. This step ensures a lump-free icing.
- Whip Icing to Stiff Peaks: Add the vanilla extract and mix to combine. Then, with the mixer on medium-low speed, gradually add the powdered sugar, one cup at a time, until all 6 cups are incorporated. Once all the sugar is in, scrape down the sides of the bowl to ensure everything is mixed. Increase the mixer speed to medium-high and beat the icing for approximately 2 minutes. Continue whipping until the icing reaches stiff peaks – it should be very thick, resembling the consistency of toothpaste. This firm icing is crucial for assembling your gingerbread house, acting as a strong adhesive. Transfer half of this stiff icing to a piping bag for assembly, and leave the remaining half in the bowl for later adjustment.
Part 3: Assembling Your Gingerbread House
This is where your gingerbread vision comes to life! Patience and a steady hand are your best friends during assembly. Allow each section to dry slightly before moving to the next for maximum stability.
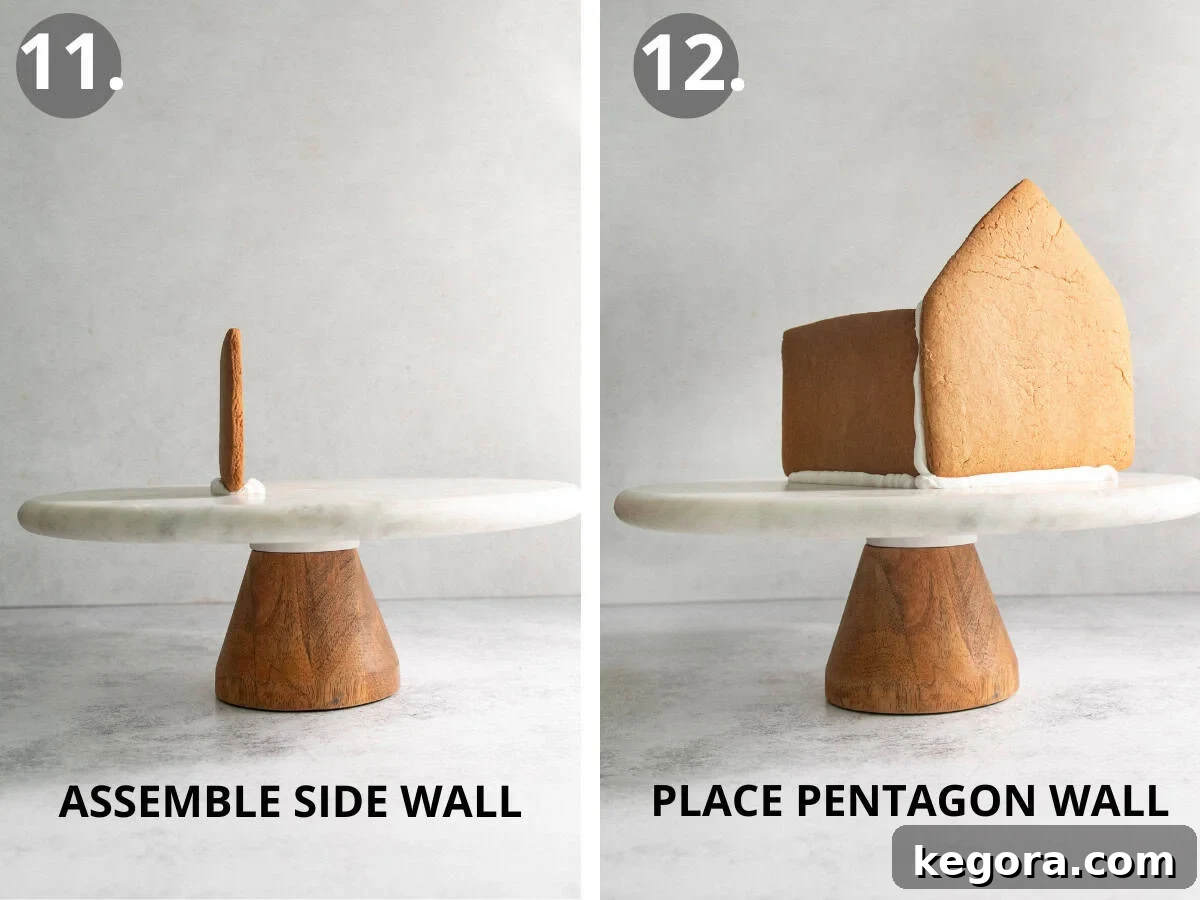
- Assemble First Side Wall: Begin by piping a generous line of your stiff royal icing onto your chosen serving platter or base. Carefully position one of your rectangular side walls directly onto this icing line, pressing gently to secure it. This forms the foundation.
- Attach First Pentagon Wall: Next, pipe a line of icing perpendicular to the front edge of the side wall you just placed. Also, pipe a line of icing along the adjacent edge of the side wall itself, where it will meet the pentagon wall. Now, carefully place one of the pentagon-shaped front/back walls into these lines of icing, gently pressing the two pieces together. Hold it in place for a moment to allow the icing to begin setting, ensuring a strong bond.
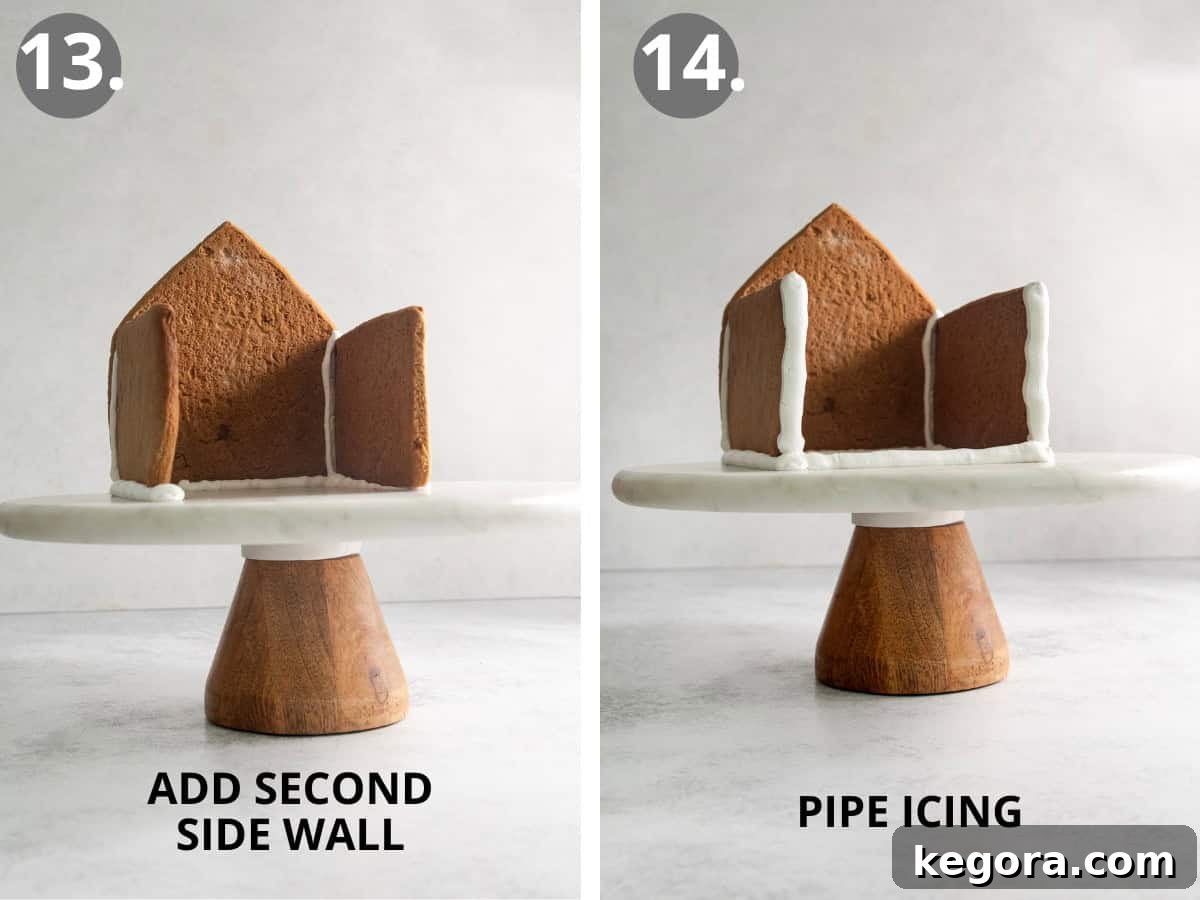
- Add Second Side Wall: Repeat the previous steps to attach the second rectangular side wall, connecting it to the first pentagon wall and securing its base to the serving platter with icing.
- Complete the Walls with the Second Pentagon Wall: Pipe icing along the open edges of the two side walls and apply a line of icing on the serving platter to complete the perimeter. Carefully fit the second pentagon wall into place, pressing gently to join all four walls. Allow the entire wall structure to dry and set for at least 15-30 minutes before proceeding, or longer if needed, to ensure maximum stability. You can use cans or small jars to prop up the walls while they dry.
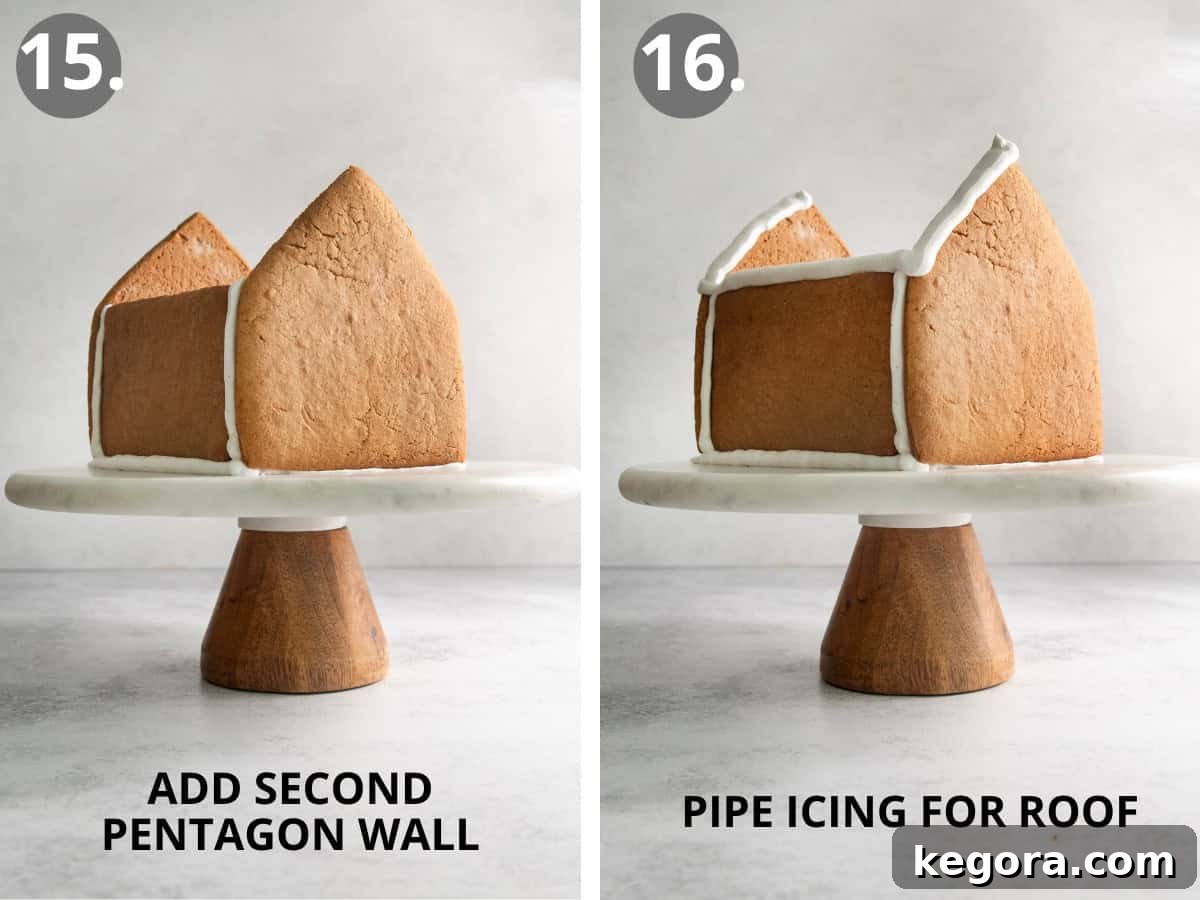
- Pipe Icing for the First Roof Panel: Once the walls are firmly set, pipe a continuous line of stiff royal icing along the top edge of one pentagon wall and the adjacent top edge of the side wall. This will create a secure “seam” for your roof.
- Attach First Roof Panel: Carefully lift one of your rectangular roof panels and gently place it onto the piped icing, aligning it with the edges of the walls. Hold it in place for a minute or two, applying light pressure, until it feels stable.
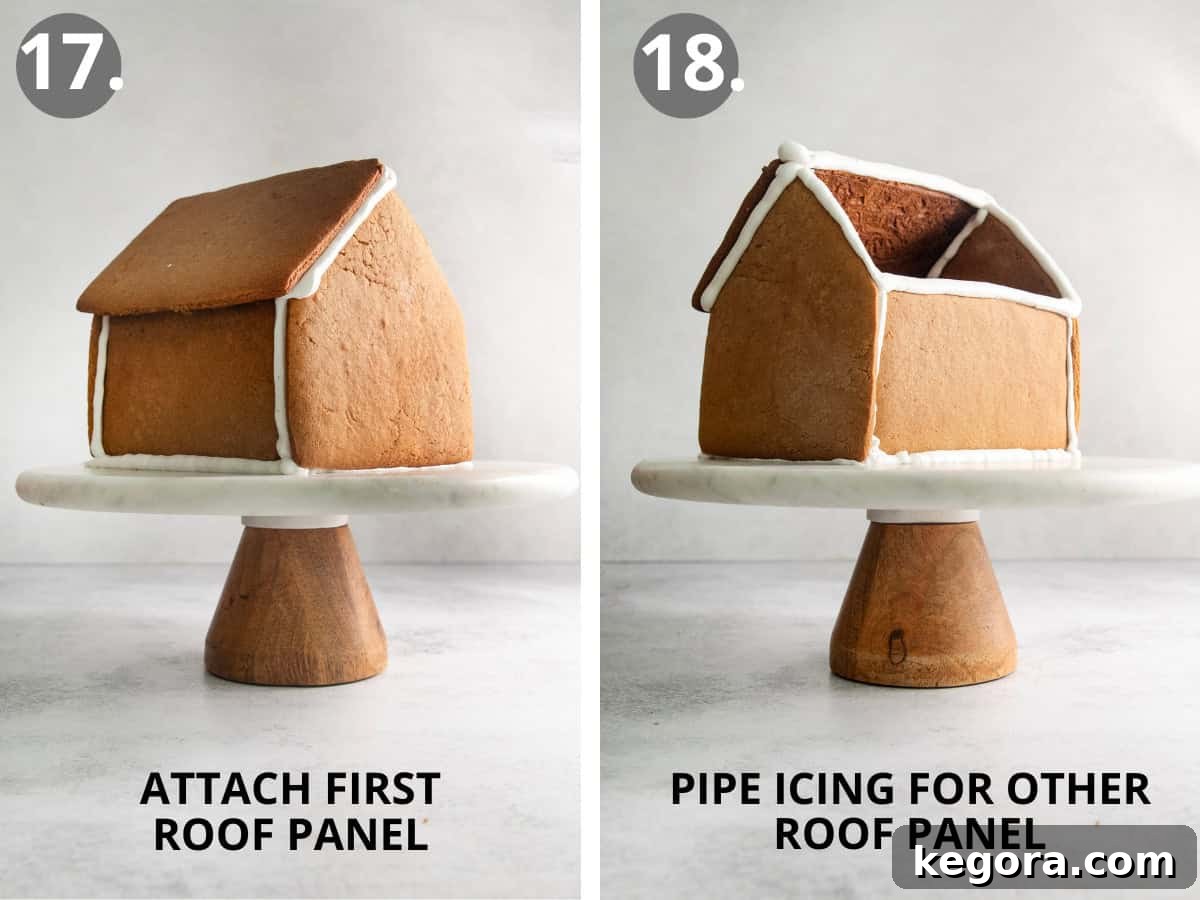
- Pipe Icing for the Second Roof Panel: Repeat the piping process, running a line of icing along the remaining top edge of the other pentagon wall and the other side wall. Also, apply a thin line of icing along the top edge of the first roof panel where the second panel will overlap.
- Attach Second Roof Panel: Carefully attach the second roof panel, aligning it perfectly and pressing gently into the fresh icing. Ensure the two roof panels meet neatly at the peak. Allow the entire structure to dry undisturbed for at least 1-2 hours, or even overnight, to ensure the icing hardens completely and your gingerbread house is perfectly stable before decorating.
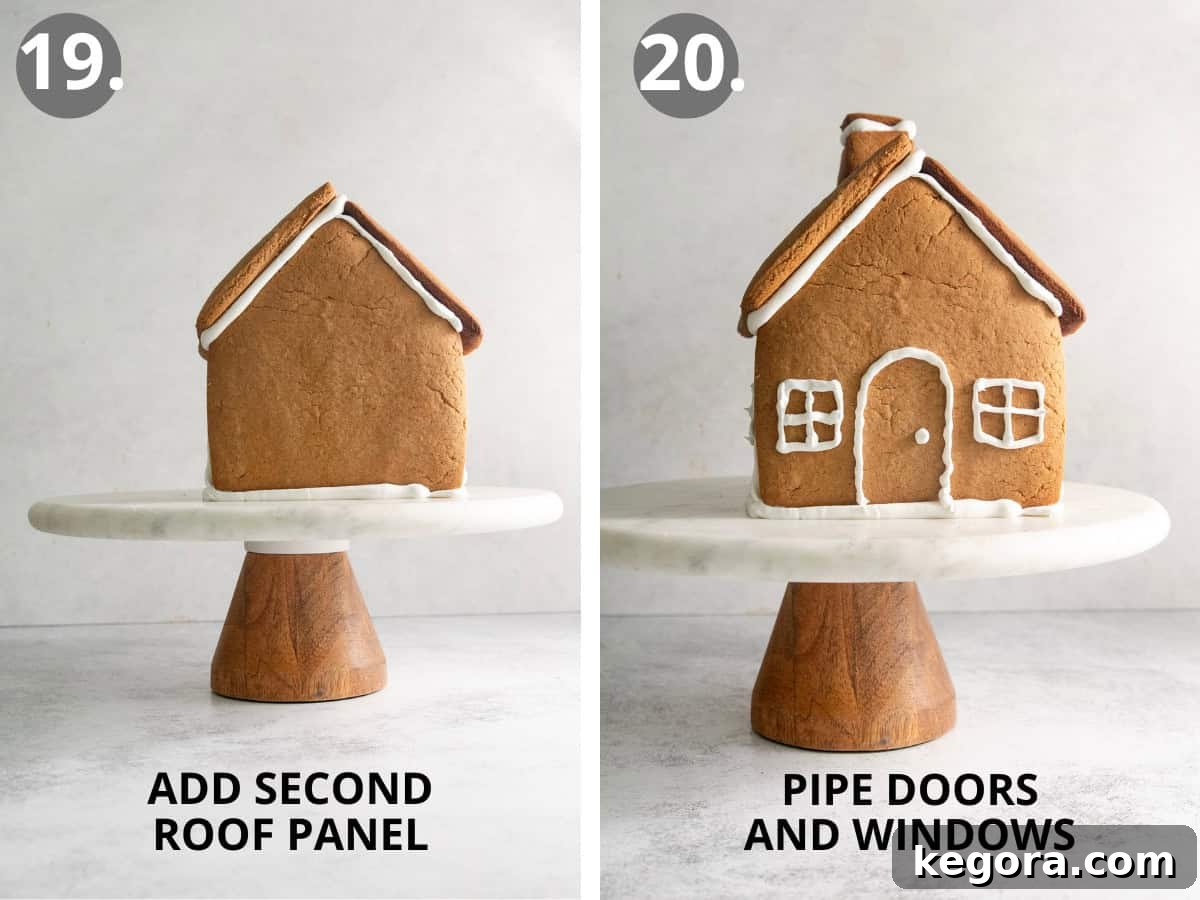
- Prepare Icing for Decoration (Piping Consistency): Now it’s time to bring out the artistic side! Take the reserved royal icing from Part 2. Turn your mixer to low speed and gradually add water, one tablespoon at a time, until the icing reaches a “piping consistency.” This means it should be thin enough to flow smoothly through a piping bag to create clean lines for doors and windows, but thick enough that it doesn’t run or lose its shape. You’ll likely need about 3 tablespoons of water. If you accidentally add too much water and it becomes too runny, simply add a little more powdered sugar to thicken it back up. Transfer about half of this piping consistency icing into a clean piping bag fitted with a small round tip. Use this to pipe out intricate doors, charming windows, and perhaps a chimney detail on your gingerbread house.
- Prepare Icing for Decoration (Flood Consistency): For the remaining piping consistency icing, continue adding water, about 1 tablespoon at a time, until it reaches a “flood consistency.” This consistency is achieved when the icing flows smoothly and effortlessly off your whisk, creating a continuous stream. You’ll likely need about 3 more tablespoons of water. This thinner icing is perfect for filling in larger areas smoothly, creating a snowy effect, or adding a soft glaze. Transfer this flood consistency icing to another piping bag.
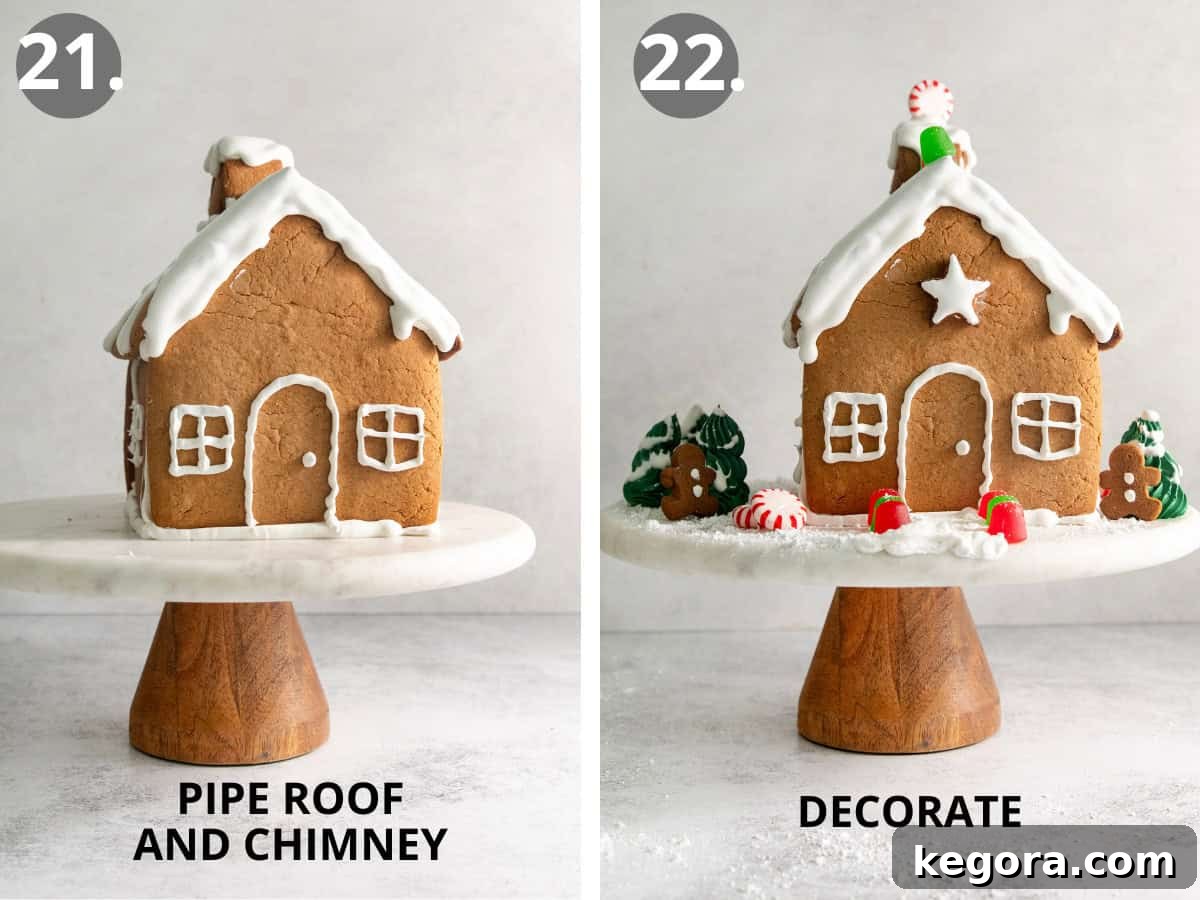
- Decorate the Roof and Chimney with “Snow”: With your flood consistency icing, drizzle the roof of your gingerbread house to create a beautiful, smooth “snow” effect. If you wish to add sprinkles for extra sparkle, do so immediately while the icing is still wet so they adhere properly.
- Apply Candy Decorations: Using your piping consistency icing, you can now attach peppermints, gumdrops, M&M’s, candy canes, or any other festive decorations you’ve chosen. The thicker icing will act as a strong adhesive, ensuring your candies stay securely in place. Get creative with patterns, arrangements, and colors to make your gingerbread house truly unique and reflective of your holiday spirit! Allow all the icing to set completely at room temperature, ideally for about 1 hour, before handling or enjoying your magnificent gluten-free gingerbread house.
Storage, Make-Ahead, and Freezing Instructions for Gingerbread
Planning ahead can make the gingerbread house building process even more enjoyable and stress-free. Here’s how to store your gingerbread house, prepare components in advance, and even freeze them for future holiday fun.
- To Store a Fully Assembled Gingerbread House: While your beautifully decorated gingerbread house can certainly be put on display throughout the holiday season to add festive cheer, it’s best enjoyed for eating on the same day it is assembled. After a day or two of being exposed to air, the gingerbread can begin to dry out, and the candies might lose some of their freshness. If you plan to eat it, consume it within 24-48 hours for optimal taste and texture. If solely for display, it can last much longer, but avoid consuming it after prolonged exposure.
- To Make Ahead (Gingerbread Cookies): To save valuable time during the busy holiday season, you can prepare the gingerbread cookies up to 48 hours in advance of assembly day. Once baked and completely cooled, store the unfrosted gingerbread pieces in an airtight container at room temperature. This will keep them fresh and ready for when you’re prepared to embark on the decorating process. Remember, the royal icing is best made fresh just before assembly, as it hardens quickly once prepared.
- To Freeze (Unfrosted, Unassembled Cookies): For even longer-term planning, unfrosted and unassembled gingerbread cookies can be stored in the freezer for up to three months. Wrap them tightly in plastic wrap, then place them in an airtight freezer-safe container or bag to prevent freezer burn. When you’re ready to build your gingerbread house, simply remove the frozen cookies and let them thaw at room temperature for a few hours. Once thawed, they will be ready for assembly. Just like with make-ahead cookies, prepare your royal icing immediately before you plan to assemble and decorate.
Can This Gingerbread House Be Made Dairy-Free?
Absolutely! Adapting this **gluten-free gingerbread house recipe** to be dairy-free is quite simple, making it enjoyable for even more guests with dietary needs. The primary dairy-containing ingredients in the gingerbread cookie dough are butter. To make it dairy-free, simply substitute regular butter with a high-quality dairy-free butter alternative (often found in stick form, suitable for baking). Similarly, ensure any shortening used is vegetable-based and dairy-free. When selecting your fun candy decorations, always double-check the labels to confirm they are also dairy-free. Many popular candies have dairy-free versions available, so you won’t have to compromise on festive flair!
Can I Use a Different Type of Icing Instead of Royal Icing?
For the purpose of assembling a gingerbread house, royal icing is undeniably the best choice, and for very good reason. Its unique composition allows it to dry hard and firm, creating a powerful, edible “glue” that provides essential structural stability for holding your gingerbread walls and roof panels together. Without this rigidity, your gingerbread house would likely collapse. However, if your intention is solely to decorate individual gingerbread cookies (not assemble a standing house), then you have more flexibility. In such cases, a simple buttercream frosting or even a good quality store-bought icing can be used. These icings remain softer and creamier, offering a different texture and taste experience perfect for standalone cookies, but they lack the hardening properties necessary for construction.
What Can Be Substituted for Meringue Powder in Royal Icing?
Meringue powder is highly recommended for royal icing due to its safety and consistent results, eliminating the need for raw egg whites. However, if you find yourself without meringue powder, you do have a couple of substitution options, though they come with some considerations:
- Raw Egg Whites: You can substitute the meringue powder with 3 large fresh egg whites. It’s important to note, however, that using raw egg whites carries a small risk of foodborne illness (such as salmonella). If you choose this route, ensure your eggs are very fresh and from a reliable source.
- Pasteurized Egg Whites: A safer alternative to raw egg whites is to use pasteurized liquid egg whites, which have been heat-treated to eliminate bacteria. These are typically found in cartons in the refrigerated section of most grocery stores. You would use an equivalent amount to 3 large egg whites.
- Powdered Egg White Substitutes: Beyond meringue powder, there are other powdered egg white substitutes available that can also work. Always follow the package instructions for reconstitution and ensure they are suitable for royal icing applications.
Regardless of your substitute, the goal is to achieve the correct consistency for the royal icing, which is crucial for both assembly and decoration.

More Delightful Gluten-Free Holiday Recipes
If you’re looking to expand your repertoire of delicious **gluten-free holiday treats** beyond this magnificent gingerbread house, explore these other fantastic recipes that are perfect for festive gatherings and cozy moments:
- Gluten-Free Christmas Cookies
- Gluten-Free Spritz Cookies
- Gluten-Free Gingerbread Bars
- Gluten-Free Ginger Snaps
- Gluten-Free Gingerbread Cookies
- Gluten-Free Peppermint Sour Cream Sugar Cookies
- Gluten-Free Chocolate Yule Log

Gluten-Free Gingerbread House Recipe
Erin Collins
2 hrs 30 mins
25 mins
1 gingerbread house
Comments
Ingredients
For the Gluten-Free Gingerbread House
- 3 cups (450g) gluten-free measure-for-measure flour (such as King Arthur)
- 2 1/2 teaspoons ground ginger
- 1 teaspoon baking soda
- 1 teaspoon ground cinnamon
- 1/2 teaspoon kosher salt
- 1/2 teaspoon ground cloves
- 1/2 cup (113g) butter, at room temperature
- 1/4 cup (49g) vegetable shortening
- 1 cup (213g) light brown sugar, lightly packed
- 1/3 cup (80ml) molasses
- 1 large egg
- 1 teaspoon vanilla extract
For the Royal Icing
- 1/2 cup (60g) meringue powder
- 1/2 cup (120ml) warm water, plus more as needed
- 1 teaspoon vanilla extract
- 6 cups (720g) powdered sugar
- Optional candy decorations: peppermints, gumdrops, M&Ms, candy canes, sprinkles, etc. (ensure they are gluten-free)
Instructions
For the Gingerbread House Components
- In a medium bowl, whisk together the gluten-free flour, ground ginger, baking soda, ground cinnamon, kosher salt, and ground cloves until well combined. Set aside.
- In the bowl of a stand mixer fitted with the paddle attachment, cream together the butter, shortening, and light brown sugar on medium speed for about 2 minutes, until the mixture is light and fluffy.
- Add the molasses, egg, and vanilla extract. Scrape down the sides of the bowl and mix until just combined.
- With the mixer on low speed, slowly add the dry ingredients to the wet ingredients. Mix until the dry ingredients are just incorporated, being careful not to overmix.
- Divide the dough in half and shape each half into a 1-inch thick disc. Wrap each disc tightly in plastic wrap and refrigerate for 30 minutes to chill.
- Once chilled, lightly dust your work surface with gluten-free flour. Working with one disc at a time, roll the dough until it is 1/4 inch thick.
- Using your templates, cut out one pentagon wall, one side wall, and one roof piece. Also, cut out any desired decorative shapes (stars, gingerbread men, chimney, etc.).
- Carefully transfer the cut gingerbread pieces to a parchment-lined baking sheet, ensuring at least 2 inches of space between each piece. Repeat steps 6 and 7 with the second disc of dough, cutting out another pentagon wall, side wall, and roof piece.
- Re-roll any unused dough scraps and cut out extra shapes or additional walls as a backup.
- Place the baking sheets with the cut cookies in the freezer to chill for 15 minutes. While they chill, preheat your oven to 350°F (175°C).
- Bake the cookies until they are golden brown and crisp around the edges. Large pieces (walls and roof) will take approximately 20-22 minutes. Small pieces (chimney, stars, etc.) will take 12-14 minutes. Allow all cookies to cool completely on the baking sheet before attempting to handle or assemble.
For the Royal Icing
- Add the meringue powder and warm water to the bowl of a stand mixer fitted with the whisk attachment. Mix on medium-low speed for about 30 seconds until the meringue powder is dissolved.
- Add the vanilla extract and mix to combine.
- With the mixer on medium-low speed, gradually add the powdered sugar, one cup at a time. Once all the powdered sugar is added, scrape down the sides of the bowl. Increase the mixer speed to medium-high.
- Beat the icing for 2 minutes, or until it reaches stiff peaks and has a thick, toothpaste-like consistency. This is your assembly icing.
- Remove half of this stiff icing and transfer it to a piping bag for immediate use in assembly. Leave the remaining half of the icing in the bowl for later consistency adjustments for decoration.
Assembly and Decoration
- To begin assembly, pipe a generous line of the stiff icing onto your serving platter or base. Place one of the side walls onto this icing line, pressing gently.
- Pipe a line of icing perpendicular to the front of the side wall on the platter, and also along the edge of the side wall where it will meet the front wall. Place a pentagon wall into the icing and gently press the two pieces together. Repeat this process with the remaining two sides to form the basic four-wall structure, ensuring all edges are securely “glued” to the platter and to each other. Allow the structure to dry for at least 15-30 minutes for stability.
- To attach the roof, pipe a continuous line of stiff icing along the top edges of the walls. Carefully position one roof panel onto one side. Repeat for the second roof panel, ensuring it meets neatly at the peak. Allow the entire assembled house to dry completely for 1-2 hours, or ideally overnight, before decorating.
- For decorating (piping consistency): With the reserved icing from step 15, turn the mixer to medium-low speed. Add water 1 tablespoon at a time (approximately 3 tablespoons total) until it reaches a piping consistency – thin enough for smooth lines, but thick enough not to run. If too watery, add more powdered sugar. Transfer half of this icing to a piping bag.
- For decorating (flood consistency): With the remaining piping consistency icing, continue adding water 1 tablespoon at a time (approximately 3 more tablespoons total) until it reaches a flood consistency – it should flow smoothly off the whisk. Transfer this icing to another piping bag.
- Using the piping consistency icing, decorate the gingerbread house by adding details like a door, windows, and a chimney (if using).
- Using the piping consistency icing as adhesive, attach peppermints, gumdrops, M&M’s, or any other decorations you wish to add to the gingerbread house.
- Using the flood consistency icing, drizzle the top of the gingerbread house to create a beautiful snowy effect. Decorate with sprinkles while the icing is still wet, if desired.
- Allow all the icing and decorations to set completely at room temperature (about 1 hour) before handling further or enjoying.
Notes
- To Store: The gingerbread house is best enjoyed for eating on the same day it is assembled. If intended for display, it can last longer, but avoid consuming after a day or two of sitting out.
- To Make Ahead: Gingerbread cookies can be baked and stored in an airtight container in the fridge for up to 48 hours in advance. Royal icing should be made immediately prior to assembly as it hardens quickly.
- To Freeze: Unfrosted, unassembled gingerbread cookies can be frozen for up to three months in an airtight container. Thaw at room temperature before assembling. Make royal icing fresh just before assembly.
- To Make Dairy-Free: Substitute dairy butter with a dairy-free butter alternative in the cookie dough. Ensure all candy decorations are also dairy-free.
Nutrition
Carbohydrates: 1287g |
Protein: 44g |
Fat: 160g |
Saturated Fat: 73g |
Polyunsaturated Fat: 21g |
Monounsaturated Fat: 49g |
Trans Fat: 10g |
Cholesterol: 408mg |
Sodium: 3180mg |
Potassium: 2132mg |
Fiber: 39g |
Sugar: 1015g |
Vitamin A: 3083IU |
Vitamin C: 0.1mg |
Calcium: 750mg |
Iron: 22mg