

This gluten-free chili is a blend of beef, beans, tomatoes, and a carefully selected medley of spices, all patiently simmered to perfection until it’s wonderfully tender and bursting with rich, comforting flavor. Naturally gluten-free and incredibly versatile, this recipe can be easily prepared in your Instant Pot for a quick weeknight meal or slowly cooked on the stovetop for that classic, deep chili taste.
There’s an undeniable comfort in a generous bowl of chili, especially on a crisp, cold day. It’s the kind of meal that wraps you in warmth from the inside out, making every spoonful a pure delight. This hearty gluten-free chili is designed to be the ultimate crowd-pleaser, perfect for cozy family dinners, game day gatherings, or simply a comforting solo meal. Elevate your chili experience by serving it with warm gluten-free garlic bread, fluffy gluten-free corn muffins, or soft gluten-free dinner rolls. Each pairing promises to complete a truly satisfying and delicious meal.

The Ultimate Gluten-Free Chili Recipe: Hearty & Flavorful (Award-Winning!)
This award-winning chili recipe has earned its spot as a consistent family favorite, praised for its robust flavor and satisfying texture. Combining ground beef with savory sausage, a rich tomato base, and a perfectly balanced blend of spices, every spoonful is packed with bold and inviting flavors that are sure to impress. It’s the kind of recipe you’ll return to again and again.
In today’s busy world, convenience is key, which is why I often opt for making this chili in my Instant Pot. It drastically cuts down on cooking time without sacrificing any of the deep flavors you’d expect from a slow-simmered chili. However, if you prefer the traditional method or simply don’t own an Instant Pot, rest assured that this recipe is equally delicious when prepared on the stovetop, allowing the flavors to meld beautifully over a longer, gentle simmer. Both methods yield a fantastic result, giving you the flexibility to choose what best fits your schedule and cooking style.
For those looking to expand their repertoire of gluten-free comfort foods, be sure to explore these other delicious recipes: a soothing bowl of gluten-free chicken noodle soup, flavorful gluten-free enchiladas, or a classic gluten-free lasagna. Each offers a unique way to enjoy wholesome, gluten-free goodness.
Is Chili Naturally Gluten-Free? A Deeper Dive
The vast majority of traditional chili recipes are indeed naturally gluten-free, relying on a wholesome foundation of ingredients like ground beef, beans, tomatoes, and an array of spices. These core components are inherently free of gluten. However, it’s crucial to exercise caution and always scrutinize ingredient labels, as some processed items or additives can surprisingly contain hidden gluten.
Common culprits include certain brands of beer, which are sometimes used in chili recipes for depth of flavor, and Worcestershire sauce, which frequently contains gluten-derived ingredients. Even some pre-made spice blends or chicken stocks can have anti-caking agents or thickeners that contain gluten. This specific recipe is meticulously crafted with 100% gluten-free ingredients, ensuring a safe and delicious meal for everyone. As a best practice for any gluten-free cooking, always double-check the labels on products such as turkey sausage and chicken stock to confirm that the brands you choose are certified or explicitly labeled gluten-free. This vigilance helps prevent cross-contamination and ensures your chili remains entirely gluten-free.
Don’t forget to pair this rich chili with a side of the best gluten-free cornbread for an unbeatable combination of flavors and textures!
Essential Ingredients for Your Perfect Gluten-Free Chili
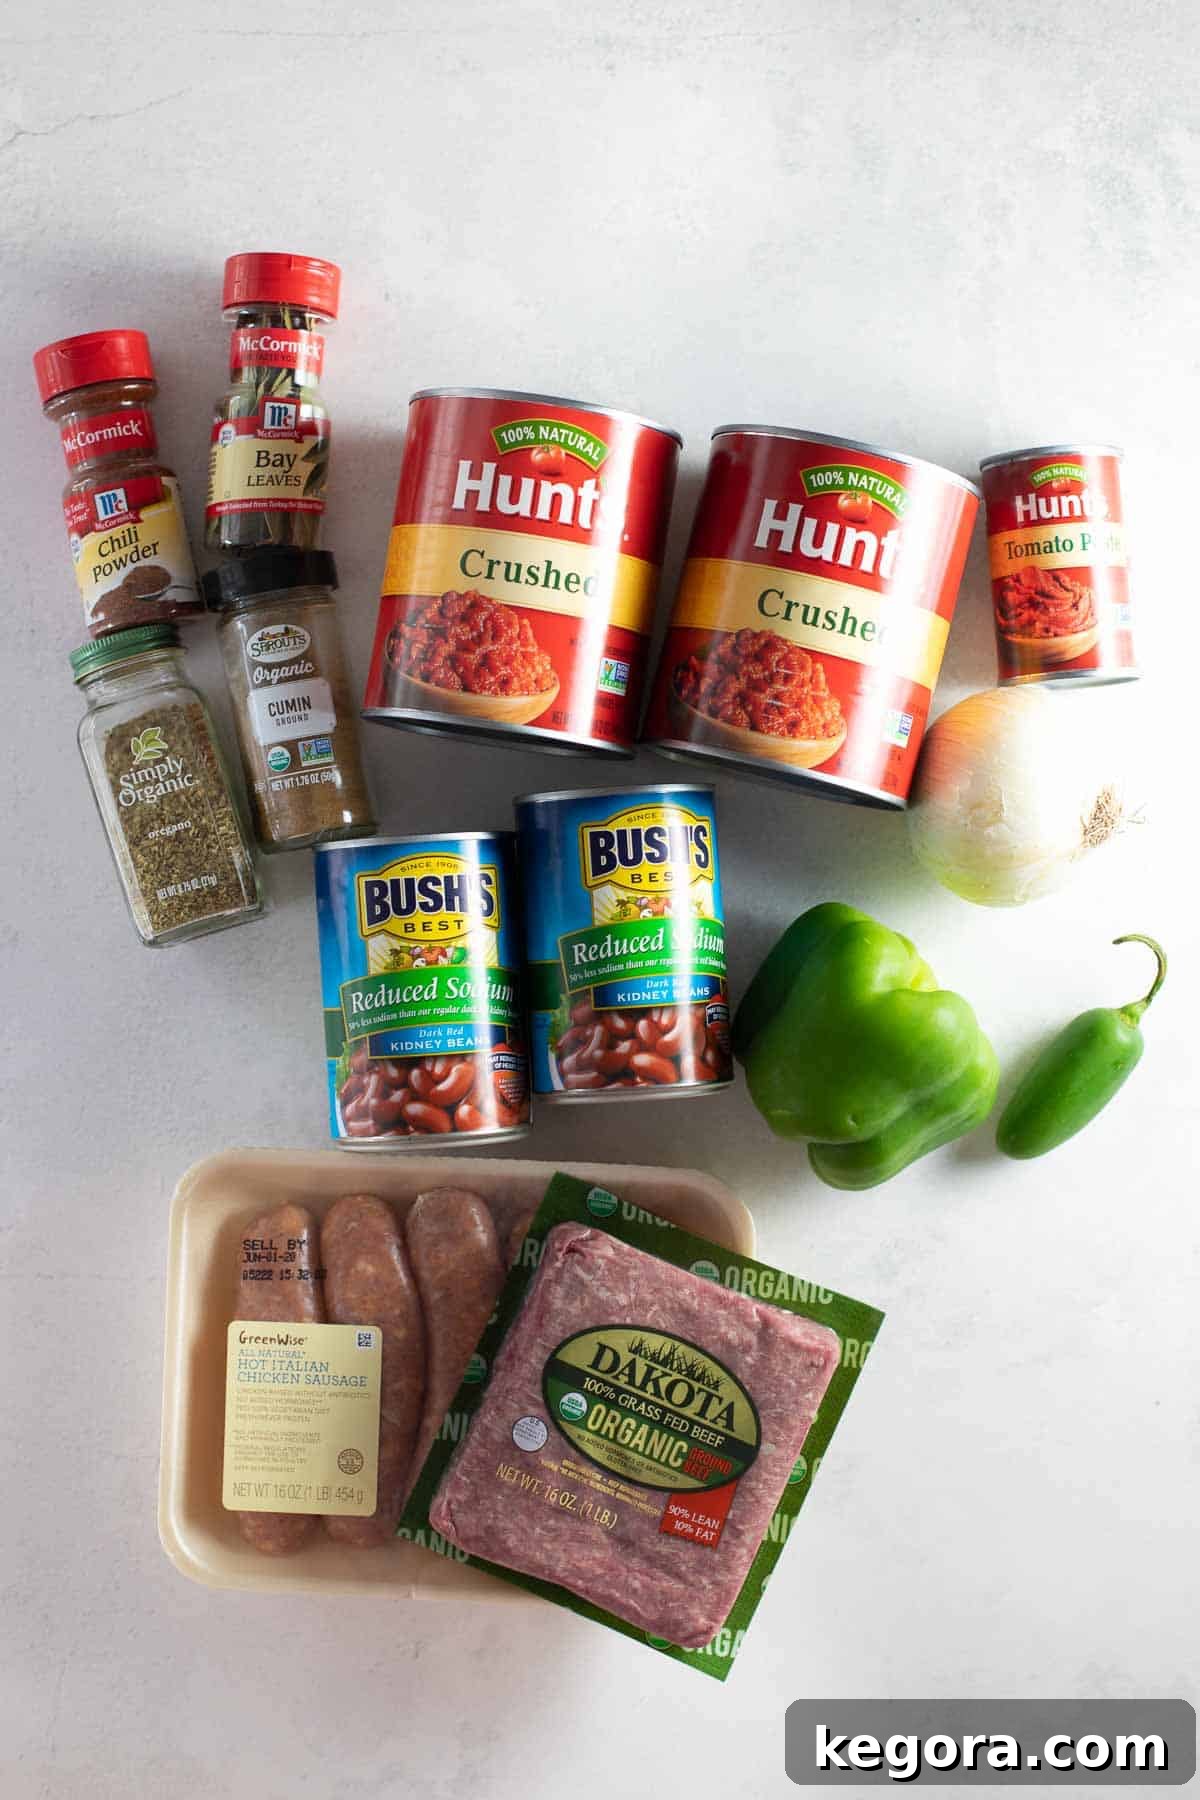
Crafting a truly exceptional chili begins with selecting the right ingredients. Each component in this recipe plays a crucial role in building layers of flavor and achieving that perfect comforting consistency. Here’s a breakdown of what you’ll need and why:
- Ground Beef & Sausage: The foundation of this chili’s robust flavor comes from a combination of meats. I prefer using a mix of lean ground beef for its classic chili texture and a flavorful pork breakfast sausage (ensure it’s gluten-free!) to introduce a delightful depth and savory kick that sets this chili apart. You can adjust the fat content to your preference.
- Aromatic Vegetables (Onion, Green Pepper, Jalapeño, Garlic): These humble vegetables are the flavor-building blocks. Chopped onion provides a sweet base, green pepper adds a fresh, slightly bitter note, and a seeded and minced jalapeño offers a gentle warmth without overwhelming heat. Minced garlic, of course, is indispensable for its pungent aroma and savory depth. For a spicier chili, leave some seeds in the jalapeño.
- Crushed Tomatoes: I specifically recommend crushed tomatoes because they contribute a rich, saucy texture without being overly chunky, creating a smooth and luscious chili base that clings beautifully to every ingredient.
- Tomato Paste: This concentrated tomato goodness is a secret weapon, adding a profound, umami-rich tomato flavor that truly deepens the entire chili. It’s essential for that slow-cooked taste.
- Signature Spices: A meticulously balanced blend of chili powder, cumin, and oregano forms the heart of this chili’s flavor profile. Chili powder brings warmth and complexity, cumin adds earthy notes, and oregano provides a subtle herbaceousness. Two bay leaves are included to infuse the chili with an aromatic, savory depth as it simmers. Adjust these to your personal taste.
- Brown Sugar: A touch of brown sugar might seem unusual, but it plays a vital role in balancing the acidity of the tomatoes. It rounds out the flavors, adding a subtle sweetness that enhances the overall richness without making the chili overtly sweet.
- Chicken Stock or Water: This liquid is crucial, especially when using an Instant Pot, as it provides the necessary moisture for the pot to come up to pressure safely. For stovetop cooking, it helps create the perfect simmering consistency. Chicken stock will add more flavor, but water works just fine.
- Kidney Beans: Canned kidney beans are incredibly convenient for this recipe. Just be sure to drain and rinse them thoroughly before adding them to remove excess sodium and any starchy liquid. They provide a wonderful hearty texture and boost the fiber content.
How to Master This Gluten-Free Chili Recipe
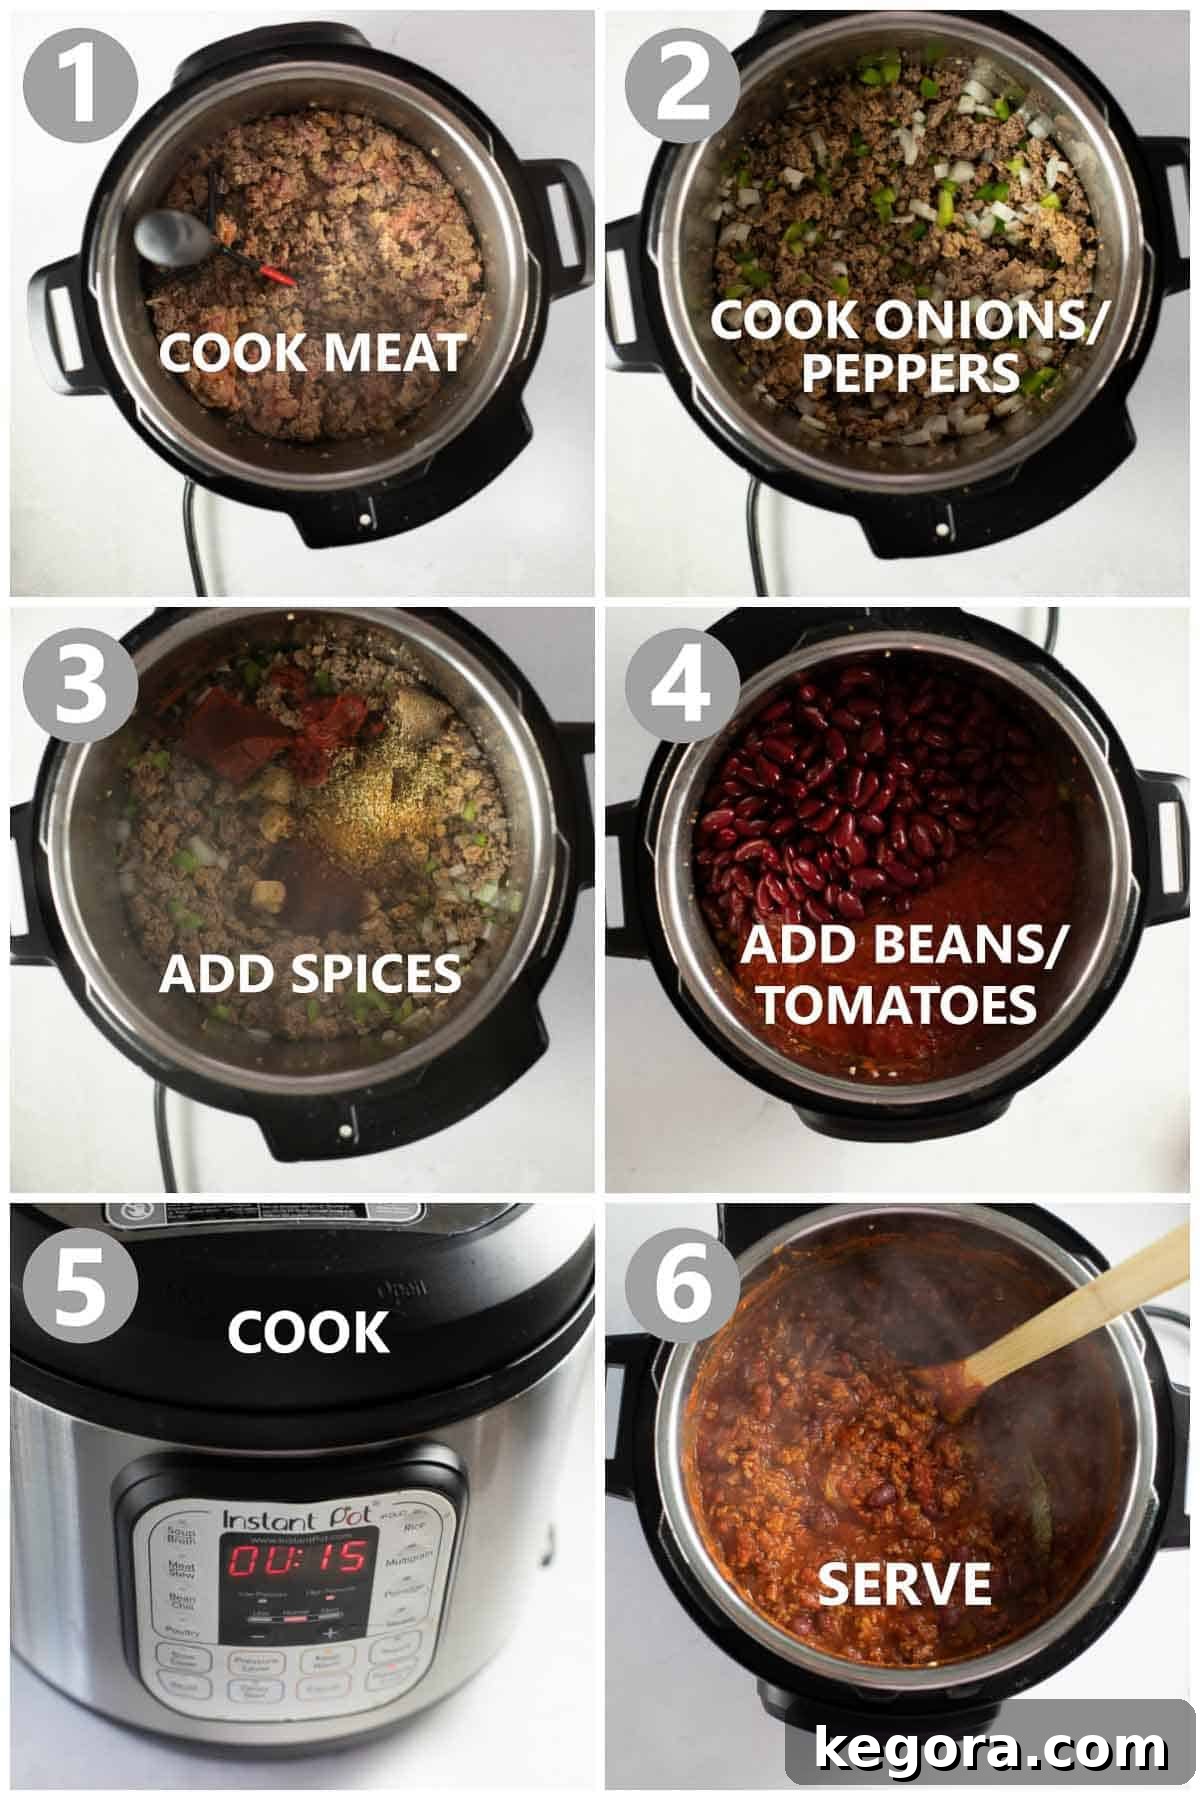
This award-winning gluten-free chili recipe is incredibly adaptable, allowing you to achieve delicious results whether you prefer the speed and convenience of an Instant Pot or the classic, slow-simmered perfection of a stovetop pot. Below, you’ll find detailed instructions for both methods. The visual guide above provides a helpful overview of the Instant Pot process, but rest assured, the stovetop method is just as straightforward and rewarding.
For the Instant Pot: Quick & Easy Comfort
The Instant Pot makes quick work of this chili, locking in flavors under pressure for a rich taste in a fraction of the time.
- Brown the Meat: Begin by turning your Instant Pot to the “Saute” function. Once hot, add a tablespoon of olive oil. Add both the ground beef and sausage to the pot. Cook until thoroughly browned, using a spatula or a meat chopper to break the meat into fine crumbles as it cooks. Once browned, carefully drain any excess fat from the pot to prevent the chili from becoming greasy.
- Sauté Aromatics: Add the chopped onion, green pepper, and minced jalapeño to the browned meat in the Instant Pot. Continue to sauté for approximately 3-5 minutes, stirring occasionally, until the vegetables have softened and become fragrant. This step is crucial for building the foundational flavors of your chili.
- Bloom the Spices & Tomato Paste: Next, add the chili powder, cumin, oregano, salt, pepper, brown sugar, bay leaves, and minced garlic to the pot, along with the tomato paste. Stir everything together well, and cook for an additional 1-2 minutes. This brief cooking time allows the spices to “bloom” in the hot oil, intensifying their flavors, and helps to deepen the color and richness of the tomato paste.
- Pressure Cook to Perfection: Pour in the crushed tomatoes, chicken stock (or water), and the drained and rinsed kidney beans. Stir gently to combine all the ingredients. Secure the Instant Pot lid, ensuring the sealing valve is in the “Sealing” position. Select the “Manual” or “High Pressure” setting and set the cooking time for 15 minutes.
- Natural Release & Serve: Once the cooking cycle is complete, allow the Instant Pot to natural release pressure for 10 minutes. This gradual release helps to tenderize the meat and prevents sputtering when you open the lid. After 10 minutes, carefully switch the sealing valve to “Venting” to quick release any remaining pressure. Remove the bay leaves before serving.
- Enjoy: Ladle the hot chili into bowls and top with your favorite garnishes.
For the Stovetop: Classic Simmered Perfection
The stovetop method allows for a gentle, extended simmer that develops a wonderfully complex flavor in your chili.
- Brown the Meat: Heat a large Dutch oven or a heavy-bottomed pot over medium-high heat. Add a tablespoon of olive oil. Introduce the ground beef and sausage to the pot and cook until both are fully browned, breaking them up with a spatula or meat chopper. Once browned, drain any excess fat from the pot to ensure your chili isn’t overly oily.
- Sauté Aromatics: Add the chopped onion, green pepper, and minced jalapeño to the pot with the browned meat. Sauté for about 3-5 minutes, stirring regularly, until the vegetables begin to soften and release their sweet aromas. This step lays down a critical flavor base.
- Bloom the Spices & Tomato Paste: Stir in the chili powder, cumin, oregano, salt, pepper, brown sugar, bay leaves, and minced garlic, along with the tomato paste. Cook for 1-2 minutes, stirring continuously, until the spices become fragrant and the tomato paste deepens in color. This process enhances the spices’ flavor.
- Simmer to Perfection: Pour in the crushed tomatoes, chicken stock (or water), and the drained and rinsed kidney beans. Stir well to combine all ingredients thoroughly. Bring the mixture to a gentle boil, then immediately reduce the heat to low. Cover the pot and let the chili simmer for 40-50 minutes, stirring occasionally to prevent sticking and ensure even cooking. The longer it simmers, the more the flavors will marry and deepen.
- Rest & Serve: After simmering, turn off the heat and let the chili rest, still covered, for about 10 minutes. This resting period allows the flavors to settle and intensify. Before serving, remember to remove the bay leaves.
- Enjoy: Serve hot, with your favorite toppings!

Serving & Storing Your Delicious Gluten-Free Chili
Once your gluten-free chili is ready, the possibilities for serving and savoring it are endless. Here’s how to make the most of this comforting dish.
How to Serve: Elevate Your Chili Experience
This chili is incredibly versatile and shines with an array of toppings. Encourage your guests or family to customize their bowls with a selection of their favorite garnishes. Consider offering:
- Creamy Additions: A dollop of sour cream or a swirl of plain Greek yogurt adds a cooling, tangy contrast.
- Cheese Please: Shredded cheddar, Monterey Jack, or a Mexican blend melts beautifully and adds a salty, rich flavor.
- Fresh & Zesty: Diced fresh jalapeños (for an extra kick), thinly sliced green onions (scallions), or a sprinkle of fresh cilantro brighten up the dish.
- Crunch Factor: Crushed tortilla chips, Fritos, or even gluten-free croutons provide a satisfying textural contrast.
- Unexpected Pairings: For a true classic, serve this chili over spaghetti or your favorite gluten-free pasta to create a delicious chili mac! It’s also fantastic alongside freshly baked cornbread or your favorite gluten-free dinner rolls for a truly cozy and complete meal.
You might also like this hearty gluten-free meatloaf for another satisfying comfort food option.
How to Store: Maximizing Freshness and Flavor
One of the best qualities of chili is that it often tastes even better the next day! Proper storage ensures you can enjoy its rich flavors for days to come or save it for a future meal.
- Refrigeration: This chili can be prepared up to 5 days in advance. Once cooled completely to room temperature, transfer it to an airtight container and store it in the refrigerator. The flavors will continue to meld and deepen, making it excellent for reheating.
- Freezing: Chili freezes exceptionally well, making it perfect for meal prepping. Allow the chili to cool completely to room temperature before packaging. Divide it into individual portions or larger family-sized amounts in freezer-safe bags (removing as much air as possible) or airtight containers. It will keep well in the freezer for up to 3 months.
- Reheating:
- From Refrigerator: Reheat refrigerated chili gently on the stovetop over medium-low heat, stirring occasionally until heated through. Alternatively, microwave in a microwave-safe bowl, stirring every minute, until hot.
- From Freezer: For best results, let frozen chili defrost in the refrigerator overnight before reheating. If you’re short on time, you can place the frozen chili directly into a glass bowl and defrost it in the microwave, using short intervals and stirring frequently until thawed and heated through.
More Gluten-Free Soups and Stews to Explore:
If you loved this chili, you’ll surely enjoy exploring other comforting and delicious gluten-free soups and stews from our collection:
- Hearty Gluten-Free Beef Stew
- Flavorful White Bean Artichoke Vegetable Soup
- Classic Chicken Tortilla Soup
We truly hope this recipe becomes a cherished favorite in your home, just as it is in ours! If you try it, please consider leaving a comment and rating below. Your feedback means a lot to us and helps other home cooks discover wonderful gluten-free meals!

Gluten-Free Chili (Award Winning!)
Erin Collins
15 minutes
45 minutes
1 hour
8 servings
Comments
Ingredients
- 1 tablespoon olive oil
- 1 pound ground beef
- 1 pound sausage I use pork breakfast sausage
- 1 large onion chopped (about 2 cups)
- 1 green pepper chopped (about 1 cup)
- 1 jalapeno pepper seeded and minced
- 2 tablespoons chili powder
- 1 tablespoon cumin
- 1 teaspoon oregano
- 1/2 teaspoon salt
- 1/4 teaspoon pepper
- 1 tablespoon brown sugar
- 2 bay leaves
- 4 cloves garlic minced
- 3 tablespoons tomato paste
- 2 28 oz cans crushed tomatoes
- 1/4-1/2 cup water or chicken stock
- 2 15 oz cans red kidney beans drained and rinsed
Instructions
For the Instant Pot:
-
Turn your Instant Pot to Saute. Add the olive oil. Add the meat and cook until browned, breaking up the beef and sausage with a spatula (or meat chopper) as you stir.
-
Add the onion, green pepper and jalapeno and cook for 3 more minutes or until softened.
-
Add the chili powder, cumin, oregano, salt, pepper, brown sugar, bay leaves, garlic and tomato paste and cook for 1-2 minutes until fragrant.
-
Pour in the crushed tomatoes, chicken stock and beans and stir to combine. Press MANUAL or High Pressure on the instant pot and cook for 15 minutes. Allow the chili to natural release for 10 minutes.
-
Serve with favorite toppings. Enjoy!
For Stovetop:
-
Heat a large dutch oven or pot over medium-high heat. Add the olive oil. Add the meat and cook until browned, breaking up the beef and sausage with a spatula (or meat chopper) as you stir.
-
Add the onion, green pepper and jalapeno and cook for 3 more minutes or until softened.
-
Add the chili powder, cumin, oregano, salt, pepper, brown sugar, bay leaves, garlic and tomato paste and cook for 1-2 minutes until fragrant.
-
Pour in the crushed tomatoes, chicken stock and beans and stir to combine. Bring to a simmer then reduce the heat and cook, stirring often for 40-50 minutes. Let sit with the lid on and the heat off for 10 minutes before serving.
-
Serve with favorite toppings. Enjoy!
Notes
To Freeze: To freeze this chili let it cool completely to room temperature before packaging into a resealable bag or tupperware to freeze. Let the chili defrost in the fridge overnight before reheating, or simply put the frozen chili in a glass bowl to defrost in the microwave.