
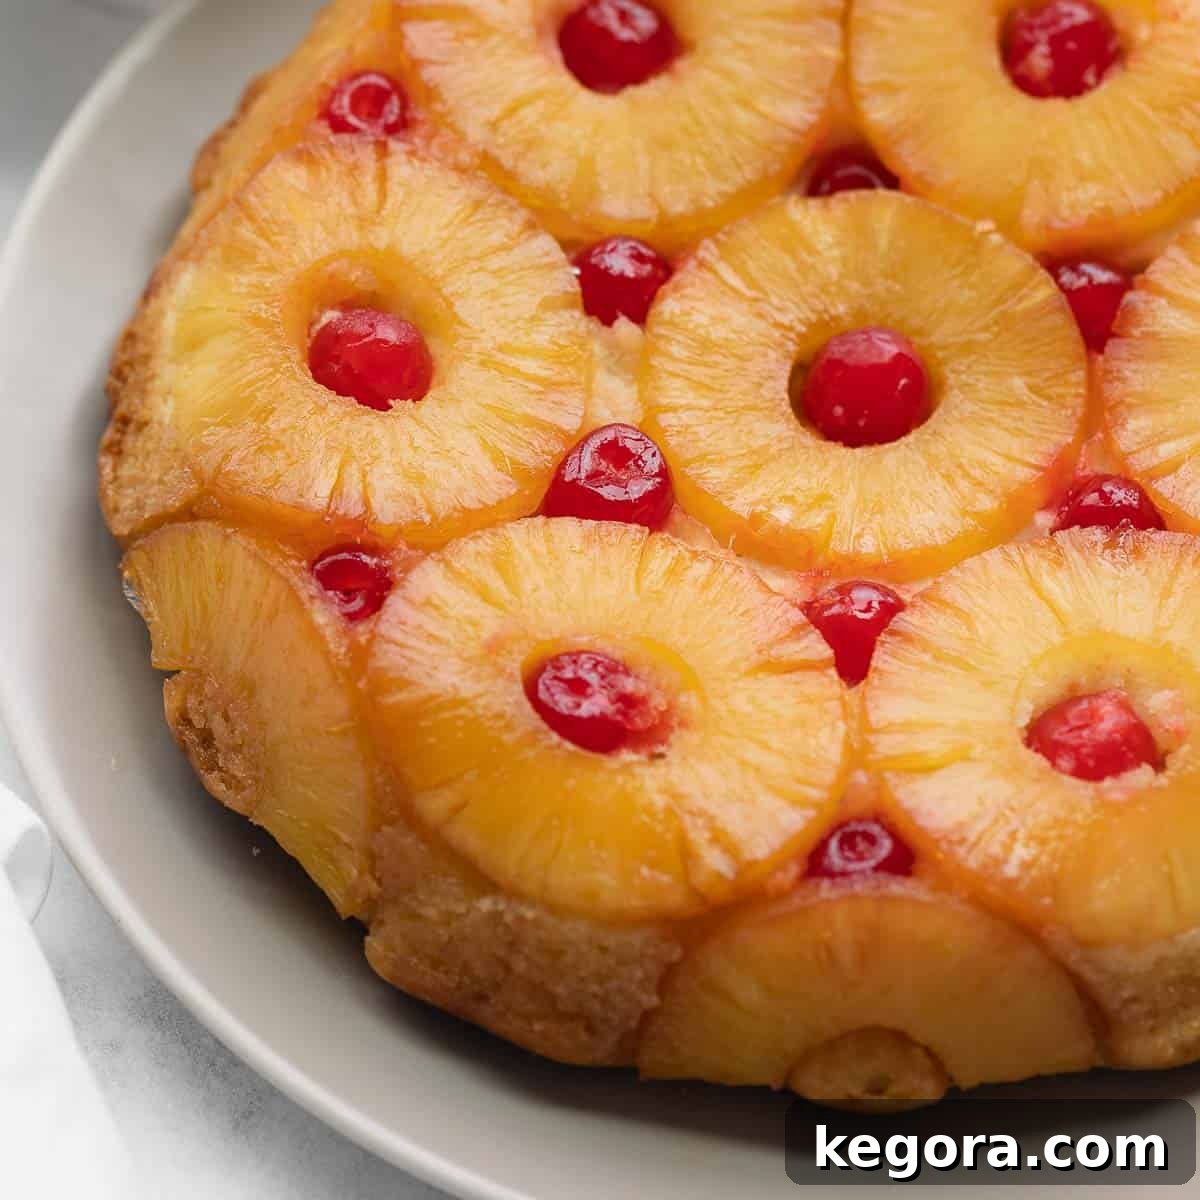
Welcome to the ultimate guide for creating a truly exceptional gluten-free pineapple upside-down cake! This isn’t just any recipe; it’s a meticulously crafted version designed to deliver the tender crumb and rich, caramelized flavor of the classic, all while being completely gluten-free. Imagine a golden, buttery, brown sugar topping infused with juicy pineapple rings and bright maraschino cherries, perfectly complementing an incredibly moist and light gluten-free white cake beneath. This recipe promises a show-stopping dessert that will impress even the most discerning palates, gluten-free or not.
For those who adore the nostalgic charm of a traditional pineapple upside-down cake but require a gluten-free option, your search ends here. This recipe captures the essence of the beloved original, making it a reliable and delicious choice for any occasion. Developed with care and tested for perfection, this cake is poised to become your new favorite gluten-free indulgence, ensuring every bite is a delightful experience.
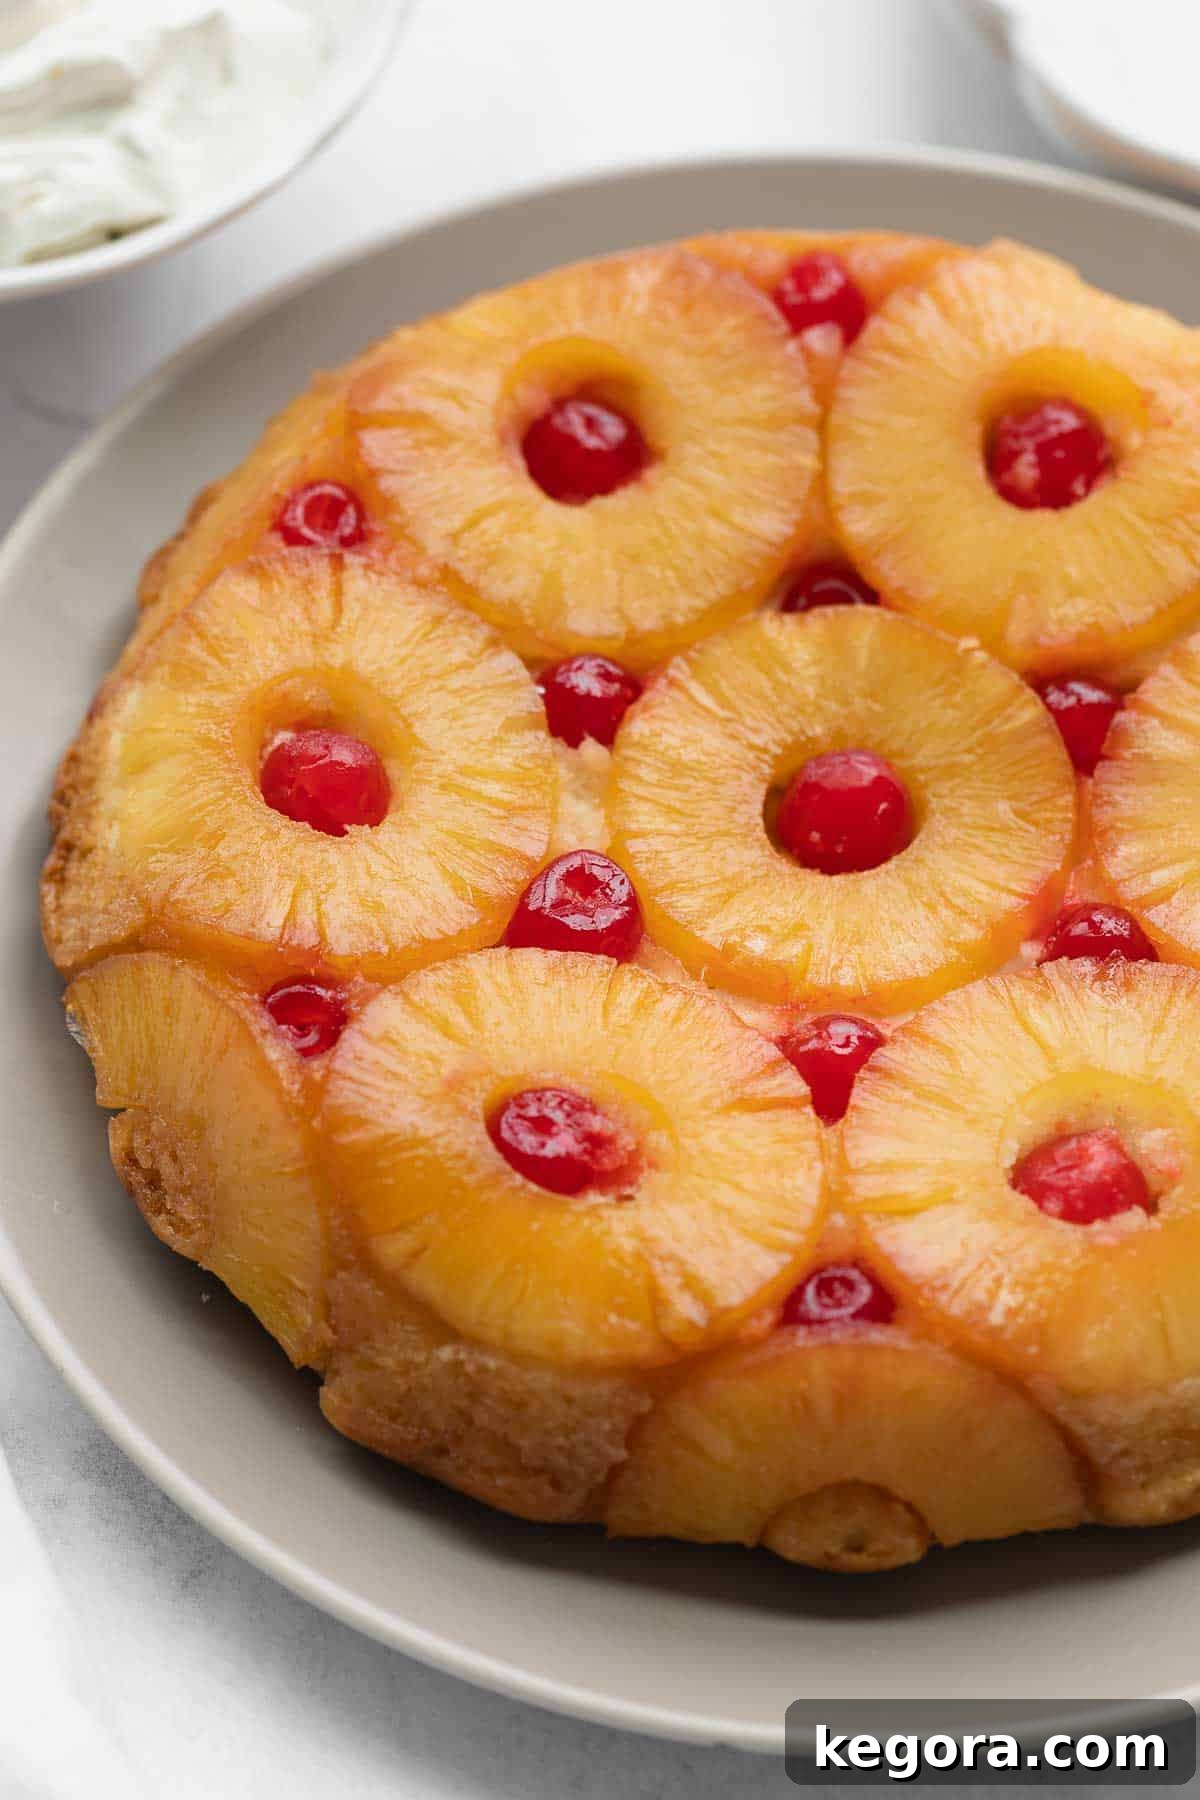
The history of pineapple upside-down cake dates back to the 1920s, gaining immense popularity after Dole held a baking contest that featured pineapple desserts. Since then, it has cemented its place as an iconic American classic, cherished for its unique presentation and delightful taste. My mission was to create a gluten-free version that not only rivals the original but potentially surpasses it in tenderness and flavor, and I’m thrilled to say, that goal has been achieved!
What makes this particular recipe so appealing is its reliance on simple, readily available pantry staples. There’s no need to seek out fresh pineapple; in fact, canned pineapple slices are preferred, honoring the cake’s traditional roots and ensuring consistent moisture and sweetness. This approach makes baking this exquisite dessert straightforward and accessible, evoking memories of cherished family recipes, perhaps even your grandmother’s classic pineapple upside-down cake.
The visual appeal of this cake is undeniable. The bold, intricate design created by the golden pineapple rings, beautifully adorned with vibrant maraschino cherries, makes a truly eye-catching statement. It’s a dessert that’s as much a feast for the eyes as it is for the taste buds, perfect for celebrations, gatherings, or simply brightening a weeknight meal.
My unique take on gluten-free pineapple upside-down cake consistently yields a cake with an incredibly soft, pillowy crumb and remarkable moisture. It stands as one of my all-time favorite gluten-free desserts, a testament to how delicious gluten-free baking can be. Achieving this delicate balance of richness and lightness is a secret I’ve perfected through extensive experimentation.
Similar to my acclaimed gluten-free vanilla cake recipe, this pineapple cake utilizes a strategic combination of sour cream and oil instead of traditional butter. This innovative choice is key to maintaining the cake’s rich flavor profile while simultaneously ensuring a remarkably light and airy crumb—a texture often challenging to achieve in gluten-free baking. For another delightful gluten-free treat, be sure to explore these bright and tangy gluten-free lemon bars.
Why You’ll Adore This Gluten-Free Pineapple Upside-Down Cake
- Unrivaled Texture: Experience a cake with an exceptionally soft, pillowy, and moist crumb that’s often elusive in gluten-free baking. Every slice is a testament to perfect texture.
- Simple, Accessible Ingredients: This recipe calls for easy-to-find gluten-free ingredients and common pantry staples, making it convenient to prepare without a special trip to specialty stores.
- Quick Baking Time: From start to finish, this cake bakes up beautifully in under an hour, ideal for when you need a fantastic dessert without a long wait.
- Consistently Reliable Results: Follow our straightforward steps to achieve a stable, perfectly risen, and absolutely delicious cake every single time. It’s a foolproof recipe you can trust.
- Visually Stunning: The vibrant caramelized pineapple and cherry topping creates a show-stopping appearance that’s sure to impress guests and make any occasion feel special.
- Classic Flavor Profile: Enjoy all the beloved, sweet, and tangy flavors of a traditional pineapple upside-down cake, now expertly crafted to be entirely gluten-free.
- Perfect for Any Occasion: Whether it’s a birthday, holiday gathering, or a simple weekend treat, this cake is versatile enough for any celebration.
Key Ingredients for Your Perfect Gluten-Free Pineapple Upside-Down Cake
The secret to achieving a truly remarkable gluten-free pineapple upside-down cake lies not just in the ingredients themselves, but in their thoughtful combination. The most crucial trick for a light, rich, and moist gluten-free cake is to use a blend of sour cream and oil instead of relying solely on butter. While butter undeniably adds flavor, it can sometimes lead to a denser crumb in gluten-free baking. Sour cream and oil work synergistically to create a delicate, buttery-like richness and an incredibly tender crumb, without weighing the cake down. It’s truly a revelation in gluten-free cake making, offering that desirable ‘buttery’ feel without the heavy texture often associated with gluten-free butter-based cakes.
This innovative approach to fat and moisture is also central to the success of my gluten-free birthday cake and gluten-free red velvet cake recipes. Traditional butterfat can sometimes cause gluten-free flour particles to clump, resulting in a heavier, less airy crumb. Sour cream, on the other hand, helps to keep the crumb light and open. It’s also the star ingredient in my delectable gluten-free coffee cake!
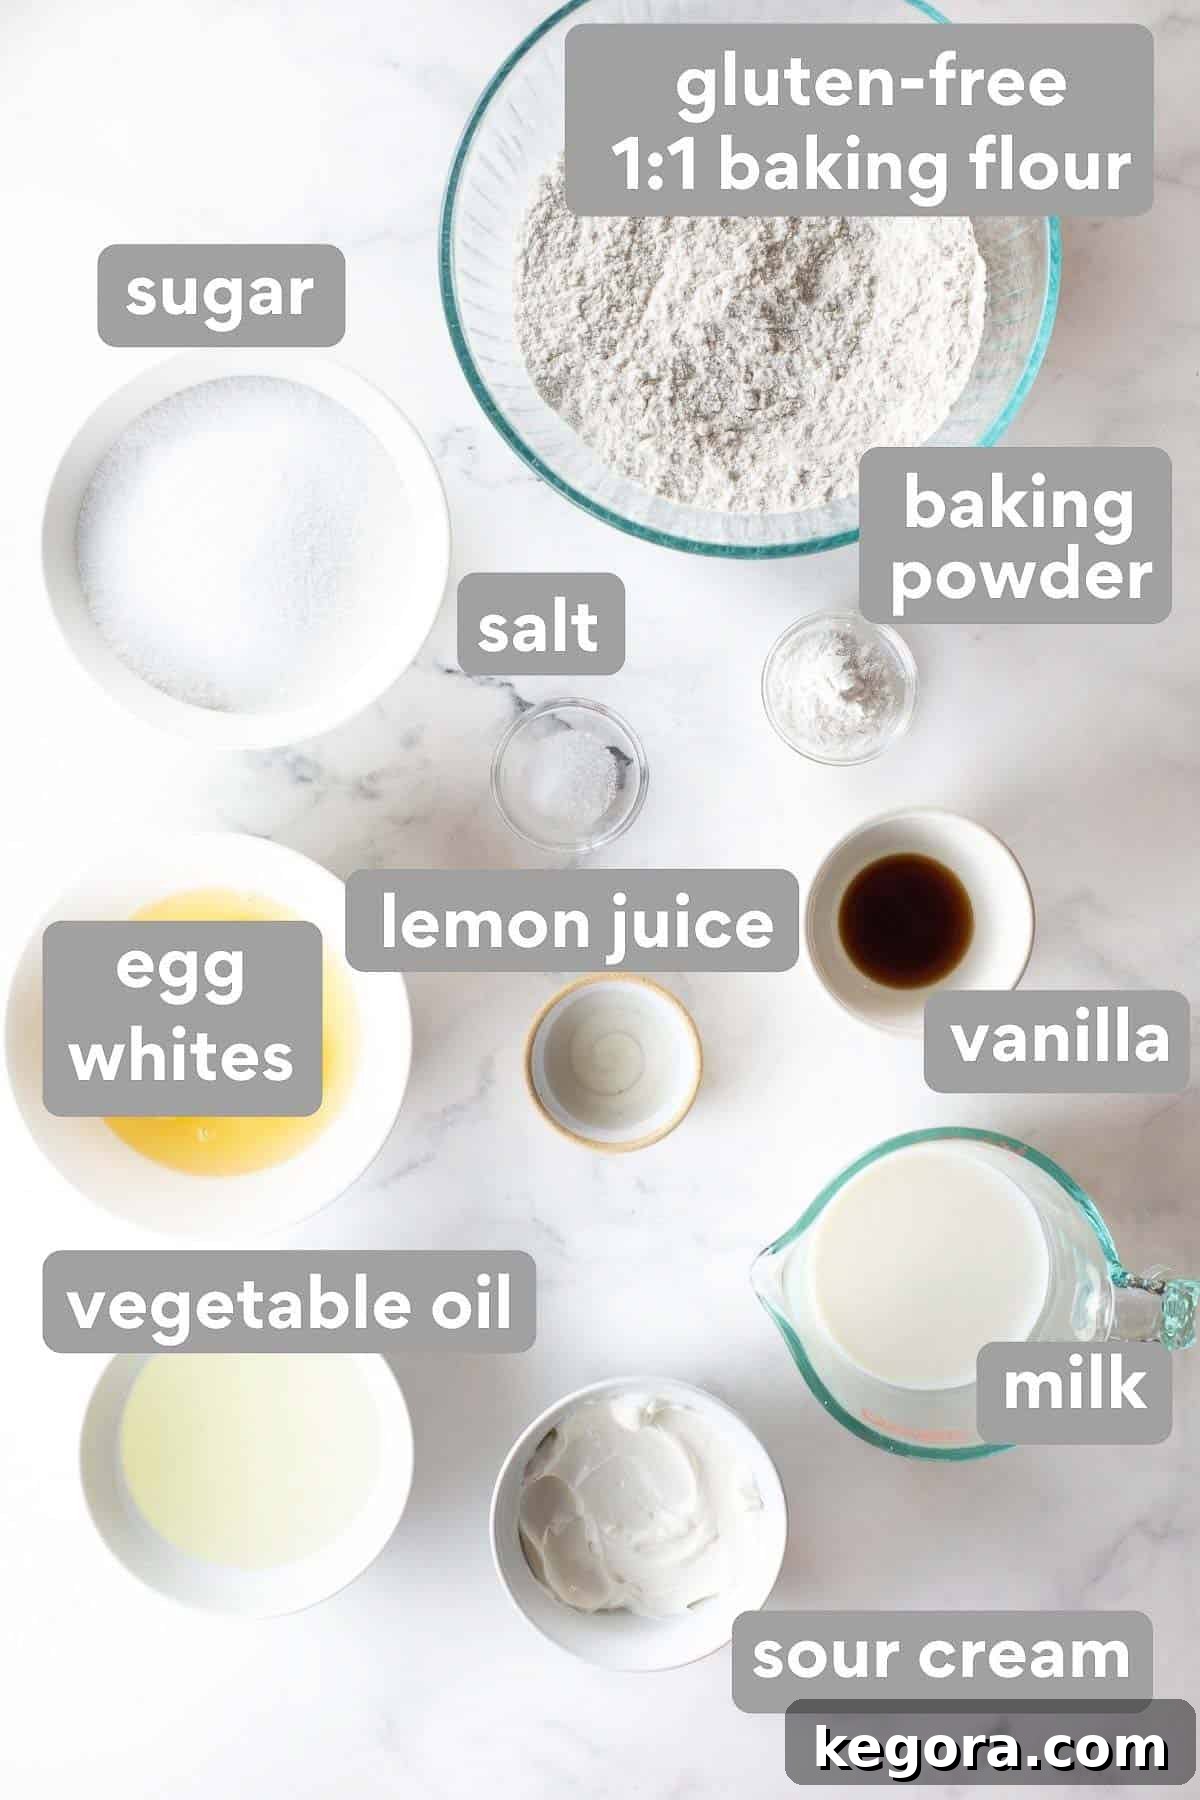
- High-Quality Gluten-Free 1:1 Baking Flour: The foundation of this cake is a reliable 1:1 gluten-free all-purpose flour blend. For optimal results, choose a blend that specifically contains xanthan gum. Xanthan gum acts as a binder, providing the necessary structure and elasticity that gluten typically offers, preventing your cake from becoming crumbly. This particular brand is highly recommended for its consistent performance in this recipe.
- Sour Cream and Oil Blend: This dynamic duo is critical for achieving the cake’s signature richness, profound moisture, and incredibly tender texture without adding excessive weight. Vegetable oil is a neutral choice, allowing the pineapple flavor to shine, but coconut oil can also be used for a subtle tropical hint. This combination ensures a delightfully light and airy crumb, a hallmark of a truly great cake.
- Fresh Lemon Juice: Don’t skip this ingredient! Lemon juice is a secret weapon in gluten-free baking. Its acidity helps to tenderize the cake crumb, making it even softer and more delicate. It also adds a subtle brightness that enhances the overall flavor profile. This is the same essential ingredient that elevates my popular gluten-free pumpkin bread.
- Baking Powder: We use a generous amount of baking powder in this recipe to ensure a fantastic rise and a beautifully airy structure. It’s essential for creating that desired light and fluffy texture.
- Canned Pineapple Slices: Opt for classic canned pineapple slices. They are convenient, consistently sweet, and their moisture content is ideal for the caramelized topping. Remember to drain and pat them thoroughly dry to prevent a soggy cake.
- Maraschino Cherries: These iconic bright red cherries add a pop of color and a touch of sweetness to the topping, completing the classic upside-down cake aesthetic. Like the pineapple, ensure they are patted dry.
- Brown Sugar: The star of the caramelized topping, brown sugar provides deep, molasses-rich sweetness and creates that irresistible, sticky glaze.
- Melted Butter: While not used in the cake batter itself, melted butter forms the base of the delicious caramelized topping, working with brown sugar to create the perfect glaze for the fruit.
- Egg Whites: Whipped egg whites are incorporated to add structure and lightness to the cake batter, contributing to its airy texture.
- Granulated Sugar: Used in the cake batter to provide sweetness and help achieve that light, fluffy texture when creamed with egg whites.
- Pure Vanilla Extract: A classic flavor enhancer that adds warmth and depth to the cake, complementing the fruity pineapple.
- Milk: Provides additional moisture to the cake batter, ensuring a tender and well-hydrated crumb. Use your preferred milk, such as 2% or whole milk.
Step-by-Step Guide: Crafting Your Gluten-Free Pineapple Upside-Down Cake
Creating this magnificent gluten-free pineapple upside-down cake is a delightful process. By following these detailed instructions, you’ll achieve a perfectly baked cake with a glistening caramelized topping and an exquisitely tender crumb. Pay close attention to the small but impactful details for the best results.
Prepare the Irresistible Caramelized Topping
- Prepare Your Pan: Begin by pouring the specified amount of melted butter evenly into the bottom of your chosen baking pan. I highly recommend using an ungreased 9×2 inch pie dish, a standard round cake pan, or a springform pan. The key is to ensure the pan has a depth of at least 2 inches to contain the batter and topping without overflowing. Distribute the brown sugar uniformly over the melted butter, creating the foundation for your rich caramelized layer.
- Dry the Fruit: This step is critical for preventing a soggy cake. Using paper towels, thoroughly pat dry both the pineapple slices and the maraschino cherries. Excess moisture from the fruit can release during baking, leading to a less-than-ideal texture. A dry fruit surface ensures the caramelization process works effectively and results in a perfectly moist, not wet, cake.
- Arrange the Fruit: Artfully arrange 6-7 full pineapple slices on top of the brown sugar layer. Then, dot the remaining spaces and, if desired, the center of each pineapple ring, with all the patted-dry maraschino cherries. This creates the classic, beautiful pattern that defines an upside-down cake. For an enhanced visual effect and to cover the edges of the pan, halve approximately 3 additional pineapple rings and arrange them around the sides of the pan (refer to the accompanying photo for guidance).
- Chill the Pan: Once your fruit arrangement is complete, carefully place the pan into the refrigerator. Chilling the prepared pan helps to solidify the butter and sugar mixture, preventing the fruit from shifting or floating when the cake batter is added. This ensures your beautiful design remains intact throughout the baking process.
Craft the Light and Tender Gluten-Free Cake Batter
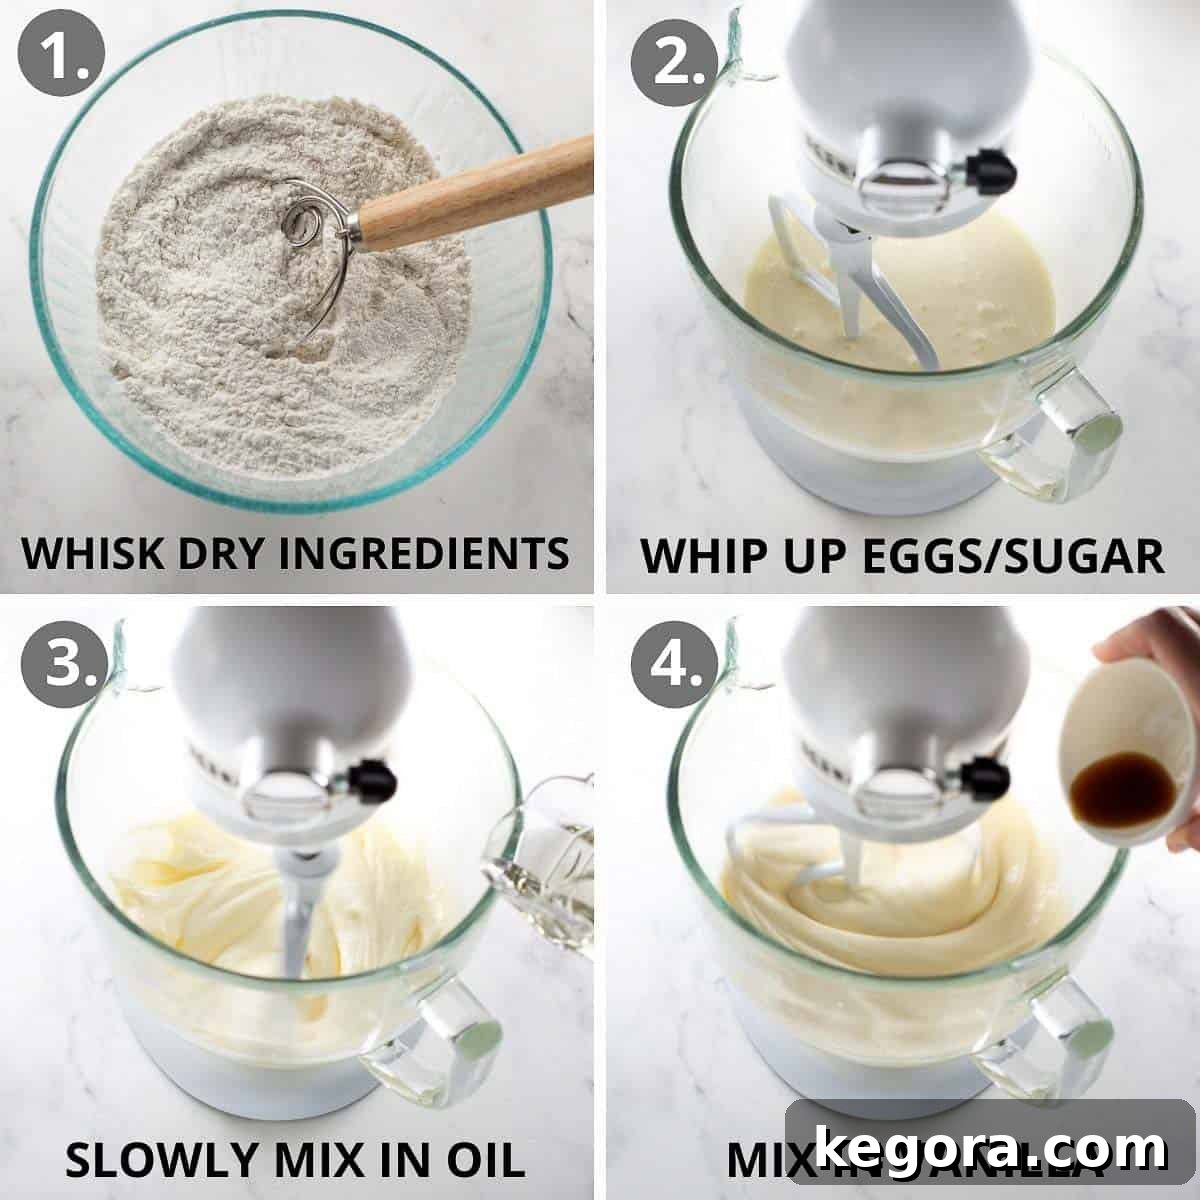
- Combine Dry Ingredients: In a medium-sized bowl, whisk together your gluten-free 1:1 baking flour, baking powder, and salt. Ensure these ingredients are thoroughly combined to distribute the leavening agents evenly, which is crucial for a consistent rise.
- Whip Egg Whites and Sugar: In the bowl of a stand mixer fitted with the whisk attachment (or using a hand mixer), add the egg whites and granulated white sugar. Whip these on medium-high speed for approximately 3 minutes, or until the mixture becomes light, fluffy, and noticeably increased in volume. This aeration is key to a light cake.
- Slowly Drizzle in Oil: With the mixer still running on a low speed, very slowly drizzle in the vegetable or coconut oil. The gradual addition prevents the loss of air you’ve just incorporated into the egg whites, which is essential for a tender, light gluten-free cake. Once the oil is integrated, mix in the vanilla extract and lemon juice until just combined.
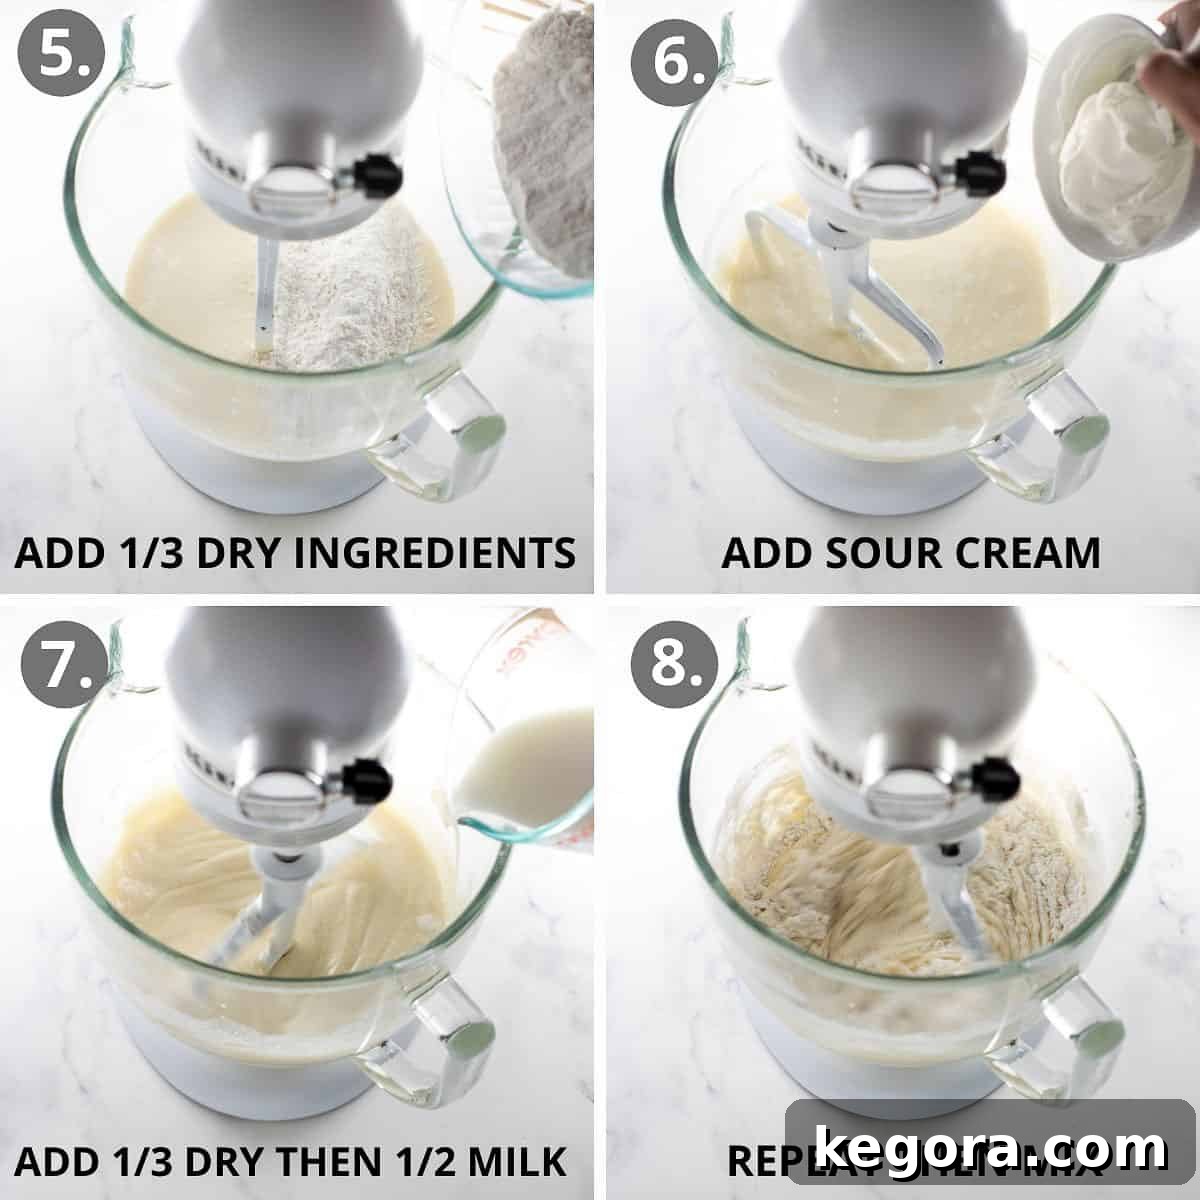
- Alternate Dry and Wet Additions: With the mixer on its lowest speed, add approximately one-third of the dry ingredient mixture to the wet ingredients. Mix until just incorporated, being careful not to overmix. Next, add the sour cream and mix until fully combined. Follow with another one-third of the dry ingredients, mixing until just blended. Then, add half of the milk, allowing it to integrate before adding the final one-third of the dry ingredients. Finish by adding the remaining milk and stirring until the batter is homogenous and smooth.
- Important Note: The technique of alternately adding dry ingredients with liquid components is paramount. This method allows the gluten-free flour to absorb moisture gradually and thoroughly into the batter, preventing the development of a dry, grainy, or crumbly texture often associated with gluten-free baked goods. It ensures a consistently moist and smooth cake.
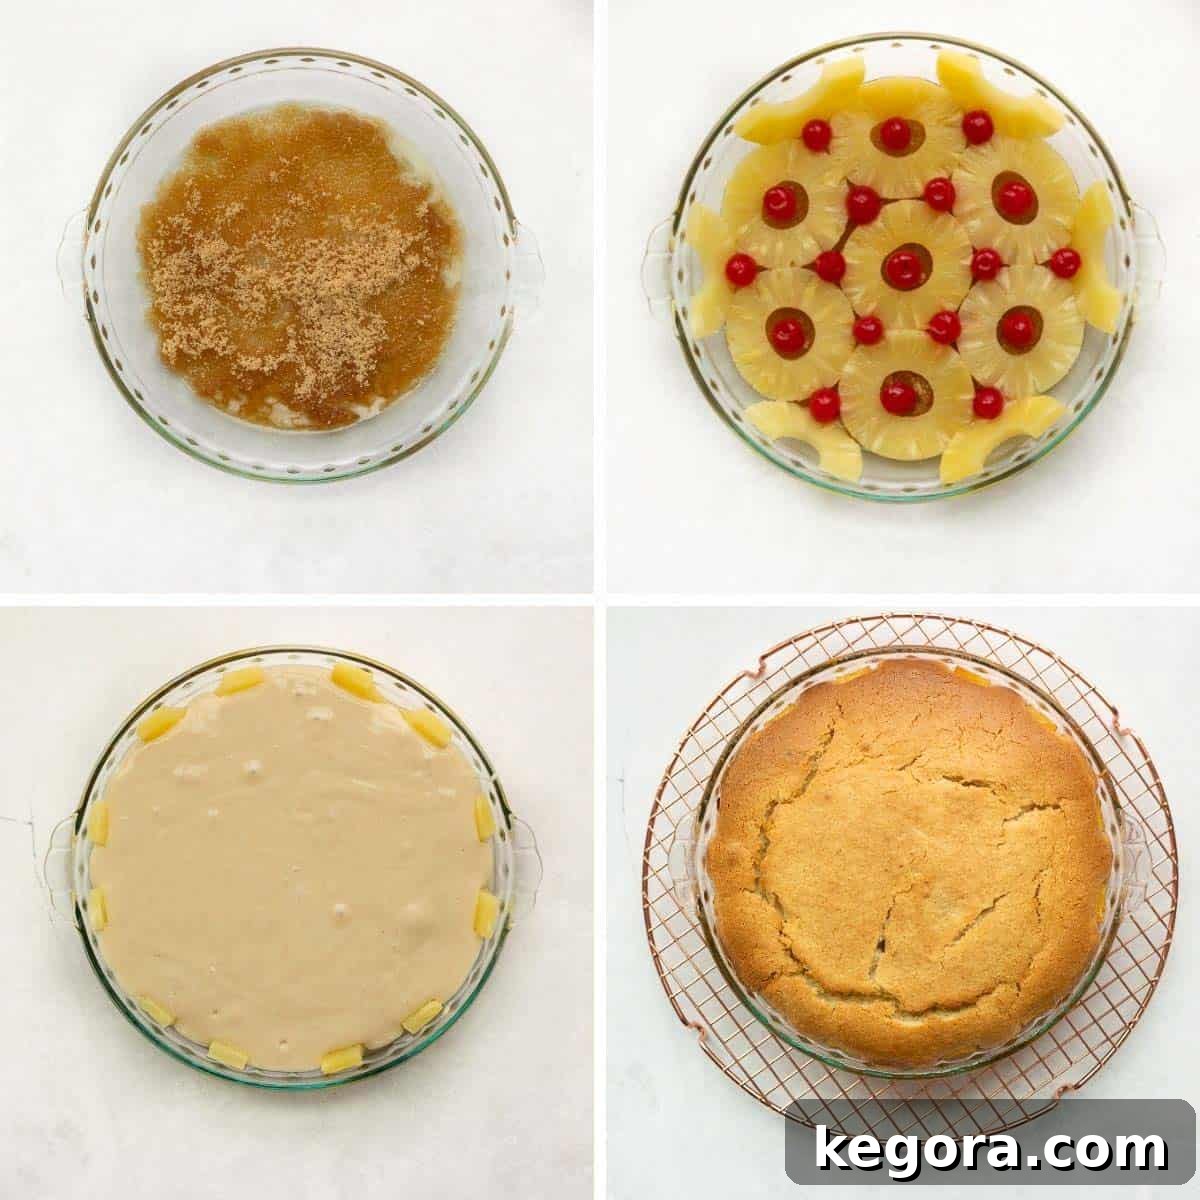
- Bake to Perfection: Gently pour the prepared cake batter over the single layer of pineapple in your chilled baking pan. Ensure the batter is evenly distributed. Preheat your oven to 375°F (190°C) and bake for 40-45 minutes. The cake is done when a wooden skewer or toothpick inserted into the center comes out clean. If you notice the top of the cake browning too quickly during the last stages of baking, loosely cover it with aluminum foil to prevent excessive browning.
- Cool and Invert: Once baked, remove the cake from the oven and place it on a wire rack to cool for precisely 20 minutes. This partial cooling period is crucial; the cake needs to set slightly but remain warm enough to release easily from the pan. After 20 minutes, carefully invert the slightly cooled cake onto a cake stand or your desired serving platter. Gently lift the pan to reveal the stunning caramelized pineapple topping.
- Final Cooling and Serving: Allow the cake to cool completely to room temperature before attempting to slice and serve. This patience ensures that the cake’s structure fully stabilizes, resulting in the fluffiest and most tender texture. Resist the temptation to refrigerate the cake to speed up cooling, as this can lead to a denser texture. Once fully cooled, slice this classic pineapple upside-down cake and serve it plain, or elevate it further with a dollop of fresh whipped cream or a scoop of creamy vanilla ice cream. Enjoy every delightful bite!
Storage Instructions for Your Gluten-Free Pineapple Upside-Down Cake
While this gluten-free pineapple upside-down cake is truly at its peak when enjoyed fresh on the day it’s made, you can certainly store it to savor for a little longer. To maintain its delightful moisture and flavor, ensure the cake is completely cooled to room temperature before storing. Once cool, cover this classic dessert tightly with plastic wrap or transfer it to an airtight container. It will keep well in the refrigerator for up to 24 hours without significant changes to its texture. For longer storage, it can remain refrigerated for up to 3-4 days, though the caramel topping may become slightly softer over time. Always ensure it’s well-sealed to prevent it from drying out or absorbing other odors from the fridge.
Frequently Asked Questions About Gluten-Free Pineapple Upside-Down Cake
A common culprit for a soggy pineapple cake, whether gluten-free or not, is excess moisture from the fruit. To prevent this, it’s absolutely vital to thoroughly blot your pineapple rings and maraschino cherries with paper towels until they are very dry before arranging them in the pan. This step removes surface liquid that would otherwise seep into the cake during baking, ensuring your cake has a perfectly moist texture without being wet or gummy.
Generally, pineapple upside-down cake, including its gluten-free counterpart, can safely sit at room temperature for up to 24 hours, especially if covered to prevent it from drying out. However, for extended freshness and to prevent spoilage, particularly in warmer climates, it’s best to store it in the refrigerator after 24 hours. When refrigerated, covered tightly, it will remain delicious for up to four days.
For the best possible results, you should not flip your cake when it’s piping hot directly out of the oven, nor should you let it cool completely in the pan. The ideal time to invert your pineapple upside-down cake is after it has cooled for approximately 20 minutes on a wire rack. This allows the cake’s structure to set slightly, making it strong enough to hold its shape when flipped, while the caramelized topping is still warm and liquid enough to release cleanly from the bottom of the pan and adhere beautifully to the cake.
While canned pineapple is traditionally used and recommended for its consistent sweetness and moisture content, you can use fresh pineapple. However, be aware that fresh pineapple contains more enzymes that can sometimes break down dairy proteins, potentially affecting the cake’s texture or preventing proper caramelization. If using fresh, make sure to slice it uniformly and pat it extremely dry to remove excess moisture. For beginners, canned pineapple is generally more foolproof for this recipe.
Several factors contribute to a moist and tender gluten-free cake. Firstly, using a high-quality 1:1 gluten-free baking flour blend with xanthan gum is crucial. Secondly, the combination of sour cream and oil in this recipe provides excellent moisture and tenderness. Thirdly, the method of alternating dry and liquid ingredients during mixing ensures the flour is well-hydrated. Lastly, avoid overbaking; start checking for doneness at the earlier end of the suggested baking time.
Essential Tips for a Flawless Gluten-Free Pineapple Upside-Down Cake
- Critical Drying Step: This cannot be stressed enough – always blot your pineapple slices and maraschino cherries meticulously dry with paper towels before placing them in the pan. Any residual moisture will lead to a watery, soggy topping and an undesirable cake texture. A truly dry fruit surface is the key to a beautifully caramelized and non-soggy finish.
- Pineapple Quantity: For this recipe, a single 20-ounce can of sliced pineapple is the perfect amount. It provides just enough slices to create that iconic and appealing fruit arrangement in the bottom of your baking pan, without excess or shortage.
- Precision Cooling and Flipping: Timing is everything when it comes to inverting this cake. Allow it to cool on a wire rack for precisely 20 minutes after removing it from the oven. This brief cooling period allows the cake structure to firm up enough to handle the flip, while the warm caramel topping remains pliable and ensures a clean release from the pan. Then, it’s crucial to let the inverted cake cool completely to room temperature before slicing. This final cooling step allows the cake’s internal structure to fully set, resulting in the most tender and fluffy crumb imaginable.
- Avoid Refrigerating During Initial Cooling: Never place this cake in the refrigerator to speed up the cooling process immediately after baking. Rapid cooling can drastically alter the cake’s delicate structure, causing it to become dense and compromising its wonderfully light and airy texture. Patience during the cooling phase will be rewarded with a superior cake.
- Proper Pan Choice: Ensure your baking pan is at least 2 inches deep. This depth is necessary to accommodate both the generous fruit topping and the cake batter without spillage during baking.
- Measure Ingredients Accurately: Especially with gluten-free baking, precision in measuring ingredients is paramount. Use a kitchen scale for flour and sugar measurements if possible (grams are provided in the recipe card), as volumetric measurements can vary.
- Don’t Overmix the Batter: Once the dry ingredients are added, mix only until just combined. Overmixing gluten-free flour can still lead to a tougher or denser cake.
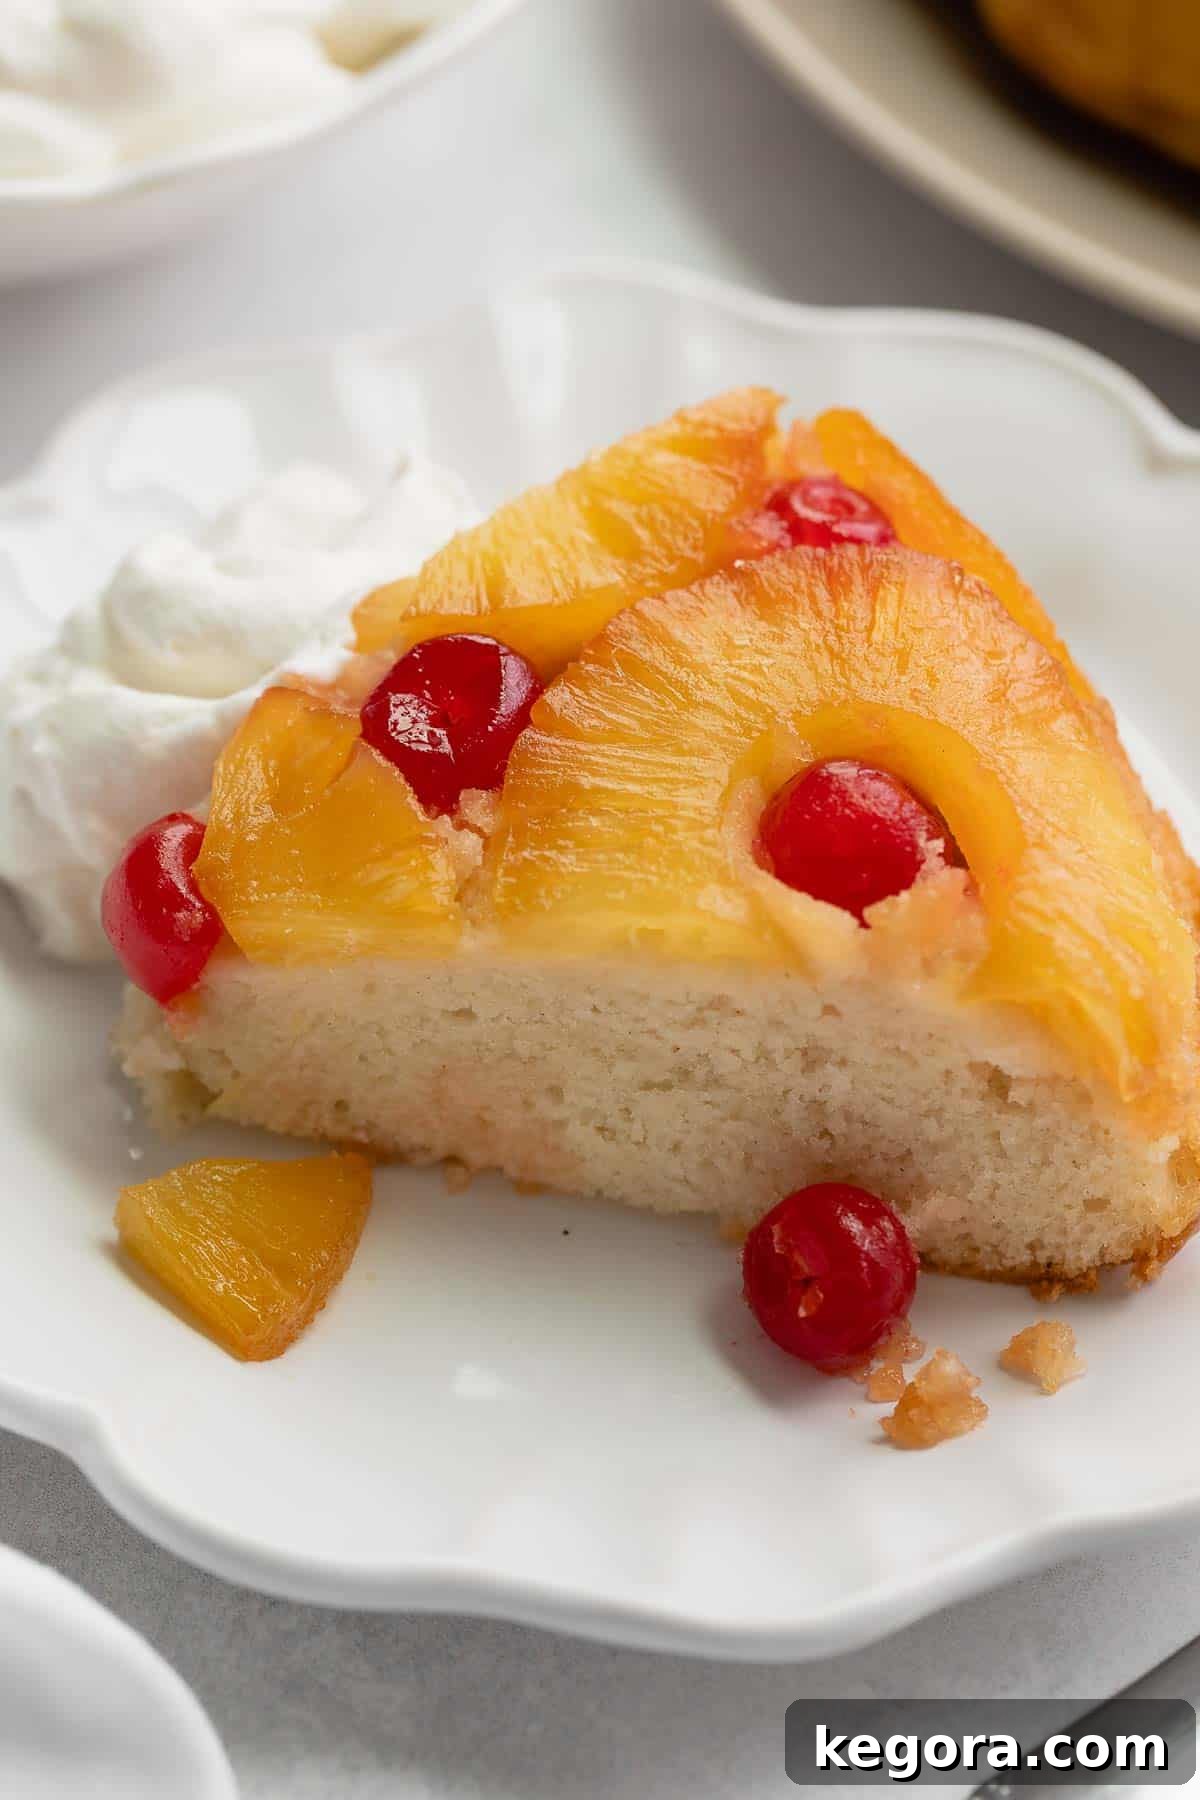
I sincerely hope you cherish this gluten-free pineapple upside-down cake as much as my family and I do! If you decide to try this delightful recipe, please take a moment to leave a comment and rating below. Your feedback is incredibly valuable and I’d love to hear about your baking experience!
Best Gluten-Free Pineapple Upside Down Cake
Erin Collins
20 mins
40 mins
1 hr
8 people
If you’re looking for a gluten-free pineapple upside-down cake reminiscent of the original classic, this recipe is it!
Comments
Print Recipe
Ingredients
Topping
- 1/4 cup butter (60g, melted)
- 1/2 cup packed light brown sugar (100g)
- 8 –10 pineapple slices (patted very dry)
- 15 –20 maraschino cherries (patted very dry)
Dry Ingredients
- 1 cup + 2 tablespoons gluten-free 1:1 baking flour (175 grams)
- 3 teaspoons baking powder
- 1 teaspoon salt
Other Ingredients
- 1 cup sugar (200 grams)
- 2 egg whites
- 1/4 cup vegetable oil (50 grams, or coconut oil)
- 1 teaspoon lemon juice
- 1 teaspoon pure vanilla extract
- 1/4 cup sour cream (60 grams)
- 1/2 cup milk (125 grams, 2% or whole milk recommended)
Instructions
For the Topping:
- Pour the melted butter into an ungreased 9×2 inch pie dish or round cake pan (ensure pan is at least 2 inches deep). Sprinkle brown sugar evenly over the butter.
- Thoroughly pat dry the pineapple slices and maraschino cherries with paper towels to prevent a soggy cake. Arrange 6-7 pineapple slices and all the cherries (placing one inside each ring) on top of the brown sugar. Halve 3 additional pineapple rings and arrange them around the sides of the pan. Place the pan in the fridge to set while preparing the batter.
Make the Cake:
- Preheat your oven to 375°F (190°C). In a medium bowl, whisk together the gluten-free flour, baking powder, and salt.
- In the bowl of a stand mixer, add the egg whites and sugar. Whip on medium-high speed for 3 minutes until light and fluffy. With the mixer running on low speed, slowly drizzle in the oil. Mix in the vanilla extract and lemon juice until just combined.
- With the mixer on low, add ⅓ of the dry ingredients and mix until incorporated. Add the sour cream and mix to combine. Add another ⅓ of the dry ingredients and mix again. Add ½ of the milk, followed by the last ⅓ of the dry ingredients. Add the remaining milk and stir until totally combined. (Adding dry ingredients alternately with liquid ensures the flour absorbs properly, preventing a dry, grainy cake.)
- Pour the cake batter into the prepared pan over the pineapple layer. Bake for 40-45 minutes, or until the center of the cake is cooked through (a toothpick inserted comes out clean). If the top browns too quickly, cover loosely with foil.
- Remove cake from the oven and cool on a wire rack for ONLY 20 minutes. Invert the slightly cooled cake onto a cake stand or serving plate. Cool the cake completely to room temperature before slicing and serving. (Do not refrigerate to speed cooling, as this will result in a dense cake.) Slice, top with whipped cream or vanilla ice cream, and enjoy!
Notes
- Important: Blot your pineapple and cherries dry before placing on the cake. Otherwise, your cake might be soggy!
- I recommend using one 20-ounce can of pineapple slices for this cake; it’s the perfect amount for the fruit arrangement!
- Let the cake cool for ONLY 20 minutes before turning it out onto the serving plate. Then let it cool completely to room temperature before slicing for the best texture.
- Do not place this cake in the fridge while it’s cooling—otherwise, the cake will be dense.
Nutrition
Calories: 230kcal | Carbohydrates: 40g | Protein: 2g | Fat: 8g | Saturated Fat: 5g | Polyunsaturated Fat: 1g | Monounsaturated Fat: 2g | Trans Fat: 1g | Cholesterol: 21mg | Sodium: 372mg | Potassium: 216mg | Fiber: 1g | Sugar: 39g | Vitamin A: 247IU | Vitamin C: 1mg | Calcium: 104mg | Iron: 1mg