

Welcome to the ultimate guide for crafting the most exquisite gluten-free sugar cookies! If you’ve been on a quest for that perfect sugar cookie that’s both delightfully soft and holds its intricate shape during baking, your search ends here. These aren’t just any gluten-free sugar cookies; they are my absolute favorite, designed to deliver an unparalleled taste and texture experience that rivals any classic sugar cookie. Prepare to fall in love with their delicate crumb, rich flavor, and the sheer joy of decorating them with your favorite frostings and sprinkles for any occasion, from festive holidays to simple everyday delights.
What truly elevates this recipe above the rest is my signature sugar cookie frosting. It features a secret ingredient – a touch of sour cream – which transforms it into an irresistibly creamy, tangy, and smooth topping that complements the cookies perfectly. This combination ensures your gluten-free sugar cookies won’t just be good; they’ll be unforgettable, taking your baking adventures to an entirely new level of deliciousness. Get ready to bake a batch that will impress everyone, whether they’re gluten-free or not!

Why You’ll Fall in Love with This Gluten-Free Sugar Cookie Recipe
Creating delicious gluten-free treats can sometimes be a challenge, particularly when aiming for the perfect texture and shape. However, this gluten-free sugar cookie recipe is meticulously developed for guaranteed success and pure enjoyment. Here’s why these cookies will quickly become a cherished part of your baking repertoire and a go-to for all your sweet cravings:
- Perfect Texture: Soft with Crispy Edges: These cookies master the art of texture, offering a wonderfully soft, tender, and slightly chewy center. This delightful interior is perfectly contrasted by delicately crisp edges, ensuring every single bite is a symphony of textures that truly satisfies. It’s the ideal balance that makes these cookies irresistible.
- Exquisite Flavor with Almond Extract: While the comforting notes of vanilla are a classic, the strategic addition of almond extract truly elevates the flavor profile of these sugar cookies. It imparts a sophisticated, slightly nutty, and aromatic depth that transforms a simple cookie into something extraordinary and incredibly addictive. This unique flavor sets them apart from traditional recipes.
- Holds Shape Beautifully During Baking: One of the biggest frustrations in cut-out cookie baking can be dough that spreads and loses its design in the oven. With this recipe, you can say goodbye to misshapen cookies! Our carefully formulated dough ensures that your intricate cookie cutter designs maintain their integrity, sharp edges, and detailed shapes throughout the entire baking process, making them ideal for elaborate decorating.
- The Secret to Unparalleled Moistness: A Touch of Sour Cream: The inclusion of sour cream is truly our “secret ingredient” and a game-changer in gluten-free baking. It works wonders by imparting incredible moisture, a subtle tang, and a magnificent richness to the cookie dough. The result is cookies that are never dry or crumbly, but rather exceptionally tender, chewy, and bursting with delightful flavor.
- Effortlessly Dairy-Free Adaptable: We understand dietary needs. This recipe is wonderfully versatile and can be easily adapted for those with dairy sensitivities or those following a vegan lifestyle. With simple substitutions like high-quality vegan butter and readily available dairy-free sour cream, you can achieve the same fantastic taste and texture without any compromise.
- Freezes Like a Dream for Future Enjoyment: Life gets busy, but delicious cookies shouldn’t be a luxury. Whether you prefer to prepare the raw dough in advance for future baking sessions or save baked cookies for later enjoyment, these gluten-free sugar cookies freeze exceptionally well. This preserves their freshness, flavor, and texture, making them perfect for meal prepping or unexpected cravings.
Essential Ingredients for Crafting the Best Gluten-Free Sugar Cookies
Crafting the perfect gluten-free sugar cookie begins with understanding the role of each ingredient and choosing high-quality components. Here’s a closer look at the key elements that contribute to the success and deliciousness of this recipe. If you have any additional questions as you gather your supplies, please don’t hesitate to leave a comment!
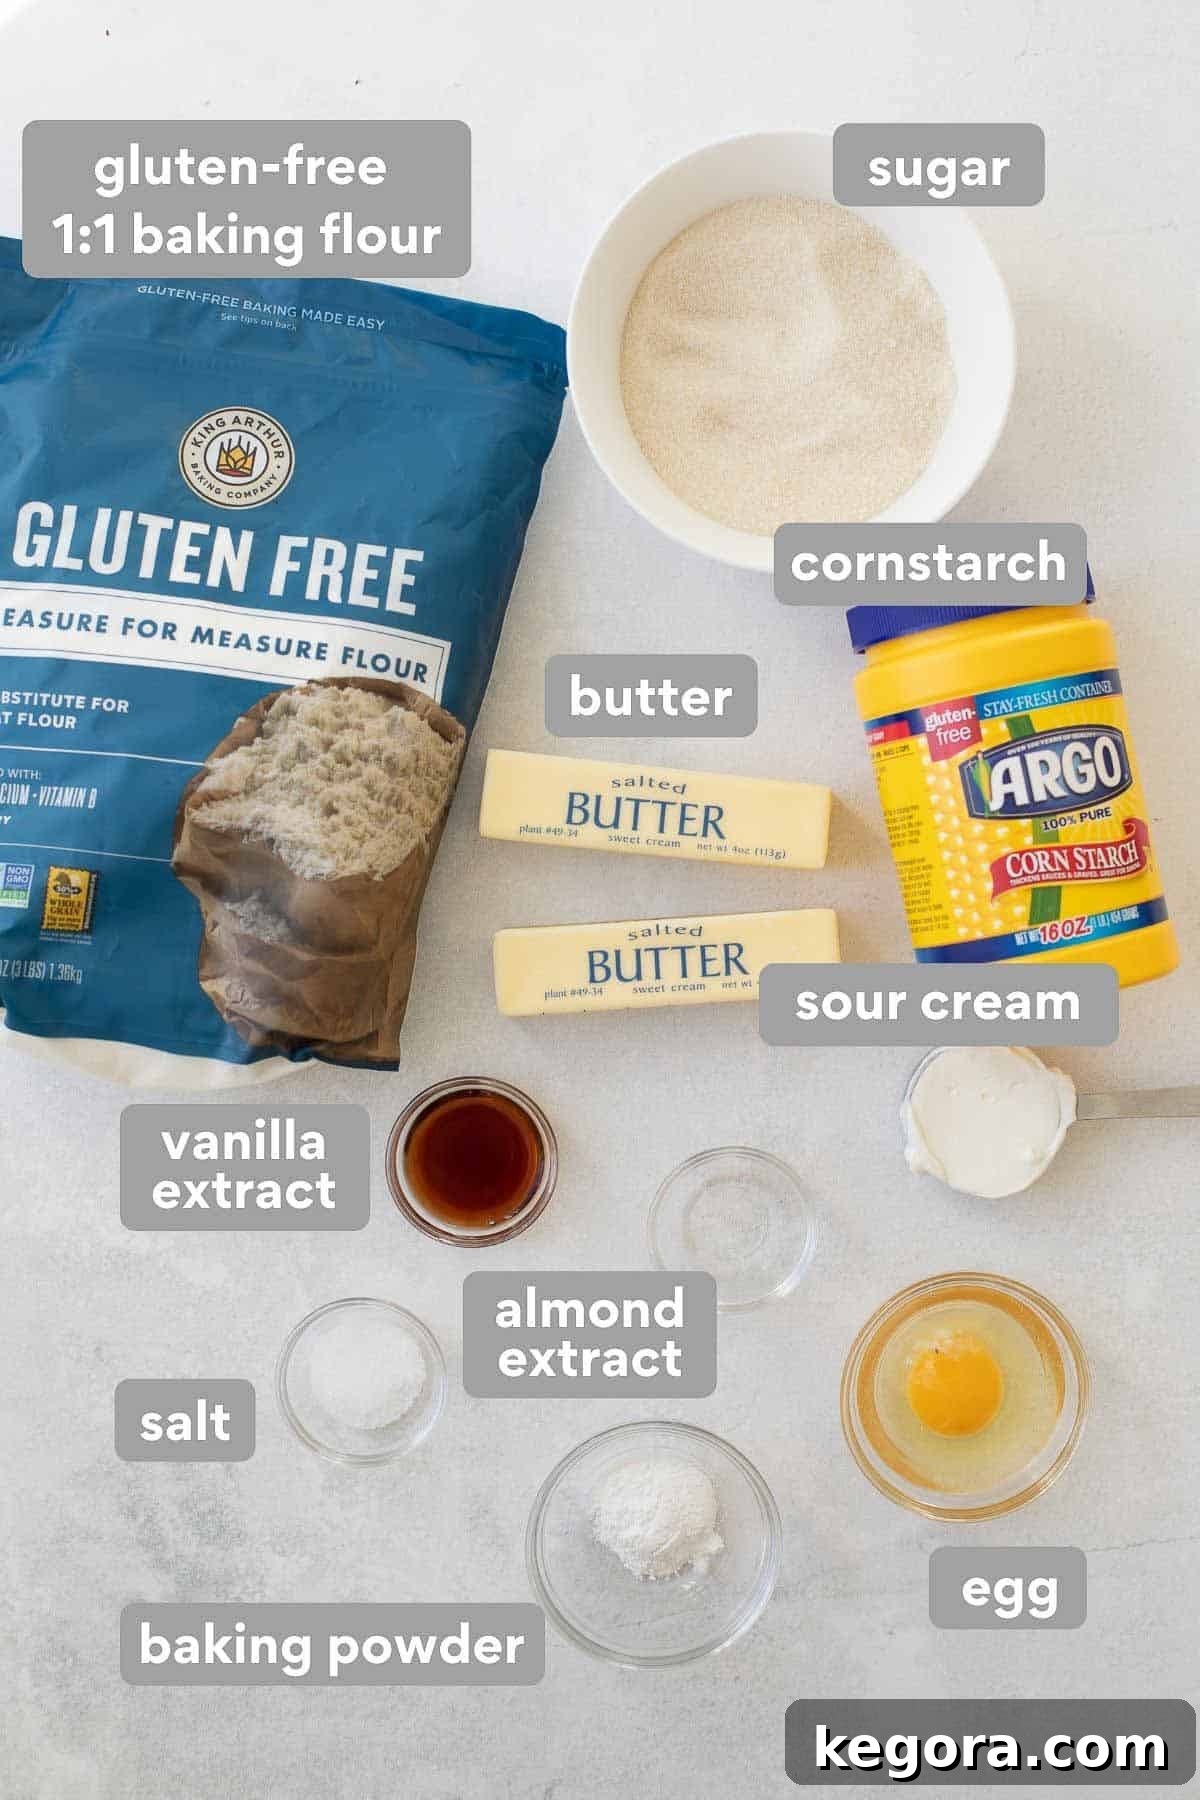
- Gluten-Free 1:1 Baking Flour Blend: This ingredient forms the very foundation of our gluten-free cookies. It is absolutely crucial to use a high-quality 1:1 (also often labeled as “measure-for-measure”) gluten-free all-purpose flour blend. These blends are specifically designed to be swapped equally with wheat flour in recipes. Crucially, ensure your chosen blend contains xanthan gum. Xanthan gum is a vital binder in gluten-free baking; it provides elasticity and structure that gluten normally would, preventing the cookies from becoming crumbly or too dense. My top recommendation for consistent and excellent results is King Arthur Gluten-Free Measure for Measure Flour.
- Cornstarch: A small yet mighty addition, cornstarch is a true game-changer in this recipe. It works to give these cookies a remarkably lighter, more delicate, and tender crumb. By reducing the overall protein content, it prevents the cookies from becoming overly dense or tough, contributing significantly to that desirable melt-in-your-mouth quality we all love in a sugar cookie.
- Sour Cream: This is the star “secret ingredient” that truly elevates these cookies to a superior level! Sour cream adds an incredible depth of richness to the cookie dough, and its acidity interacts with the leavening agents to produce a tender crumb. More importantly for gluten-free baking, it is instrumental in achieving that coveted chewy texture that is often a challenge to replicate without gluten. It also dramatically boosts the overall moistness of the cookies. For those who are dairy-free, readily available dairy-free sour cream alternatives work perfectly and yield fantastic results.
- Vanilla Extract & Almond Extract: The combination of these two extracts is what creates the exquisitely balanced and incredibly delicious flavor profile of these cookies. Pure vanilla extract provides a warm, sweet, and comforting base, while almond extract introduces a sophisticated, slightly nutty, and intensely aromatic depth that makes these cookies truly irresistible and memorable. Do not skip the almond extract; it is key to their unique and addictive taste!
- Butter: This is a foundational ingredient that provides essential richness and contributes significantly to the cookies’ tender texture. It’s crucial that your butter is softened to room temperature before you begin, as this allows for proper creaming with the sugar, a process that incorporates air into the mixture and is vital for creating a light and airy dough. For dairy-free versions, a high-quality vegan butter can be used as a direct substitute or in combination with shortening.
- Granulated Sugar: Beyond simply providing sweetness, granulated sugar plays a crucial role in the texture of the cookies. It helps to create those wonderfully delicate crispy edges that contrast beautifully with the soft interior.
- Egg: The egg acts as a powerful binder, holding all the ingredients together. It adds essential moisture, contributes to the cookie’s structural integrity, and enriches the flavor and tenderness of the dough.
- Baking Powder & Salt: Baking powder is our leavening agent, providing a slight lift and contributing to the tender, cake-like texture of the cookies. Salt is equally important, not just for seasoning but also for balancing the sweetness and enhancing all the other wonderful flavors present in the cookies.
Dairy-Free Adaptation Tip: To effortlessly transform these into dairy-free sugar cookies without sacrificing any of the fantastic texture or flavor, I highly recommend using a combination of 1/2 cup shortening and 1/2 cup vegan butter in place of the 1 cup of traditional dairy butter. This blend helps to mimic the richness and structure that dairy butter provides. For the sour cream component, Forager Project Dairy-Free Sour Cream is an excellent choice that consistently delivers fantastic results and maintains the signature tang and moistness.
If you’re interested in exploring other equally delicious gluten-free cookie options that offer a different texture profile, you might enjoy these delightful almond flour sugar cookies, which are both gluten-free and grain-free.
Step-by-Step Guide: How to Master Gluten-Free Sugar Cookies for Perfect Results
Making these gluten-free sugar cookies is a surprisingly straightforward and rewarding process, resulting in consistently perfect treats every time. Follow these detailed steps carefully, and you’ll be enjoying beautifully baked and delicious cookies in no time.
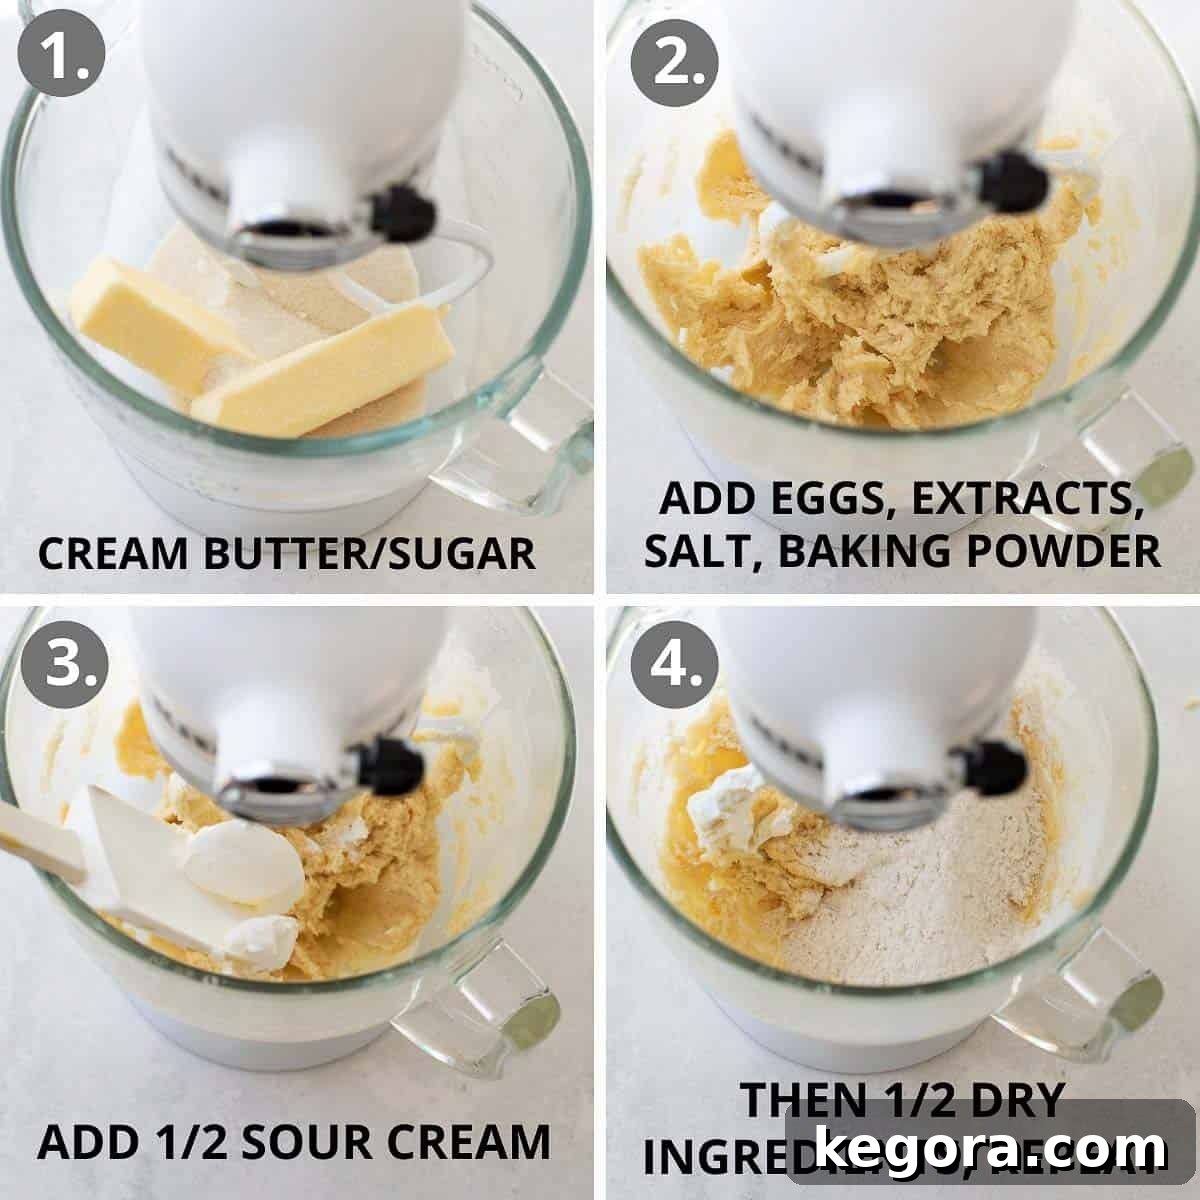
1. Prepare the Dough for Perfection
- Cream Butter and Sugar: Begin by adding the softened butter and granulated sugar to the bowl of a stand mixer fitted with a paddle attachment. (If you don’t have a stand mixer, a large bowl and a good quality hand mixer will work just as well). Cream these two ingredients together on medium speed until the mixture transforms into a light, fluffy, and noticeably pale consistency. This process should take approximately 3 minutes. This crucial step is not just about combining; it’s about incorporating air, which is absolutely vital for achieving a tender, melt-in-your-mouth cookie texture.
- Add Wet Ingredients: Next, gently crack the egg into the mixture, followed by the vanilla extract, almond extract, salt, and baking powder. Mix these ingredients on low speed until they are just well combined. Be mindful not to overmix at this stage, as excessive agitation can affect the final texture.
- Incorporate Dry Ingredients (with the secret touch): Now it’s time to add our key dry and moist components. With the mixer still running on low speed, add half of the sour cream, followed immediately by the cornstarch. Mix briefly until barely combined. Then, add half of your measured gluten-free flour blend to the wet ingredients, followed by the remaining half of the sour cream. Continue mixing until these are just combined. Finally, add the other half of the dry ingredients (the rest of the gluten-free flour) and mix until everything is thoroughly incorporated and a cohesive, uniform dough forms. The dough should pull away from the sides of the bowl.
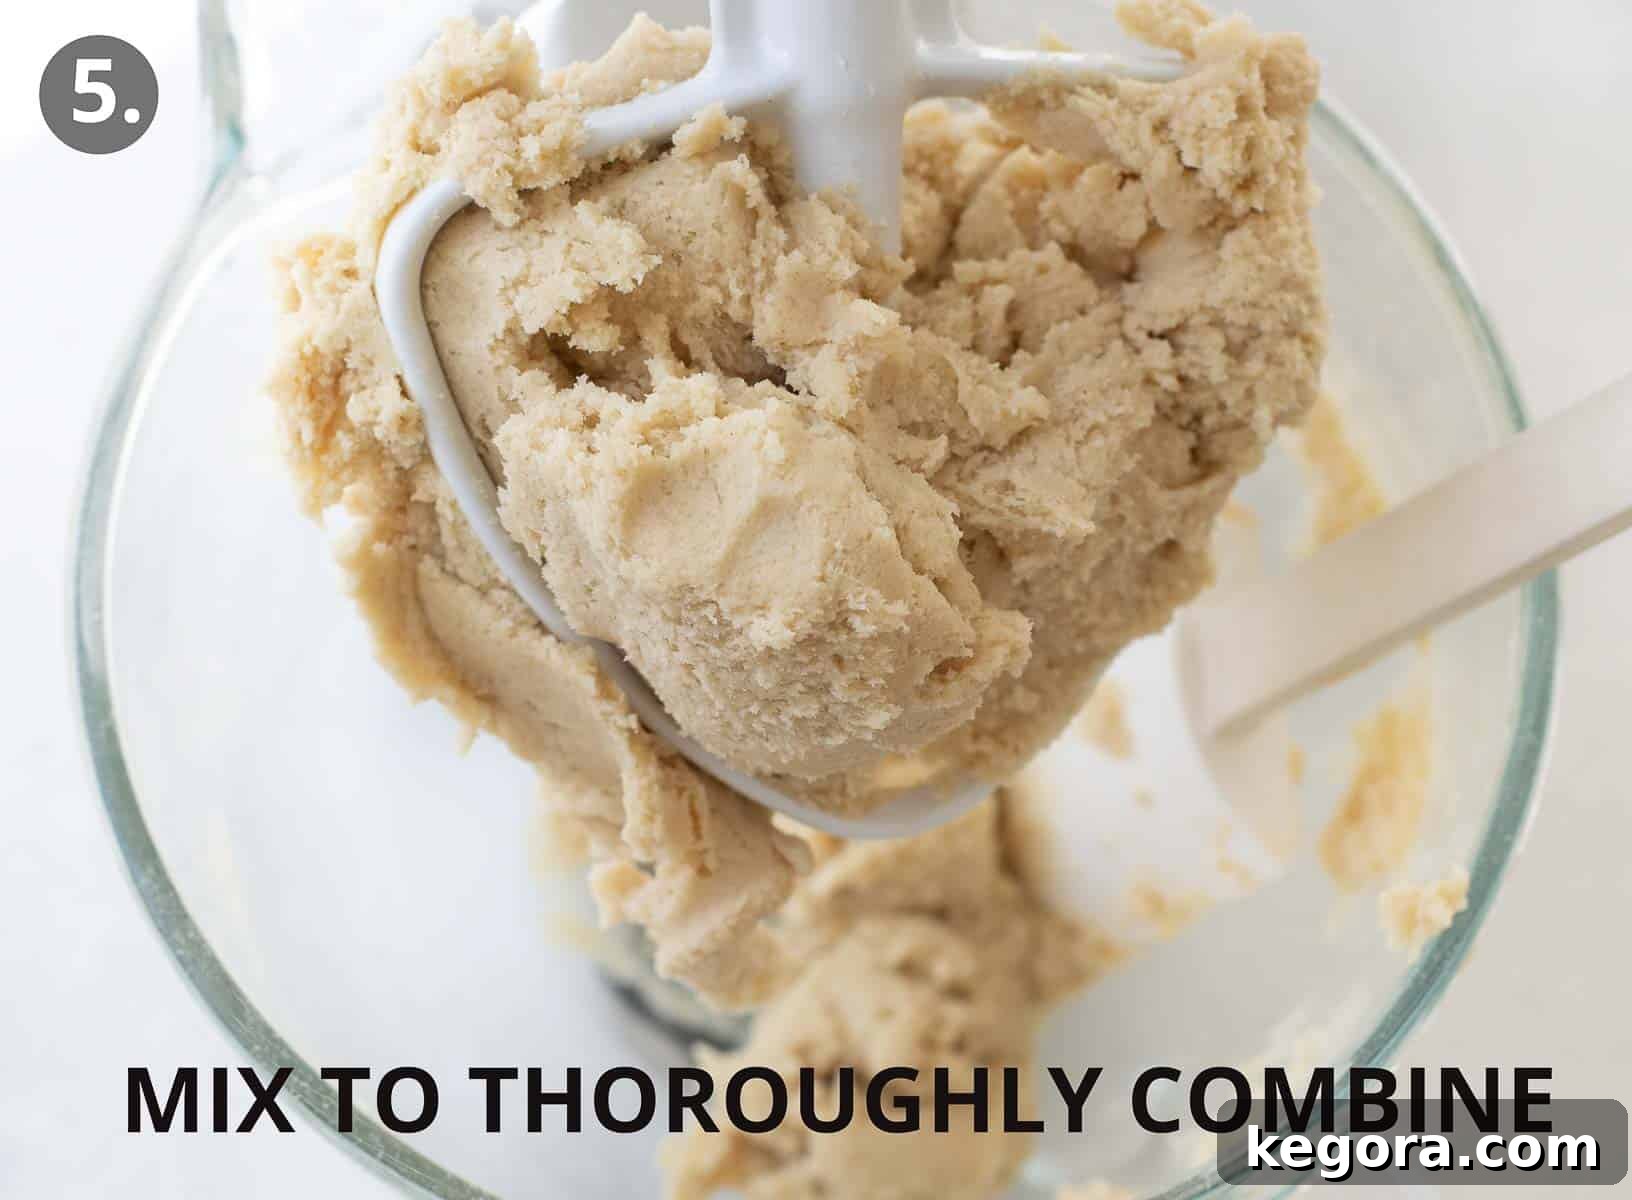
- Final Mix and Scrape: After the main mixing, use a sturdy rubber spatula to scrape down the sides and bottom of the mixing bowl. This ensures that any unmixed pockets of ingredients are fully incorporated. Give the dough one final, short mix until it is totally combined and smooth, with no streaks of flour visible.
2. Chill, Roll, and Bake the Cookies to Perfection
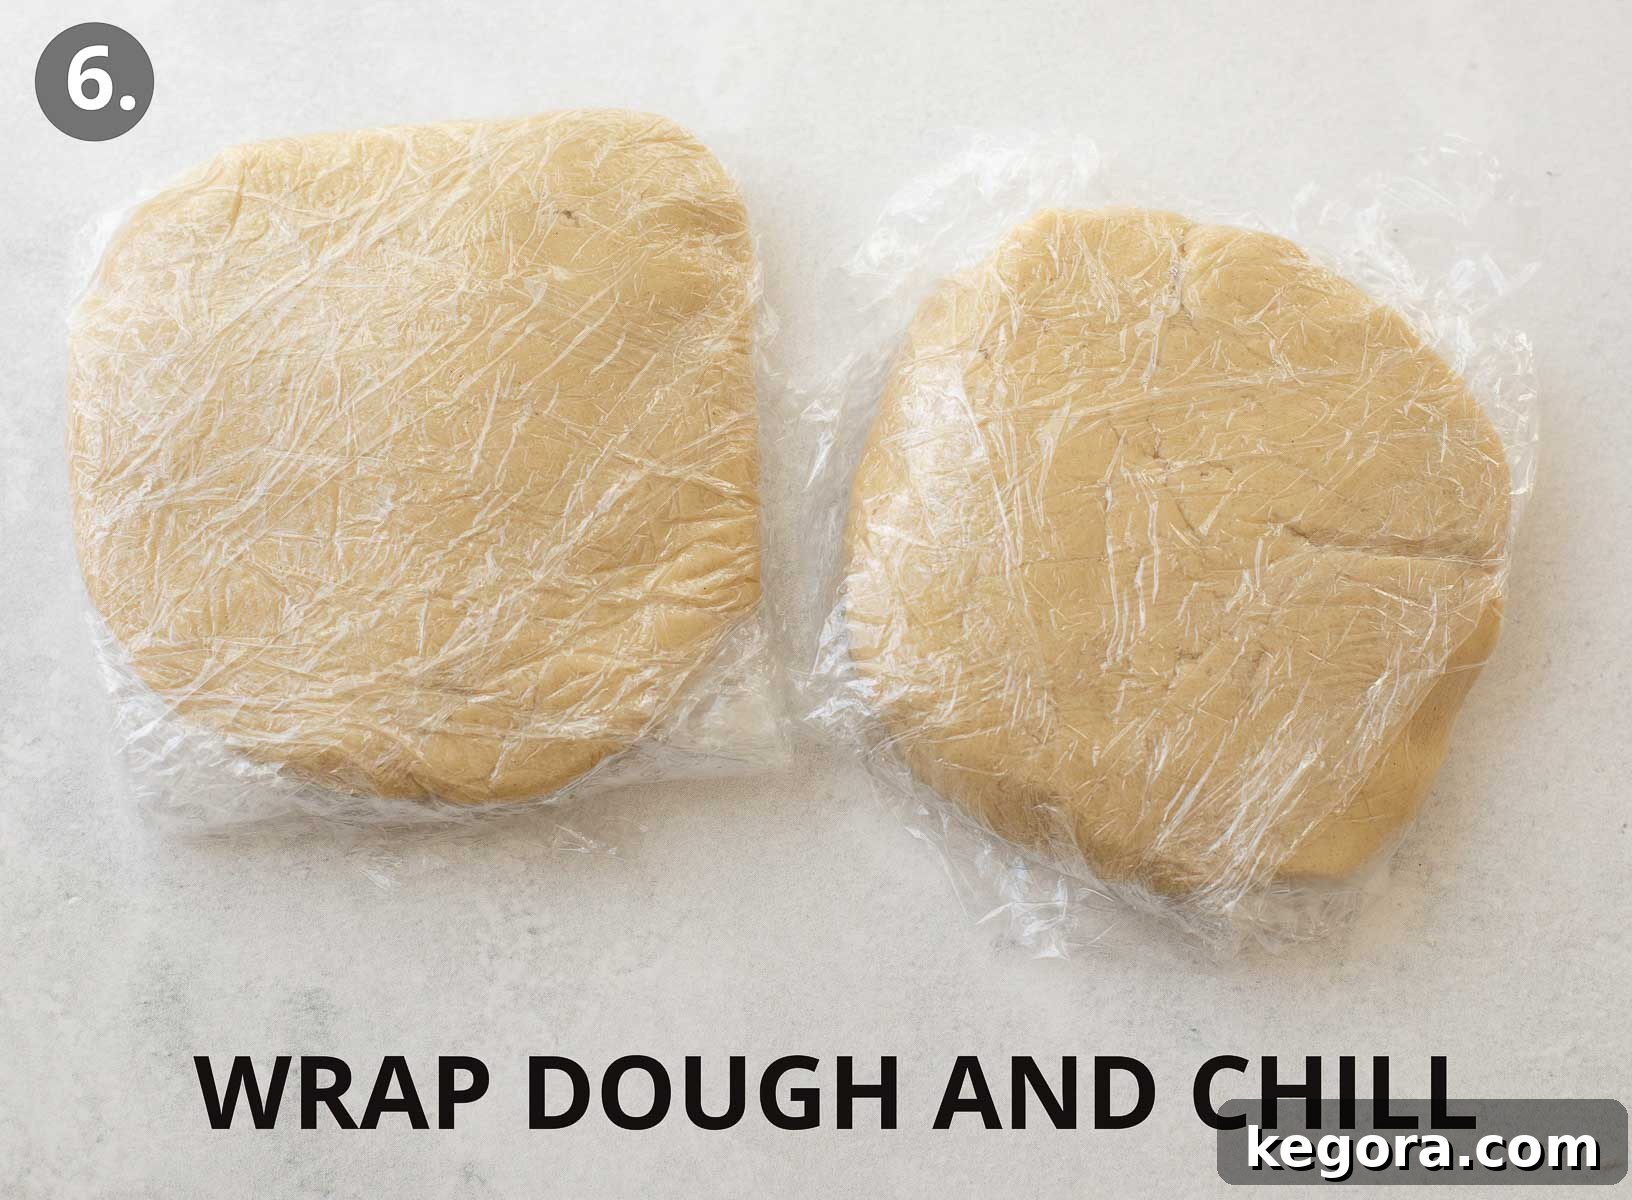
- Chill the Dough: This step is critical for successful gluten-free sugar cookies! Divide the prepared dough into two relatively flattened disks. Wrap each dough disk tightly in plastic wrap, ensuring no air can get in. Refrigerate the dough for a minimum of 1 hour, or ideally, up to 2 days. This chilling period is absolutely vital for several reasons: it allows the gluten-free flour to fully hydrate, preventing a gritty texture; it firms up the dough, making it much easier to roll out and cut without sticking; and most importantly, it prevents the cookies from spreading excessively in the oven, ensuring your cut-out shapes hold beautifully.
Pro Tip for Drop Cookies: If you’re running short on time or simply prefer the rustic charm and ease of drop cookies over the meticulous process of rolling and cutting, consider trying these equally delicious gluten-free Christmas cookies. They’re designed for a quicker preparation without sacrificing flavor!

- Prepare for Baking: Preheat your oven to 350°F (175°C). Prepare two baking sheets by lining them with either silicone baking mats or parchment paper. This vital step prevents the cookies from sticking and promotes even baking, ensuring a consistent result across your entire batch.
- Roll and Cut: Lightly sprinkle a clean counter or your chosen work surface with a small amount of gluten-free flour. Take one chilled dough disk from the refrigerator and roll it out with a rolling pin to your desired thickness on the lightly floured surface. For delightfully soft, tender sugar cookies with a slightly chewy bite, aim for approximately 1/4-inch thick. If you have a preference for a crisper cookie with a more pronounced snap, you can roll the dough a bit thinner, to about 1/8 inch. Personally, I find the 1/4-inch thickness provides the absolute best balance of softness and structure. Use your favorite cookie cutters to create your desired shapes, then very carefully use a thin, flexible spatula to transfer the cut cookies to the prepared baking sheets, ensuring you leave a little space between each cookie for even airflow.
- Bake to Perfection: Place the baking sheets in the preheated oven and bake the cookies for 9-11 minutes. The exact baking time can vary slightly depending on your specific oven and the thickness of your cookies. You’ll know the cookies are done when their edges appear set and are very lightly golden, while the centers still look soft and pale. It’s crucial to avoid overbaking, as this can quickly lead to dry, hard cookies.
- Cooling Process: Once baked, remove the cookies from the oven and allow them to cool on the hot baking sheet for 5 minutes. During this brief period, they will continue to set and firm up. After 5 minutes, gently transfer them to a wire rack to cool completely. Allowing them to cool fully on a wire rack prevents them from becoming soggy on the bottom and helps maintain their crisp edges, making them perfect for frosting.

Beyond these classics, you might also want to try these wonderfully festive and fun gluten-free funfetti sugar cookies for an extra sprinkle of joy and celebration in your baking!
Elevating Your Cookies with the Best Gluten-Free Sugar Cookie Frosting
These versatile gluten-free sugar cookies are an absolutely ideal canvas for unleashing your creativity, making them perfect for celebrating any occasion or holiday throughout the year! We particularly enjoy transforming them into festive Christmas cookies during the holiday season, complete with intricate designs and vibrant colors. However, their adaptability means they are equally wonderful for cutting into charming heart shapes for Valentine’s Day, spooky pumpkins for Halloween, adorable bunnies for Easter, or any other fun design your imagination conjures. The inherent beauty of these cookies truly lies in their endless versatility, making them a cherished staple for year-round celebrations.
While these cookies provide a fantastic base that pairs beautifully with any frosting you desire – be it a classic royal icing for achieving intricate, professional-looking designs, or a rich, creamy, and traditional buttercream for a more indulgent and plush feel – I’ve included my absolute favorite recipe for buttercream frosting below. What truly makes this particular buttercream stand out and garner rave reviews is its unique and delightful secret ingredient: sour cream. Trust me on this one; once you experience the incredible depth of flavor, the velvety smooth texture, and the perfect balance of sweetness and tang that sour cream imparts to buttercream frosting, you’ll wonder how you ever made frosting without it! It’s so unbelievably delicious and adds a subtle, refreshing tartness that perfectly complements the sweetness of the sugar cookies, creating an unforgettable taste experience.
This sour cream buttercream is not only incredibly easy to whip up but also boasts a wonderfully spreadable consistency, making the decorating process an absolute breeze, even for beginners. You can effortlessly tint it with various food colorings to perfectly match your party theme, holiday, or personal preference, and then add your favorite sprinkles, edible glitter, or other decorations for that extra festive and personalized touch. Get ready to impress everyone with both the perfectly baked gluten-free cookies and their show-stopping, secretly delicious frosting!
Frequently Asked Questions About Gluten-Free Sugar Cookies
Navigating the world of gluten-free baking can sometimes bring up a few specific questions, especially when striving for perfection. Here are detailed answers to some common inquiries about this gluten-free sugar cookie recipe to ensure your baking experience is as smooth, enjoyable, and successful as possible.
Do I absolutely have to chill the dough?
Yes, chilling the gluten-free sugar cookie dough is an absolutely non-negotiable and critical step for achieving the best possible results. This essential resting period allows the various components of the gluten-free flour blend, particularly the starches and gums (like xanthan gum), ample time to fully hydrate and absorb moisture. Proper hydration is key to preventing a gritty or sandy texture in your final cookies and ensures the dough becomes pliable, making it easy to roll out and cut without cracking or tearing. More importantly, chilled dough maintains its shape beautifully during the baking process, which is crucial for achieving those crisp, defined edges on your cut-out cookies. Skipping this vital step almost always leads to cookies that spread too much in the oven, losing their decorative shapes.
How thick should I roll the dough for the perfect cookie?
The ideal thickness for rolling your dough largely depends on your personal preference for cookie texture! For a wonderfully soft, chewy sugar cookie with a tender crumb, I highly recommend aiming to roll the dough until it is approximately 1/4-inch thick. This thickness provides enough body and substance to support that lovely soft center. If you prefer a crisper cookie with a more pronounced snap and a firmer bite, you can certainly roll the dough thinner, to about 1/8 inch. While both options yield delicious results, my personal favorite for that perfect balance of softness and structure is the 1/4-inch thick cookie. Experiment to find what you love best!
Can I make these cookies dairy-free?
Absolutely! This recipe is wonderfully adaptable for dairy-free diets, ensuring everyone can enjoy these delightful sugar cookies. You can easily substitute traditional dairy butter with a high-quality vegan butter and utilize readily available dairy-free sour cream. For optimal texture and to closely mimic the richness and structure that dairy butter provides, I specifically suggest using a combination of 1/2 cup shortening and 1/2 cup vegan butter to replace the 1 cup of butter called for in the recipe. For dairy-free sour cream, the Forager Project brand is a fantastic option that consistently yields excellent results in terms of flavor and consistency.
What if my gluten-free dough is too sticky or too dry?
Gluten-free doughs can sometimes be a bit more sensitive to humidity and ingredient measurements than their gluten-containing counterparts. If your dough feels excessively sticky after its chilling period, try lightly dusting your rolling surface, your hands, and your rolling pin with a bit more gluten-free flour. Avoid adding too much at once, as this can dry out the dough. If, conversely, your dough seems too dry or crumbly and difficult to work with, this might be due to accidentally over-measuring the flour or insufficient liquid. You can try adding a teaspoon of milk (either dairy or a non-dairy alternative like almond milk) at a time and gently kneading it into the dough until it reaches a more pliable and workable consistency. Always remember to spoon and level your flour into measuring cups, rather than scooping directly from the bag, to avoid compacting and adding too much.
Can I re-roll the dough scraps after cutting out cookies?
Yes, you can absolutely re-roll the dough scraps left over after cutting out your initial batch of cookies! To do so effectively, gently gather all the scraps together and press them firmly to form a new, cohesive disk of dough. Once reformed, wrap this new disk tightly in plastic wrap and place it back in the refrigerator to chill for about 15-20 minutes. This quick chill will help the dough firm up again, making it much easier to handle and roll out without becoming too sticky or delicate. Be mindful not to re-roll the dough too many times, as it can sometimes become tough or less pliable with excessive handling. Typically, 1-2 re-rolls yield excellent results without compromising the cookie’s final texture.

Storage and Freezing Instructions for Your Gluten-Free Sugar Cookies
Proper storage is key to maintaining the freshness, deliciousness, and perfect texture of your homemade gluten-free sugar cookies, allowing you to enjoy them days or even months after baking.
To Store Baked Cookies (Frosted or Unfrosted):
Once your cookies are completely cooled to room temperature (and thoroughly frosted, if desired, allowing the frosting to set), it’s crucial to store them correctly. Place them in an airtight container at room temperature. They will maintain their fresh taste and delightful texture for up to 3 days. For best results with frosted cookies, arrange them in a single layer or separate layers with sheets of parchment paper between them. This prevents the frosting from sticking together or becoming smudged, keeping your beautiful decorations intact.
To Freeze Baked Cookies (Unfrosted for Best Results):
Plain (unfrosted) gluten-free sugar cookies freeze exceptionally well and can be stored for up to 3 months. To freeze them effectively, first arrange the completely cooled cookies in a single layer on a baking sheet and flash freeze them for about 30 minutes, or until they are solid. This step prevents them from sticking together. Then, transfer the frozen cookies to a freezer-friendly airtight container or a heavy-duty Ziploc bag. For added protection, layer them between sheets of parchment paper. When you’re ready to enjoy them, simply thaw the cookies in the refrigerator overnight or at room temperature for a few hours before serving or frosting.
To Freeze Raw Cookie Dough:
For ultimate convenience and future baking sessions, you can also freeze the raw cookie dough! After dividing and forming your flattened dough disks, wrap each disk very tightly in a double layer of plastic wrap to prevent freezer burn. Then, place the wrapped dough disks into a freezer-safe bag or container. The raw dough can be successfully frozen for up to 2-3 months. When you’re ready to bake, simply transfer the dough from the freezer to the refrigerator and allow it to thaw overnight. Once thawed, proceed with rolling and baking the cookies as directed in the recipe. This is a fantastic time-saver for busy schedules, allowing you to have freshly baked cookies whenever the craving strikes!
Explore More Delicious Gluten-Free Cookie Recipes for Every Occasion
If you’ve thoroughly enjoyed baking and devouring these perfect gluten-free sugar cookies, you’ll be thrilled to discover a whole world of other fantastic gluten-free cookie recipes that are equally delightful, satisfying, and easy to make. Expand your baking repertoire and find new favorites with these tried-and-true gluten-free delights, perfect for any season or celebration:
- Gluten-Free Christmas Cookies
- Gluten-Free Almond Cookies
- Gluten-Free Gingerbread Cookies
- Gluten-Free Snowball Cookies
- Gluten-Free Thumbprint Cookies
- Gluten-Free Chocolate Chip Biscotti
- Gluten-Free Molasses Cookies
- Gluten-Free Spritz Cookies
Making gluten-free sugar cookies is a beloved holiday tradition in our home, bringing immense joy and delicious aromas to the kitchen every year! I sincerely hope this exceptional recipe brings as much happiness and deliciousness to your kitchen and your loved ones as it does to ours. If you try this recipe, please be sure to leave a comment and a rating below. Your feedback truly means the world to me and helps others discover these wonderful treats! Happy baking!

Gluten-Free Sugar Cookies (Tried & True!)
Author: Erin Collins
Prep Time: 20 mins
Cook Time: 10 mins
Chill Time: 1 hr
Total Time: 1 hr 30 mins
Servings: 24 cookies (depending on size)
The ONE TRUE gluten-free sugar cookie recipe! I’ve tried dozens of gluten-free sugar cookie recipes over the years and this is the one I can’t stop making.
These gluten-free cut-out cookies are soft in the center, crisp on the edges and hold their shape during baking. Make them with your favorite cookie cutters for any holiday or occasion!
Ingredients
For the Cookies:
- 1 cup butter, softened (227g)
- 1 cup granulated sugar (200g)
- 1 egg
- 2 teaspoons vanilla extract
- 1/2 teaspoon almond extract
- 3/4 teaspoon salt
- 1 1/2 teaspoons baking powder
- 1/4 cup sour cream (60g, dairy-free sour cream works!)
- 3 tablespoons cornstarch
- 2 1/2 cups gluten-free 1:1 baking flour (380g)
For the Frosting:
- 1/2 cup butter (113g)
- 1/4 cup sour cream (60g, dairy-free sour cream works!)
- 3 cups powdered sugar (390g)
- 1/2 teaspoon almond extract
- 2 tablespoons milk (or almond milk)
- Food coloring (optional)
Instructions
Make the Dough:
- In the bowl of a stand mixer fitted with a paddle attachment (or use a large bowl with a hand mixer), add the butter and granulated sugar. Cream together until light and fluffy, about 3 minutes.
- Add the egg, almond extract, vanilla extract, salt, and baking powder. Mix until well combined.
- With the mixer running on low, add half of the sour cream followed by the cornstarch. Add 1/2 of the flour followed by the other 1/2 of the sour cream. Mix until combined then add the other 1/2 of the flour and mix until incorporated. Scrape down the sides and bottom of the bowl then mix again until totally combined.
- Divide the dough into two flattened balls and wrap each ball tightly in plastic wrap. Refrigerate for at least 1 hour or up to 2 days.
Bake the Cookies:
- Preheat the oven to 350°F (175°C). Line 2 baking sheets with silicone baking mats or parchment paper.
- Lightly sprinkle a clean counter with gluten-free flour. Roll out the chilled dough to the desired thickness on the lightly floured surface. (Tip: For a soft sugar cookie, roll the dough until it is about 1/4-inch thick. For crisper cookies you can roll the dough thinner to 1/8 inch. I prefer 1/4-inch thick cookies!)
- Cut out the cookies with desired cookie cutters, then use a thin spatula to transfer the cookies to the prepared pan.
- Bake the cookies for 9-11 minutes until set. Cool on the baking sheet for 5 minutes, then transfer to a cooling rack to cool completely.
Make the Frosting:
- In a medium bowl, combine all frosting ingredients. Using a hand mixer, whip until light and fluffy. Add a little more milk if the frosting is too thick, or more powdered sugar if it’s too thin.
- Frost the cookies as desired. Enjoy!
Notes
- Dairy-Free? To make these cookies dairy-free I recommend using 1/2 cup shortening and 1/2 cup vegan butter in place of 1 cup the butter. You can also use dairy-free sour cream – I like the brand Forager.
- To Store: Store the cookies in an airtight container or wrapped tightly in plastic wrap at room temperature for up to 3 days.
- To Freeze: Plain gluten-free sugar cookies freeze well up to 3 months. To freeze, layer the cookies between sheets of parchment paper and place in a freezer-friendly container or Ziploc. Thaw in the refrigerator or at room temperature.
Nutrition
Carbohydrates: 33g |
Protein: 2g |
Fat: 14g |
Saturated Fat: 8g |
Polyunsaturated Fat: 1g |
Monounsaturated Fat: 4g |
Trans Fat: 1g |
Cholesterol: 40mg |
Sodium: 184mg |
Potassium: 87mg |
Fiber: 1g |
Sugar: 23g |
Vitamin A: 396IU |
Vitamin C: 1mg |
Calcium: 29mg |
Iron: 1mg