
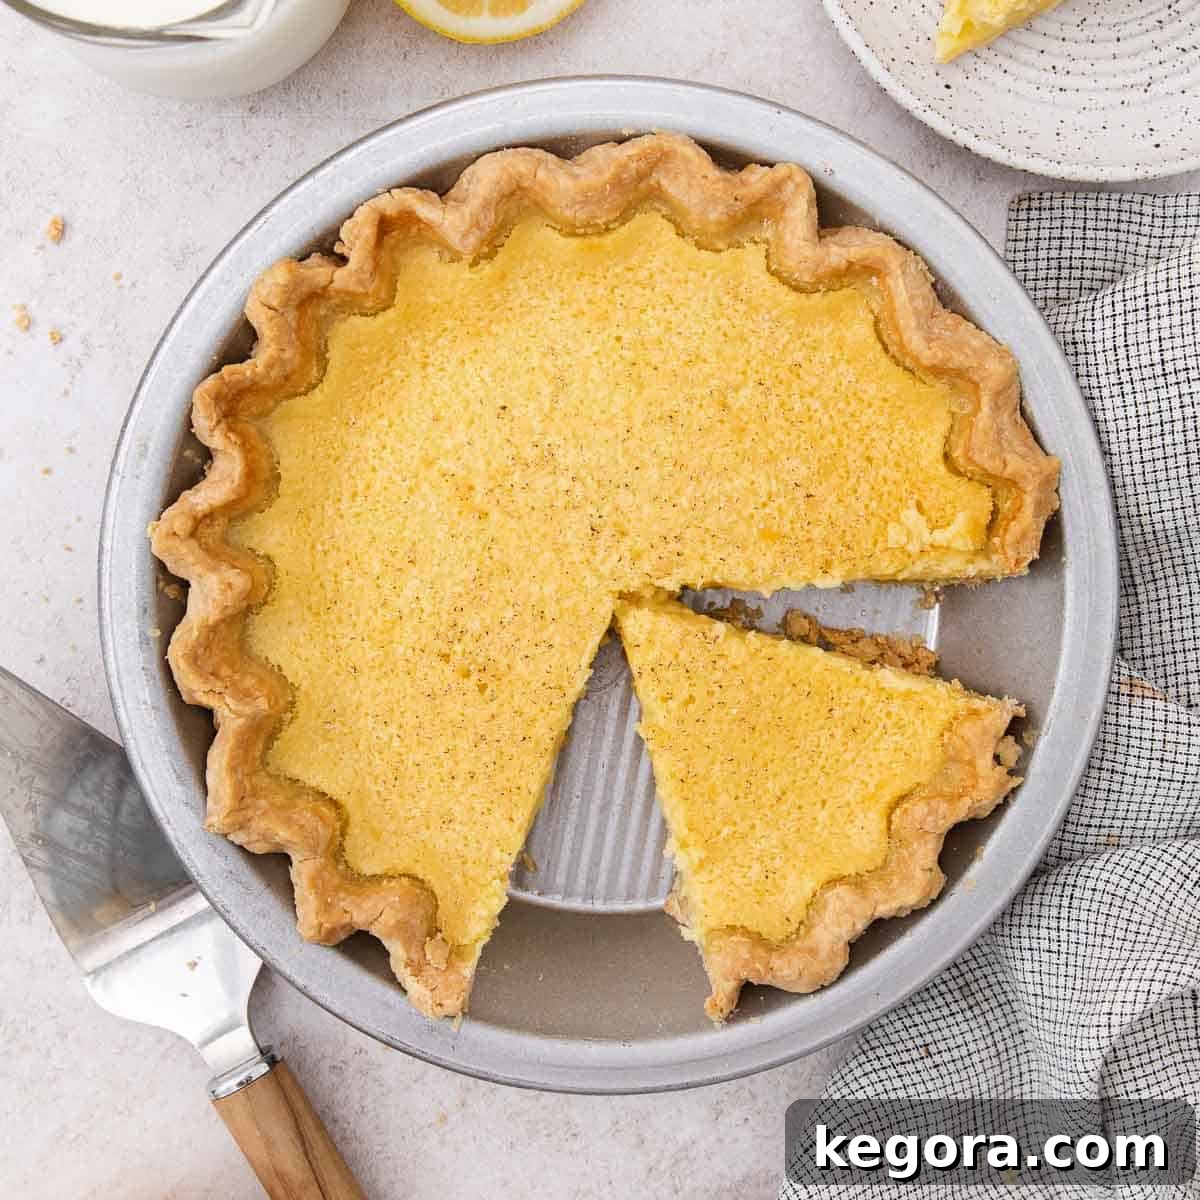
Erin’s Gluten-Free Buttermilk Pie: A Southern Classic Reimagined
There’s something truly comforting and nostalgic about a classic Southern buttermilk pie. Its rich, custardy filling, delicate balance of sweet and tangy flavors, and crisp crust evoke memories of holidays and family gatherings. For those navigating a gluten-free lifestyle, enjoying such traditional treats can often be a challenge. But fret not! This carefully crafted gluten-free buttermilk pie recipe brings all the beloved characteristics of the original, ensuring everyone can savor a slice of this timeless dessert.
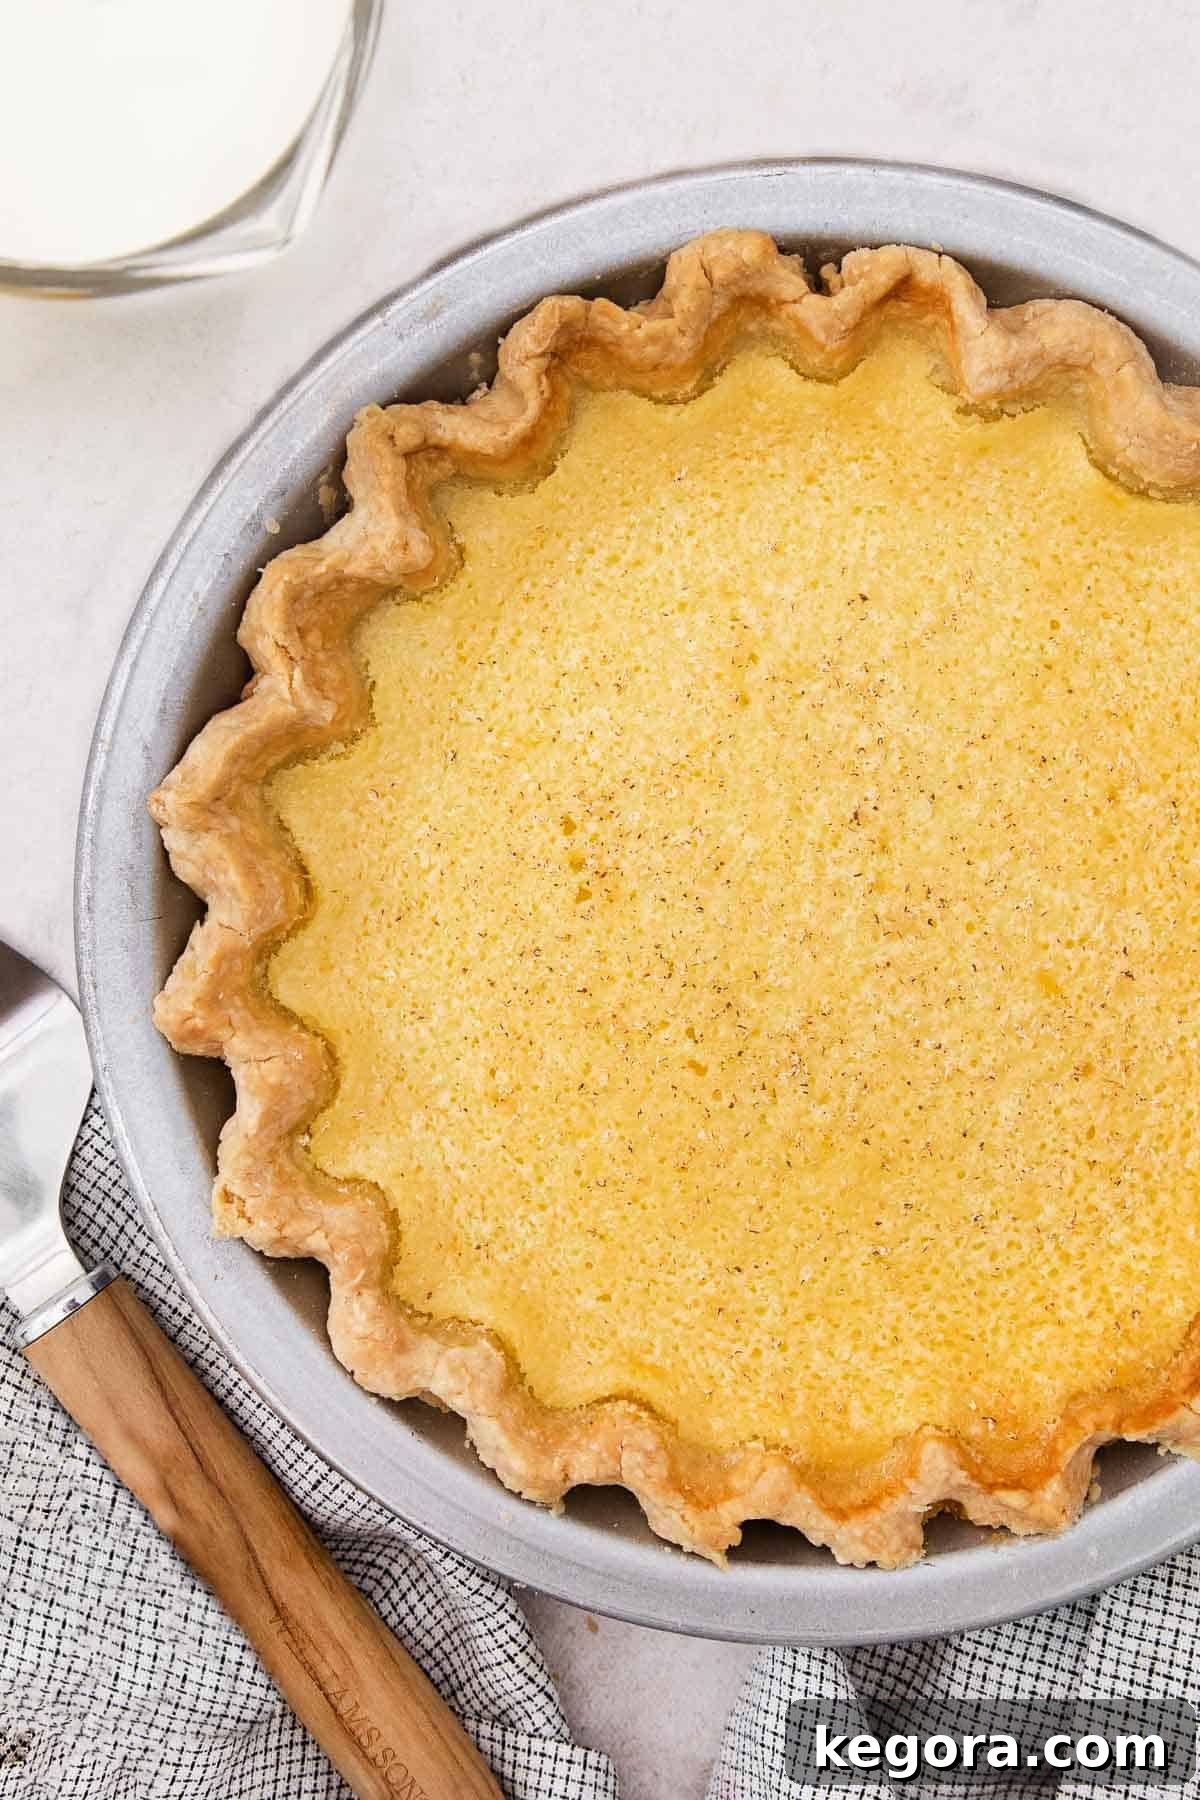
My journey to perfect this gluten-free buttermilk pie has been one of passion and precision. The result is a pie that truly hits the spot, boasting a silky-smooth filling infused with tangy buttermilk, a hint of warm nutmeg, and bright lemon zest. All of this delightful custard is nestled within a crisp, flaky gluten-free pie crust that perfectly complements the creamy interior. It’s a pie that’s not just “good for gluten-free,” but simply delicious in its own right.
One of the many advantages of this recipe is that it tastes even better the day after it’s baked. This makes it an ideal make-ahead option for holidays and special occasions, allowing you to focus on other preparations without compromising on dessert quality. Imagine pulling a perfectly chilled, ready-to-serve pie from the fridge, knowing it’s at its peak flavor and texture.
Why You’ll Fall in Love with This Gluten-Free Buttermilk Pie
If you’ve been searching for a gluten-free dessert that doesn’t compromise on flavor or texture, look no further. This recipe masterfully captures the essence of traditional buttermilk pie while offering a superior gluten-free experience. Here’s why it’s destined to become a staple in your kitchen:
- Authentic Southern Flavor: This pie delivers all the classic notes of a traditional buttermilk pie – a delightful blend of sweet and tangy, with a subtle spice from nutmeg and a refreshing zest from lemon. It’s a flavor profile that’s both comforting and sophisticated.
- Flaky Gluten-Free Crust: The biggest challenge with gluten-free pies is often the crust. Our recipe ensures a gluten-free crust that actually flakes, holding up beautifully to the rich custard filling. Say goodbye to crumbly, dry crusts and hello to buttery perfection.
- Silky, Custardy Texture: The filling is the heart of any buttermilk pie, and ours is unbelievably silky-smooth and custardy. It sets perfectly, offering that melt-in-your-mouth experience without being overly dense or eggy.
- Perfect for Any Occasion: Whether it’s a cozy family dinner or a grand holiday feast, this pie fits right in. Its elegant simplicity and make-ahead convenience make it an excellent choice for any gathering, especially Thanksgiving and Christmas.
- Effortless Elegance: While it looks and tastes impressive, this pie is surprisingly straightforward to make. With our detailed instructions, even novice bakers can achieve spectacular results.
Top Tips for Buttermilk Pie Perfection
Achieving the perfect gluten-free buttermilk pie involves a few key techniques. Follow these expert tips to ensure your pie turns out flawlessly every time:
- Master the Crust: The foundation of any great pie is its crust. For an unparalleled crisp, golden, and flaky gluten-free crust, I highly recommend using my tried-and-true gluten-free pie crust recipe. The secret weapon here is a quick par-bake on a preheated pizza steel. This technique ensures the bottom crust is firm and won’t get soggy from the wet filling, delivering that satisfying crunch with every bite.
- Avoid Overbaking: This is crucial for achieving that signature custardy texture. The pie should still have a slight wobble in the center when removed from the oven. It will continue to set as it cools, so resist the urge to bake it until completely firm. Overbaked pie can become rubbery or dry.
- Room Temperature Ingredients: For the filling, ensure your buttermilk and eggs are at room temperature. This helps them incorporate smoothly with the melted butter and sugar, creating a homogenous mixture that bakes evenly into a perfectly smooth custard.
- Fresh is Best: When it comes to lemon zest and nutmeg, fresh ingredients make a noticeable difference. Freshly grated nutmeg offers a much more vibrant and aromatic flavor than pre-ground, and fresh lemon zest provides a brighter, more pronounced citrus note.
Looking for more gluten-free pie recipes to complete your dessert repertoire? Explore these other delectable options:
- Gluten-Free Apple Pie
- Gluten-Free Coconut Cream Pie
- Gluten-Free Pumpkin Pie
- Gluten-Free Cherry Pie
xoxo erin
Essential Ingredients for Your Gluten-Free Buttermilk Pie
Creating this exquisite gluten-free buttermilk pie relies on a few key ingredients, each playing a vital role in achieving the perfect flavor and texture. Here are some detailed notes on what you’ll need, along with tips for best results. For precise measurements, please refer to the recipe card below.
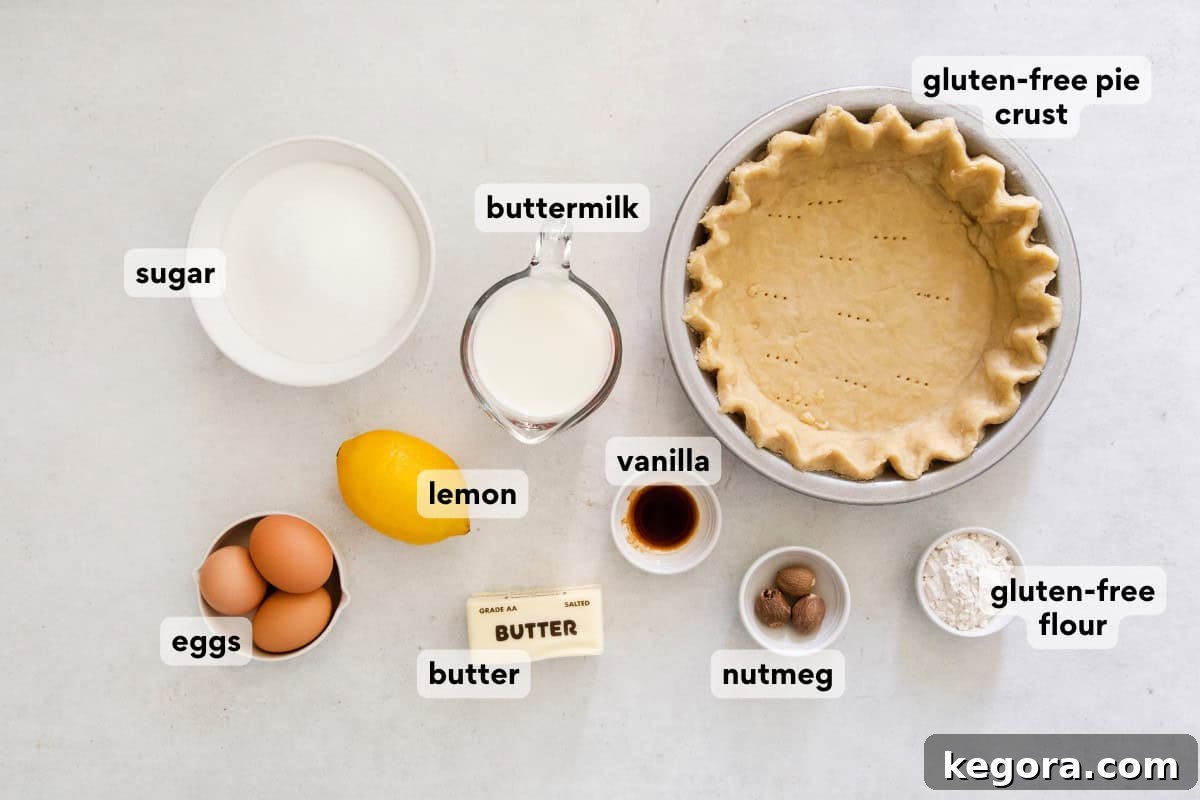
- High-Quality Gluten-Free Flour Blend: The success of your gluten-free pie crust hinges on the flour. Opt for a measure-for-measure gluten-free blend that includes xanthan gum. Xanthan gum is essential for providing structure and elasticity that gluten typically offers, preventing a crumbly crust. My top recommendation is King Arthur Gluten-Free Measure-for-Measure Flour, which consistently delivers excellent results for a crisp, flaky crust.
- Unsalted Butter (Chilled for Crust, Melted/Cooled for Filling): Butter is fundamental for both the crust and the filling. For the crust, using frozen, grated butter helps create pockets of steam during baking, resulting in a wonderfully flaky texture. In the filling, using melted and slightly cooled butter is key. This ensures it blends smoothly with the eggs and sugar, preventing the eggs from scrambling and contributing to that desirable super silky, sliceable custard filling.
- Buttermilk (Room Temperature): This is the star ingredient that gives buttermilk pie its distinctive tangy flavor and tender texture. Using room temperature buttermilk is crucial for the filling. Cold buttermilk can cause the mixture to seize or curdle when combined with other ingredients, leading to an unevenly set custard. Room temperature buttermilk integrates seamlessly, ensuring a perfectly smooth and consistent filling.
- Fresh Lemon and Nutmeg: This dynamic duo is what elevates this pie from good to extraordinary. The bright, zesty lemon helps to cut through the sweetness of the pie, adding a refreshing tang that balances the richness of the custard. Nutmeg introduces a warm, aromatic depth that is characteristic of classic Southern baking. Always use freshly grated lemon zest and nutmeg for superior flavor. A light sprinkling of nutmeg over the top before baking also adds a beautiful, professional bakery finish.
- Eggs (Room Temperature): Large eggs provide structure and richness to the custard. Like buttermilk, ensuring eggs are at room temperature helps them emulsify better with the other ingredients, leading to a smoother, more uniform filling and preventing a curdled texture.
- Granulated Sugar: Provides the essential sweetness and contributes to the custard’s smooth texture when dissolved properly.
- Shortening (Frozen for Crust): A small amount of frozen, grated shortening in the crust recipe adds extra tenderness and flakiness, complementing the butter beautifully.
- White Vinegar (for Crust): This may seem unusual, but vinegar helps to tenderize the gluten-free flour, making the dough more pliable and easier to work with, while also contributing to flakiness.
- Vanilla Extract: A touch of vanilla enhances the overall sweetness and depth of flavor in the filling. Use pure vanilla extract for the best taste.
How to Make the Perfect Gluten-Free Buttermilk Pie: Step-by-Step Guide
Ready to bake? This comprehensive guide walks you through each step of creating a magnificent gluten-free buttermilk pie, from the initial crust preparation to the final bake. While this provides a thorough overview, remember you can jump to the full recipe card below for precise measurements and a condensed format.
1. Crafting the Flaky Gluten-Free Crust
The foundation of this pie is its incredible gluten-free crust. Don’t skip these crucial steps for optimal flakiness and structure:
- Prepare Your Fats: Start by ensuring your butter and shortening are frozen solid. This is paramount for achieving a flaky crust. Grate both the frozen butter and shortening using the large holes of a box grater. Tossing the grated fats with the dry flour mixture helps coat them, preventing them from melting too quickly and creating those essential pockets of steam during baking.
- Combine Dry Ingredients: In a medium bowl, whisk together your gluten-free measure-for-measure flour, granulated sugar, and kosher salt. This ensures all dry ingredients are evenly distributed.
- Create the Liquid Mixture: In a separate small measuring cup, combine a large egg and white vinegar. Whisk until perfectly smooth, then add enough cold water to reach ½ cup total liquid. This cold, acidic mixture helps bind the dough without overworking the flour, and the vinegar also contributes to a tender crust. Refrigerate this liquid until ready to use.
- Mix Dough Gently: Gradually drizzle the cold liquid mixture, 1 tablespoon at a time, over the flour and fat mixture. Use a rubber spatula to gently stir and toss the mixture after each addition. The goal is for the dough to come together in large clumps, but it should not be sticky. You’ll typically use about half of the prepared liquid (5-6 tablespoons). Over-mixing or adding too much liquid can lead to a tough crust.
- Form and Chill the Dough: Pour the dough into a bowl and use your hands to gently bring it together into a cohesive ball. Shape it into a disc about 1 inch thick, wrap it tightly in plastic wrap, and refrigerate for at least 1 hour, or up to 2 days. Chilling allows the fats to firm up and the flour to hydrate, making the dough easier to roll.
- Roll and Place the Crust: If the dough has chilled for longer than an hour, let it sit at room temperature for about 15 minutes to become more pliable. Roll the dough into a 12-inch circle on a lightly floured surface (a pastry mat is helpful here). Be patient, as gluten-free dough can be a bit more delicate. Gently transfer it to a 9-inch pie plate, easing it into the edges without stretching. Trim excess dough and crimp the edges as desired.
- Freeze and Par-Bake: Freeze the shaped crust for 15 minutes to 1 hour until firm. This helps prevent shrinkage during baking. Prick holes all over the bottom and sides with a fork. Place a pizza steel in your oven and preheat to 375°F (190°C). Line the frozen crust with parchment paper and fill with pie weights. Bake for 10 minutes, then carefully remove the weights and parchment. Cool the crust for 10 minutes on a rack, then reduce the oven temperature to 350°F (175°C) while keeping the pizza steel in place. This par-baking on a pizza steel step is vital for a truly crisp, non-soggy bottom crust.
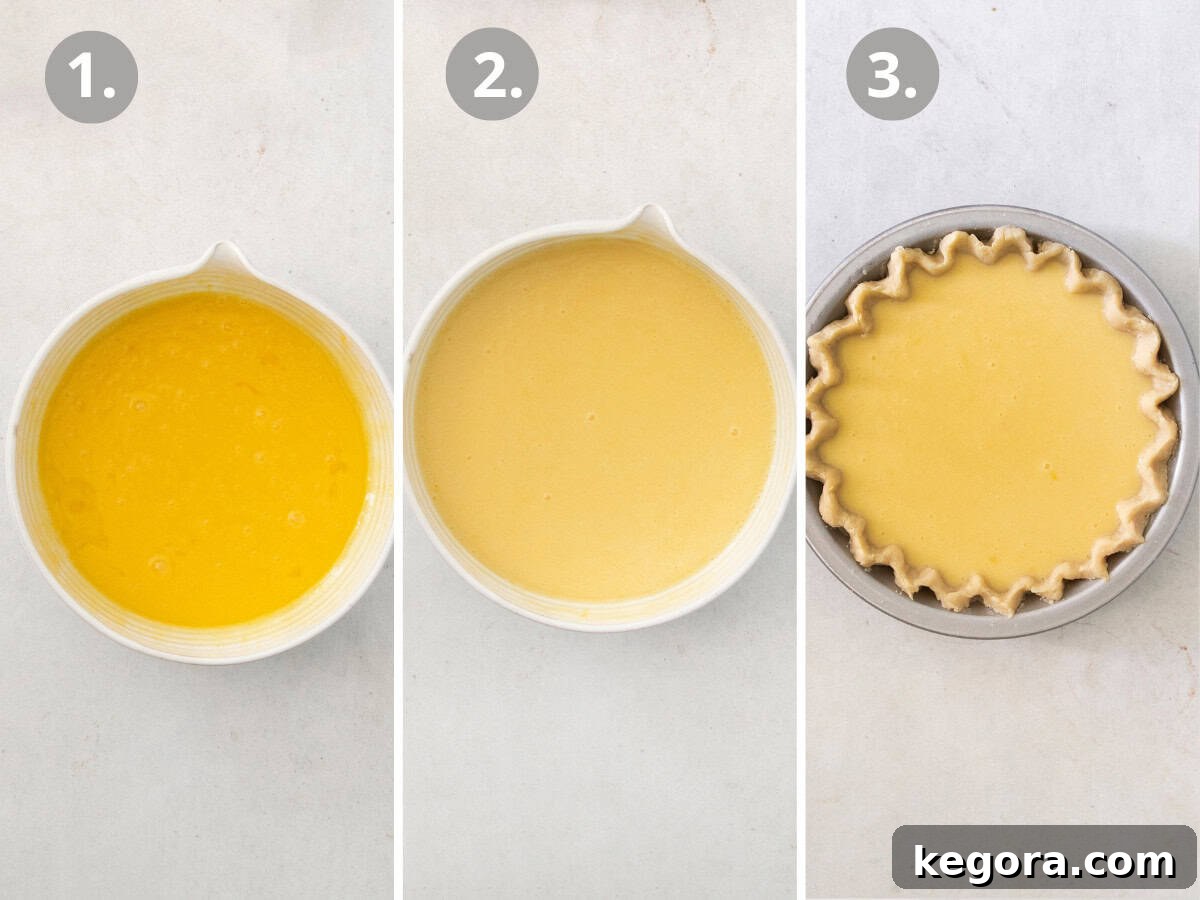
2. Preparing the Silky Buttermilk Filling
With your crust ready, it’s time to prepare the luscious, creamy filling:
- Combine Fats and Sugars: In a large mixing bowl, whisk together the melted and slightly cooled unsalted butter with the granulated sugar until the mixture is glossy and thick. This creates a smooth base for your custard.
- Incorporate Eggs: Add the large eggs one at a time, whisking thoroughly after each addition until the mixture is smooth and slightly frothy. Ensure your eggs are at room temperature to prevent curdling.
- Add Dry Flavorings: Sprinkle in the 3 tablespoons of measure-for-measure gluten-free flour, fresh lemon zest, and ground nutmeg. Whisk until there are no dry spots left and the mixture is well combined. The flour helps to thicken the custard slightly, contributing to its creamy texture.
- Introduce Wet Ingredients: Finally, whisk in the room temperature buttermilk, fresh lemon juice, and vanilla extract until the entire mixture is completely smooth and turns a creamy, pale yellow. The fresh lemon juice further brightens the flavor and enhances the tanginess of the buttermilk.
3. Assembling and Baking Your Masterpiece
The final steps bring it all together:
- Prepare for Baking: Place your par-baked pie dish on a rimmed baking sheet. This is a simple but effective preventative measure in case the filling bubbles over slightly during baking, saving you from a messy oven cleanup.
- Pour the Filling: Carefully pour the buttermilk filling into the prepped crust. The filling should come close to the top but not overflow. Gently tap the pan on the counter a couple of times to release any trapped air bubbles, which helps ensure a smooth top. For an extra touch of elegance, dust the top lightly with a bit more freshly grated nutmeg.
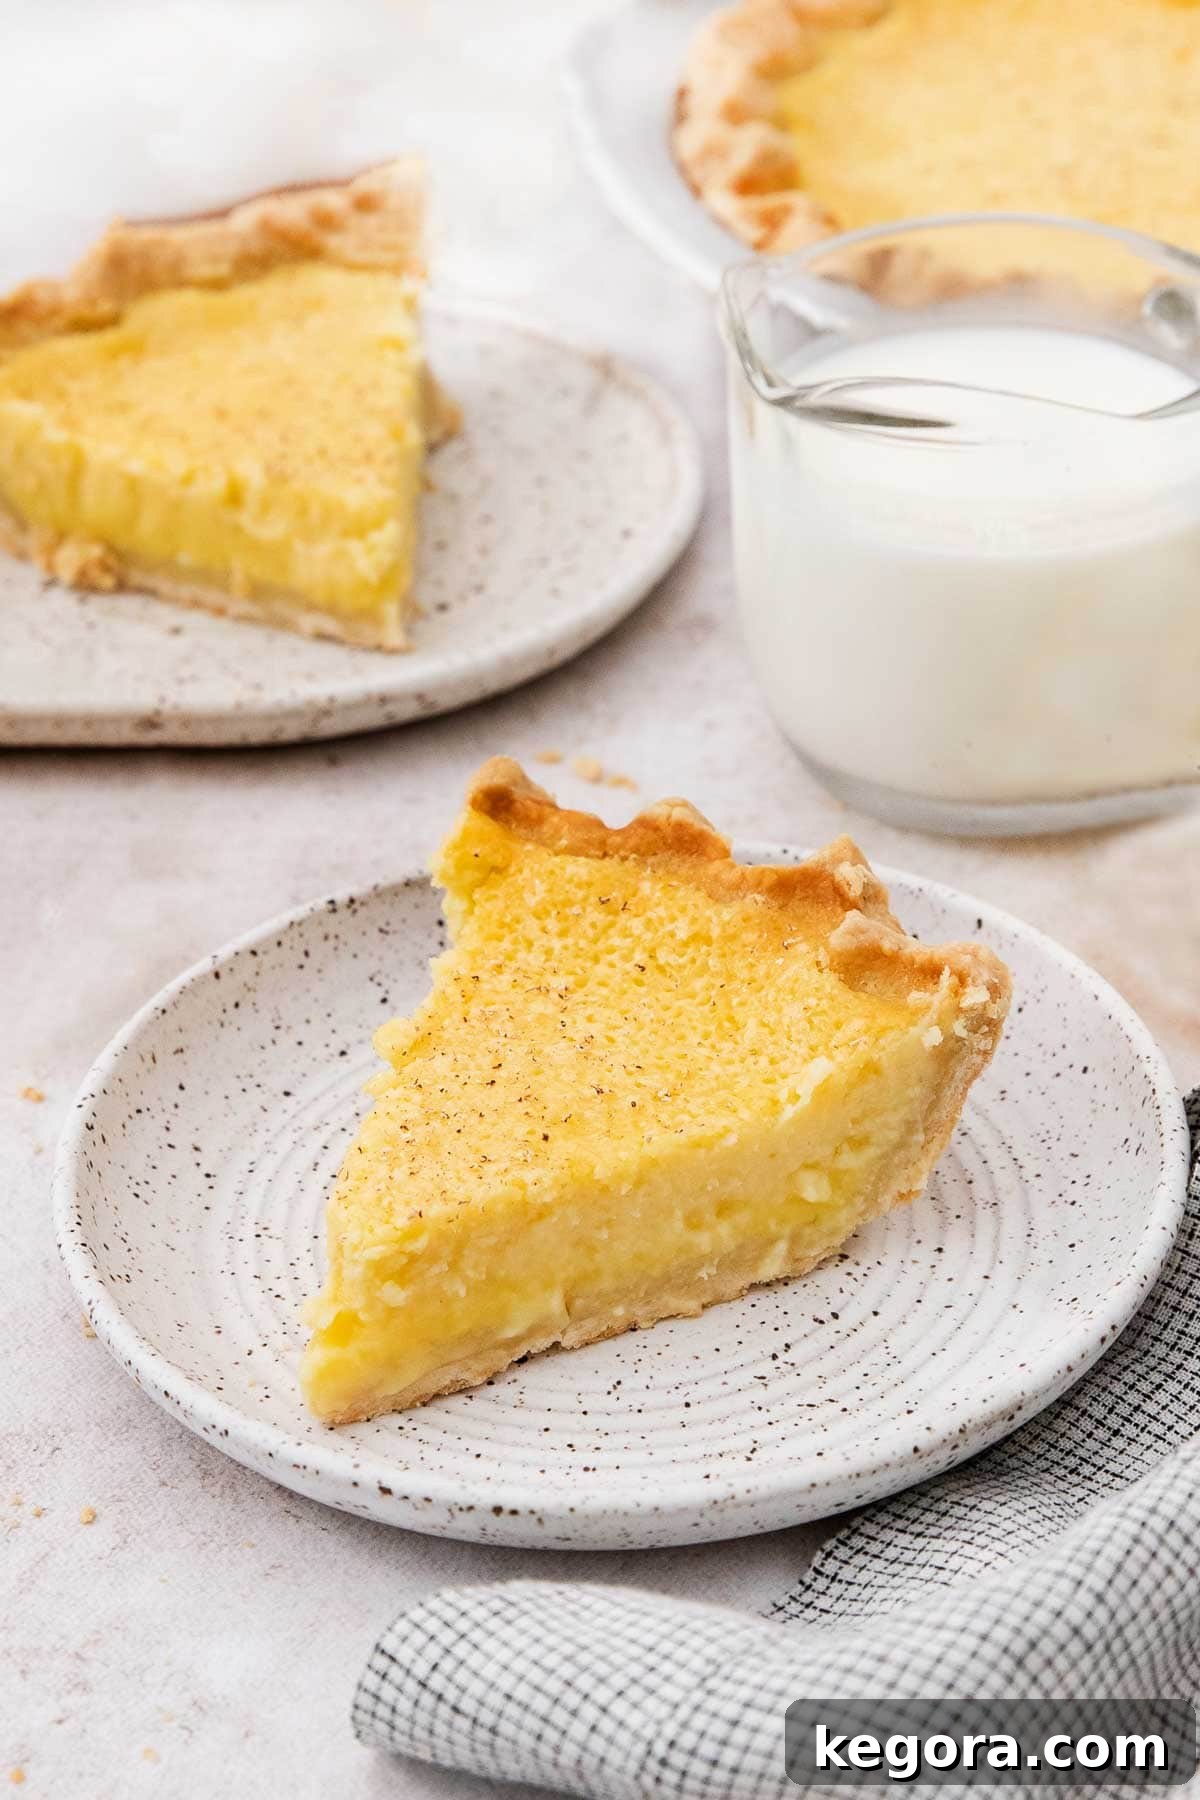
- Bake to Perfection: Bake in your preheated 350°F (175°C) oven (with the pizza steel still in place) for 50 to 55 minutes. The pie is done when the edges are puffed and set, but the very center still has a slight wobble when gently shaken. This delicate wobble is the secret to a silky, custardy texture. Overbaking will result in a firmer, less desirable consistency.
- Cool and Serve: Once baked, transfer the pie to a wire rack and allow it to cool completely to room temperature, which typically takes 2 to 3 hours. This cooling time is essential for the custard to fully set. Serve your magnificent gluten-free buttermilk pie at room temperature, or chill it in the fridge for a colder treat.
Gluten-Free Buttermilk Pie (Easy Old-Fashioned!)
Erin Collins
1 hr 45 mins
55 mins
2 hrs
8
This old-fashioned gluten-free buttermilk pie is wonderfully sweet and perfectly custardy, baked in a buttery and flaky gluten-free crust!
It’s a cherished Southern family recipe that is guaranteed to make you famous at Thanksgiving gatherings and any holiday table.
Comments
Ingredients
For the Gluten-Free Pie Crust:
- ½ cup (113g) unsalted butter, frozen until solid
- 2 tablespoons (28g) shortening, frozen until solid
- 1½ cups (225g) gluten-free measure-for-measure flour (with xanthan gum)
- 1 teaspoon granulated sugar
- ½ teaspoon kosher salt
- 1 large egg
- 1 tablespoon white vinegar
- Cold water (as needed, approximately ¼ cup)
For the Buttermilk Filling:
- ½ cup (113g) unsalted butter, melted and slightly cooled
- 1 ½ cups (350g) granulated sugar
- 3 large eggs, at room temperature
- 3 tablespoons measure for measure gluten-free flour
- 1 teaspoon fresh lemon zest
- ¼ teaspoon ground nutmeg, plus more for sprinkling
- 1 cup (240 ml) buttermilk, at room temperature
- 2 teaspoons fresh lemon juice
- 2 teaspoons vanilla extract
Instructions
For the Gluten-Free Pie Crust:
- Freeze Fats: Ensure your butter and shortening are frozen until solid before beginning. This is crucial for a flaky crust.
- Combine Dry Ingredients: In a medium bowl, whisk together the gluten-free flour, sugar, and salt.
- Prepare Liquid Mixture: In a small measuring cup, add the egg and white vinegar. Whisk until completely smooth. Then, add cold water until the mixture measures ½ cup total liquid and whisk to fully combine. Refrigerate this egg-vinegar-water mixture until ready to use.
- Grate Butter: Using the large holes of a box grater, grate the frozen butter directly into the bowl with the dry ingredients. Toss gently to coat the butter in the flour mixture.
- Grate Shortening: Repeat the grating process with the frozen shortening, adding it to the flour mixture and tossing to coat.
- Form Dough: Drizzle 1 tablespoon of the chilled egg-vinegar-water mixture over the flour and butter mixture. Using a rubber spatula, gently stir and toss the mixture, distributing the moisture evenly. Continue adding the liquid, 1 tablespoon at a time, stirring after each addition, until the dough begins to come together in large clumps. You will use approximately 5-6 tablespoons of the liquid (about half of what you prepared). Avoid overworking the dough.
- Bring Dough Together: Pour the dough mixture into a clean bowl and use your hands to gently bring the dough together, pressing any loose bits into the cohesive mass. Add another tablespoon of liquid only if absolutely needed for the dough to hold together, but it should be moist enough without being sticky.
- Shape and Chill: Turn the dough out onto a lightly floured surface. Gather it and gently shape it into a disc about 1 inch thick. Wrap the disc tightly in plastic wrap and refrigerate for 1 hour or up to 2 days.
- Roll Dough: If the dough has been refrigerated longer than 1 hour, let it sit at room temperature for 15 minutes before rolling. Place the dough on a lightly floured pastry mat or silicone baking mat. Roll the pie crust into a circle approximately 12 inches in diameter. Gluten-free pie crust requires patience; gently press together any slits or breaks on the edges.
- Fit into Pie Plate: Use the pastry mat to carefully flip the dough into a 9-inch pie plate. Gently ease the dough into the contours of the pan without stretching. Trim any excess edges with scissors and shape the edges as desired (e.g., crimp with fingers or a fork).
- Freeze and Prick: Wrap the shaped pie crust loosely in plastic wrap and place it in the freezer for 15 minutes to 1 hour until it is chilled and firm. With a fork, prick holes all over the bottom and sides of the crust.
- Preheat Oven with Pizza Steel: Place a pizza steel in your oven (this helps achieve a wonderfully crispy bottom crust). Preheat the oven to 375°F (190°C).
- Par-Bake Crust: Line the frozen crust with parchment paper and fill it with pie weights. Bake for 10 minutes. Carefully remove the weights and parchment paper. Let the crust cool for 10 minutes on a wire rack. Reduce the oven temperature to 350°F (175°C), keeping the pizza steel in place.
For the Buttermilk Filling:
- Whisk Butter and Sugar: In a large bowl, whisk together the melted and slightly cooled butter and the granulated sugar until smooth and glossy.
- Add Eggs: Add the eggs one at a time, whisking well after each addition to fully incorporate them and create a frothy texture.
- Mix in Dry Flavorings: Sprinkle in the gluten-free flour, lemon zest, and nutmeg. Whisk until all dry ingredients are thoroughly combined and no clumps remain.
- Finish Filling: Whisk in the buttermilk, lemon juice, and vanilla extract until the filling is completely smooth and uniform.
- Assemble Pie: Place the par-baked pie dish on a rimmed baking sheet. Carefully pour the buttermilk filling into the crust. It should come close to the top but not overflow. Gently tap the baking sheet on the counter a few times to release any air bubbles. Lightly sprinkle the top of the pie with additional nutmeg for garnish.
- Bake: Bake at 350°F (175°C) for 50 to 55 minutes, or until the edges of the pie are set and slightly puffed, but the very center still has a slight, delicate wobble when gently shaken. This wobble indicates a perfectly custardy texture. Do not overbake!
- Cool: Remove the pie from the oven and cool completely on a wire rack until it reaches room temperature, which will take approximately 2 to 3 hours. The custard will continue to set as it cools. Serve at room temperature, or refrigerate if you prefer a chilled pie.
Recipe Notes & Expert Tips
Gluten-Free Assurance: This recipe is designed to be naturally gluten-free by utilizing a high-quality measure-for-measure gluten-free flour blend. Always ensure all your ingredients are certified gluten-free if cross-contamination is a concern.
Dairy-Free Adaptation: For a dairy-free version, substitute buttermilk with any dairy-free milk combined with a tablespoon of lemon juice (let it sit for 5-10 minutes to curdle). Replace butter with a dairy-free stick butter alternative. Please note that dairy-free substitutions may slightly alter the texture and may not achieve the exact same silky, custardy consistency as the traditional version, but it will still be delicious.
Nut-Free: This recipe is inherently nut-free, making it a safe and delightful option for those with nut allergies.
Make-Ahead Convenience: This pie is an excellent make-ahead dessert. You can bake it up to one day in advance. In fact, many find that the flavors meld and deepen overnight, resulting in an even more delicious pie the next day! Simply follow the recipe instructions, allow the pie to cool completely to room temperature, then cover it loosely with plastic wrap and refrigerate until you’re ready to serve.
Storage Tips: Store any leftover pie slices in an airtight container in the refrigerator for up to three days. This keeps the custard fresh and the crust from becoming stale.
Freezing Instructions: If you wish to freeze this pie, wrap individual slices tightly in plastic wrap, then place them in an airtight freezer-safe bag or container. They can be stored in the freezer for up to one month. To serve, thaw slices in the refrigerator overnight, then bring them to room temperature before enjoying. This is a fantastic way to enjoy a slice of this pie whenever a craving strikes!
Serving Suggestions: While this gluten-free buttermilk pie is utterly delightful on its own, it also pairs beautifully with a dollop of freshly whipped cream, a scoop of vanilla bean ice cream, or a handful of fresh berries. A warm cup of coffee or a glass of iced tea also complements its rich, tangy sweetness perfectly.
Nutrition
Calories: 372kcal | Carbohydrates: 21g | Protein: 7g | Fat: 30g | Saturated Fat: 17g | Polyunsaturated Fat: 2g | Monounsaturated Fat: 8g | Trans Fat: 1g | Cholesterol: 146mg | Sodium: 391mg | Potassium: 81mg | Fiber: 3g | Sugar: 3g | Vitamin A: 878IU | Vitamin C: 1mg | Calcium: 71mg | Iron: 1mg
MORE IRRESISTIBLE GLUTEN-FREE THANKSGIVING DESSERTS
If you loved this gluten-free buttermilk pie, you’ll be thrilled to discover more delightful gluten-free dessert options perfect for Thanksgiving, Christmas, or any festive occasion. Expand your holiday baking repertoire with these fantastic recipes that are sure to please every palate.